Plugin Manual
One manual covering all four synths in the range — Hybridwave, Bluewave, Firewave, and Shearwave. They share the same modulation matrix, signal chain, and effects engine under the hood, but each has its own distinct approach to sound. Pick a plugin below, or use the sidebar to jump straight to any stage of the signal flow.
A hybrid synth built around nine independent synthesis engines on every oscillator slot — Subtractive, Wavetable, FM, Granular, Additive, Sampler, Phase Distortion, Wavefolding, and Physical Modeling.
A free, focused four-oscillator subtractive synth — the same signal chain and effects engine as Hybridwave, distilled into classic analogue-style sound design.
A free wavefolding, West Coast-style synth — the same shared architecture as Bluewave, with its subtractive engine swapped out for wavefolding.
A free phase distortion synth in the classic Casio CZ tradition — four oscillators, five waveshapes, a modulatable DCW control, and full MPE support, on the same shared architecture as the rest of the range.
This manual walks through every page of each plugin in the order sound actually flows through it — start with whichever synth you own, or jump to any stage using the sidebar or the signal chain strip above.
This manual covers the whole Music Sound Software plugin range — Hybridwave, Bluewave, Firewave, and Shearwave — since all four share the same underlying modulation matrix, signal chain, and effects engine. Each section below is marked Hybridwave, Bluewave, Firewave & Shearwave when it applies across all four — though exact counts (LFOs, envelope slots, mod matrix sources/destinations, preset totals) differ between them — Hybridwave only for engines unique to Hybridwave, Firewave & Hybridwave for the wavefolding engine shared by Firewave and Hybridwave, Shearwave & Hybridwave for the phase distortion engine shared by Shearwave and Hybridwave, or Partially shared for the handful of colour themes that aren't common across all four.
Presets
Presets are the fastest way into Hybridwave — over 500 factory presets across every engine, plus your own library, all reachable from the same browser.
Loading a preset
Click Load in the top toolbar to open the preset browser. Type into the search box to filter by name, or use the type dropdown to narrow the list down to a single category — Bass, Pad, Lead, and so on. Selecting a preset shows its full metadata on the right: type, author, description, tags, and the date it was created, so you know what you're loading before you commit to it.
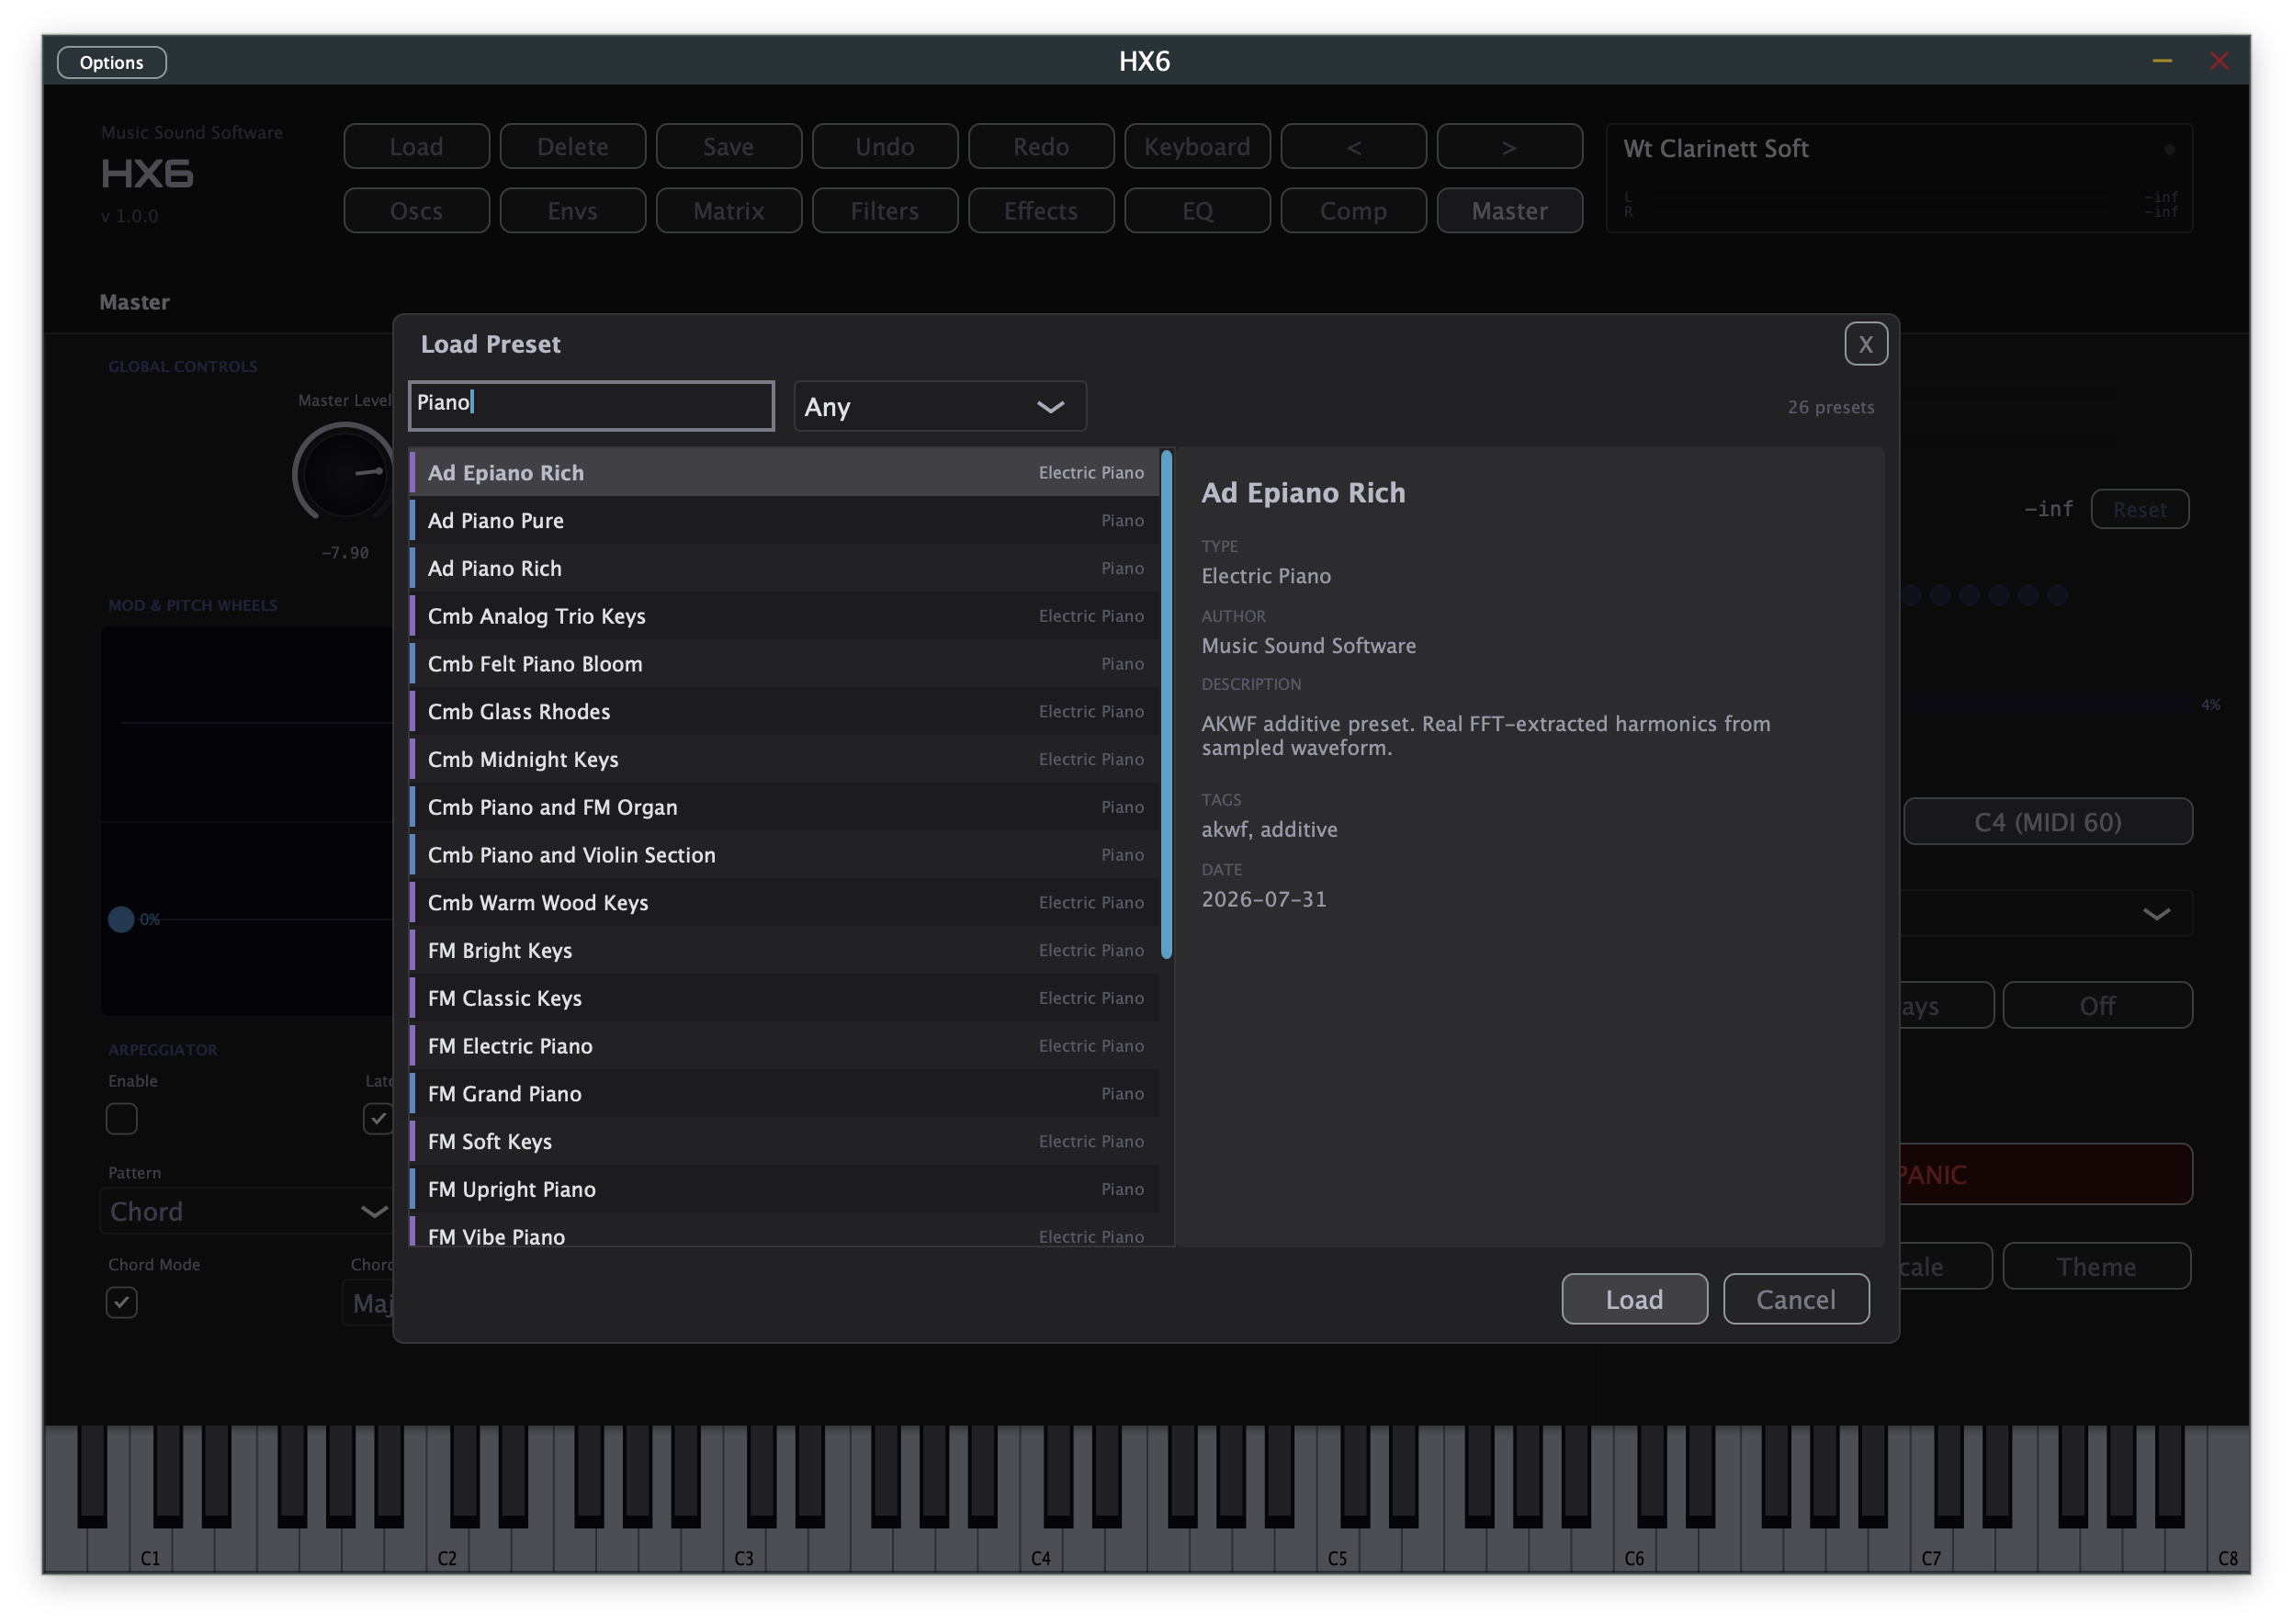
Once a preset is loaded, the < and > arrows next to the toolbar step to the previous or next preset in your current filtered list — handy for auditioning a whole category back-to-back. Undo and Redo step back through every parameter change you've made since, not just preset loads.
Saving your own presets
Click Save to open the save dialog. Give the preset a name, pick a category, and optionally fill in an author, a short description, and tags — the same fields you see when browsing, so future-you (or anyone else using the preset) has context. You can save in Hybridwave's native binary format (.hbwb) or as human-readable XML (.hbwx) if you want to inspect or hand-edit the file.
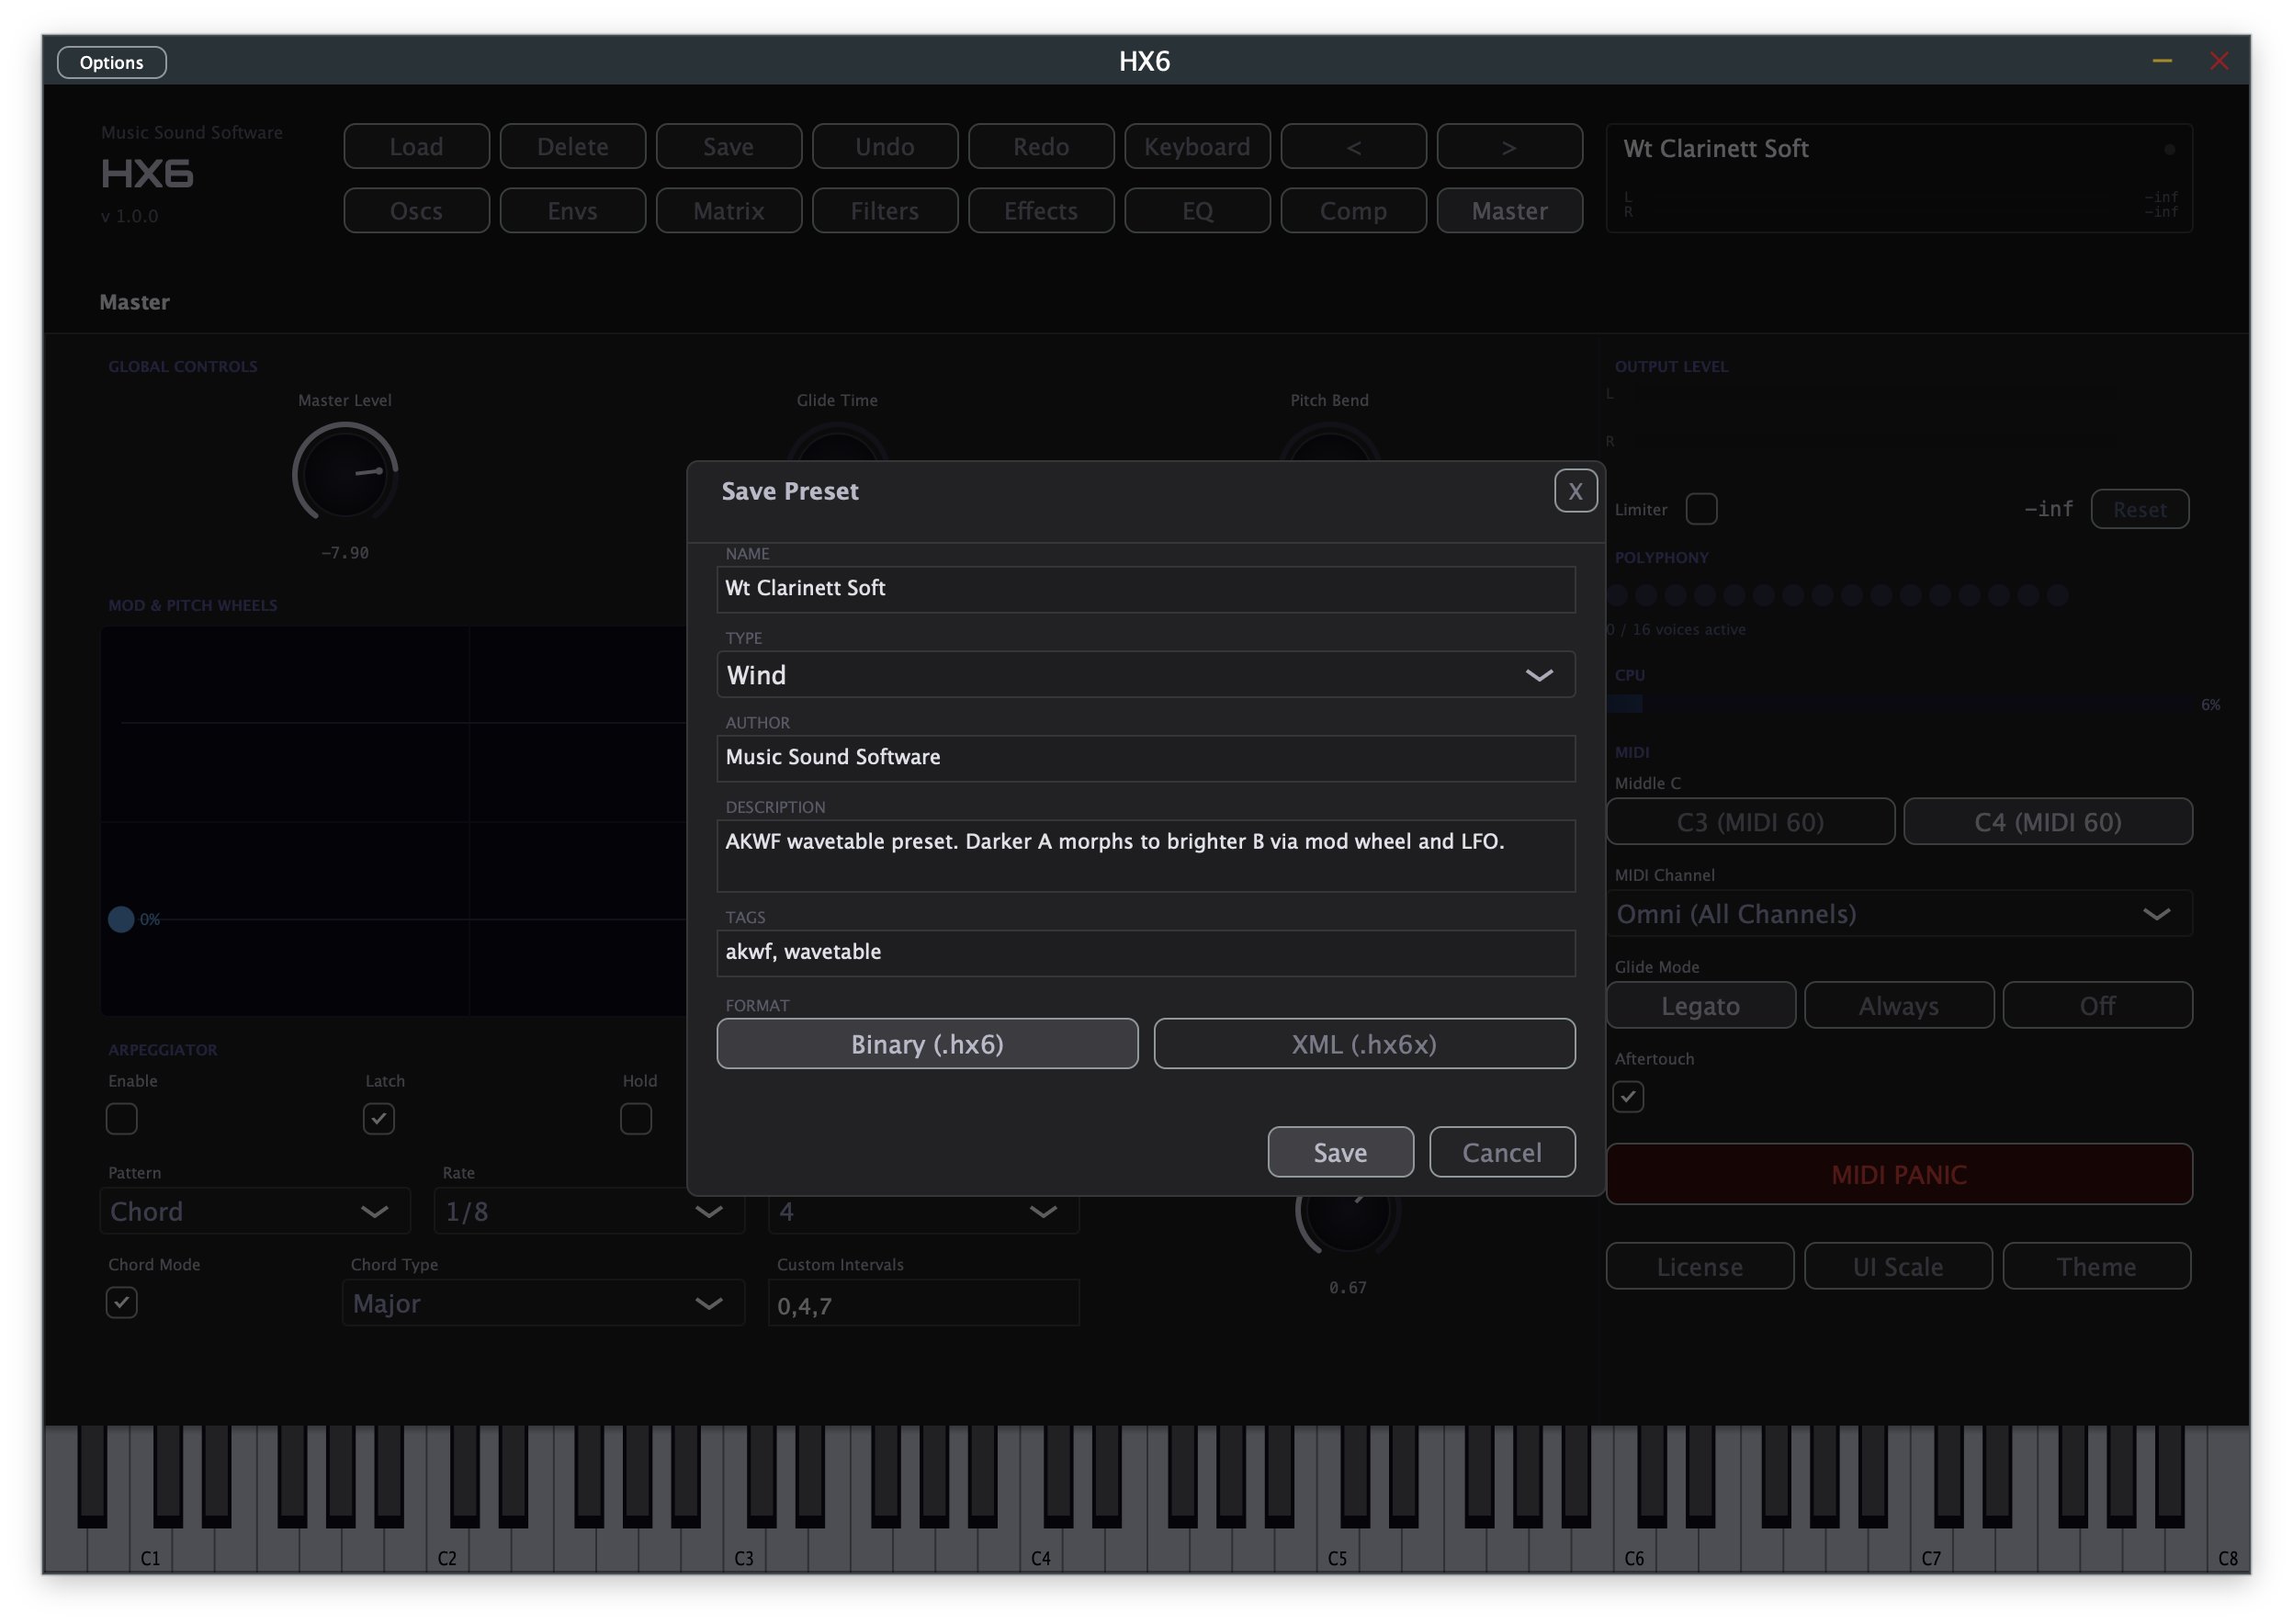
Categories
Every preset is tagged with one category, used for filtering in the browser. The full list:
Deleting a preset (via the Delete button) removes the file from disk permanently — there's no separate trash. Save a copy first if you're not sure.
Choosing an Engine
Hybridwave gives you six oscillator slots per voice. Each slot is independent and can be assigned to any of the nine synthesis engines — mix a subtractive sub-oscillator with an FM lead and a physically-modeled string layer, all in one preset.
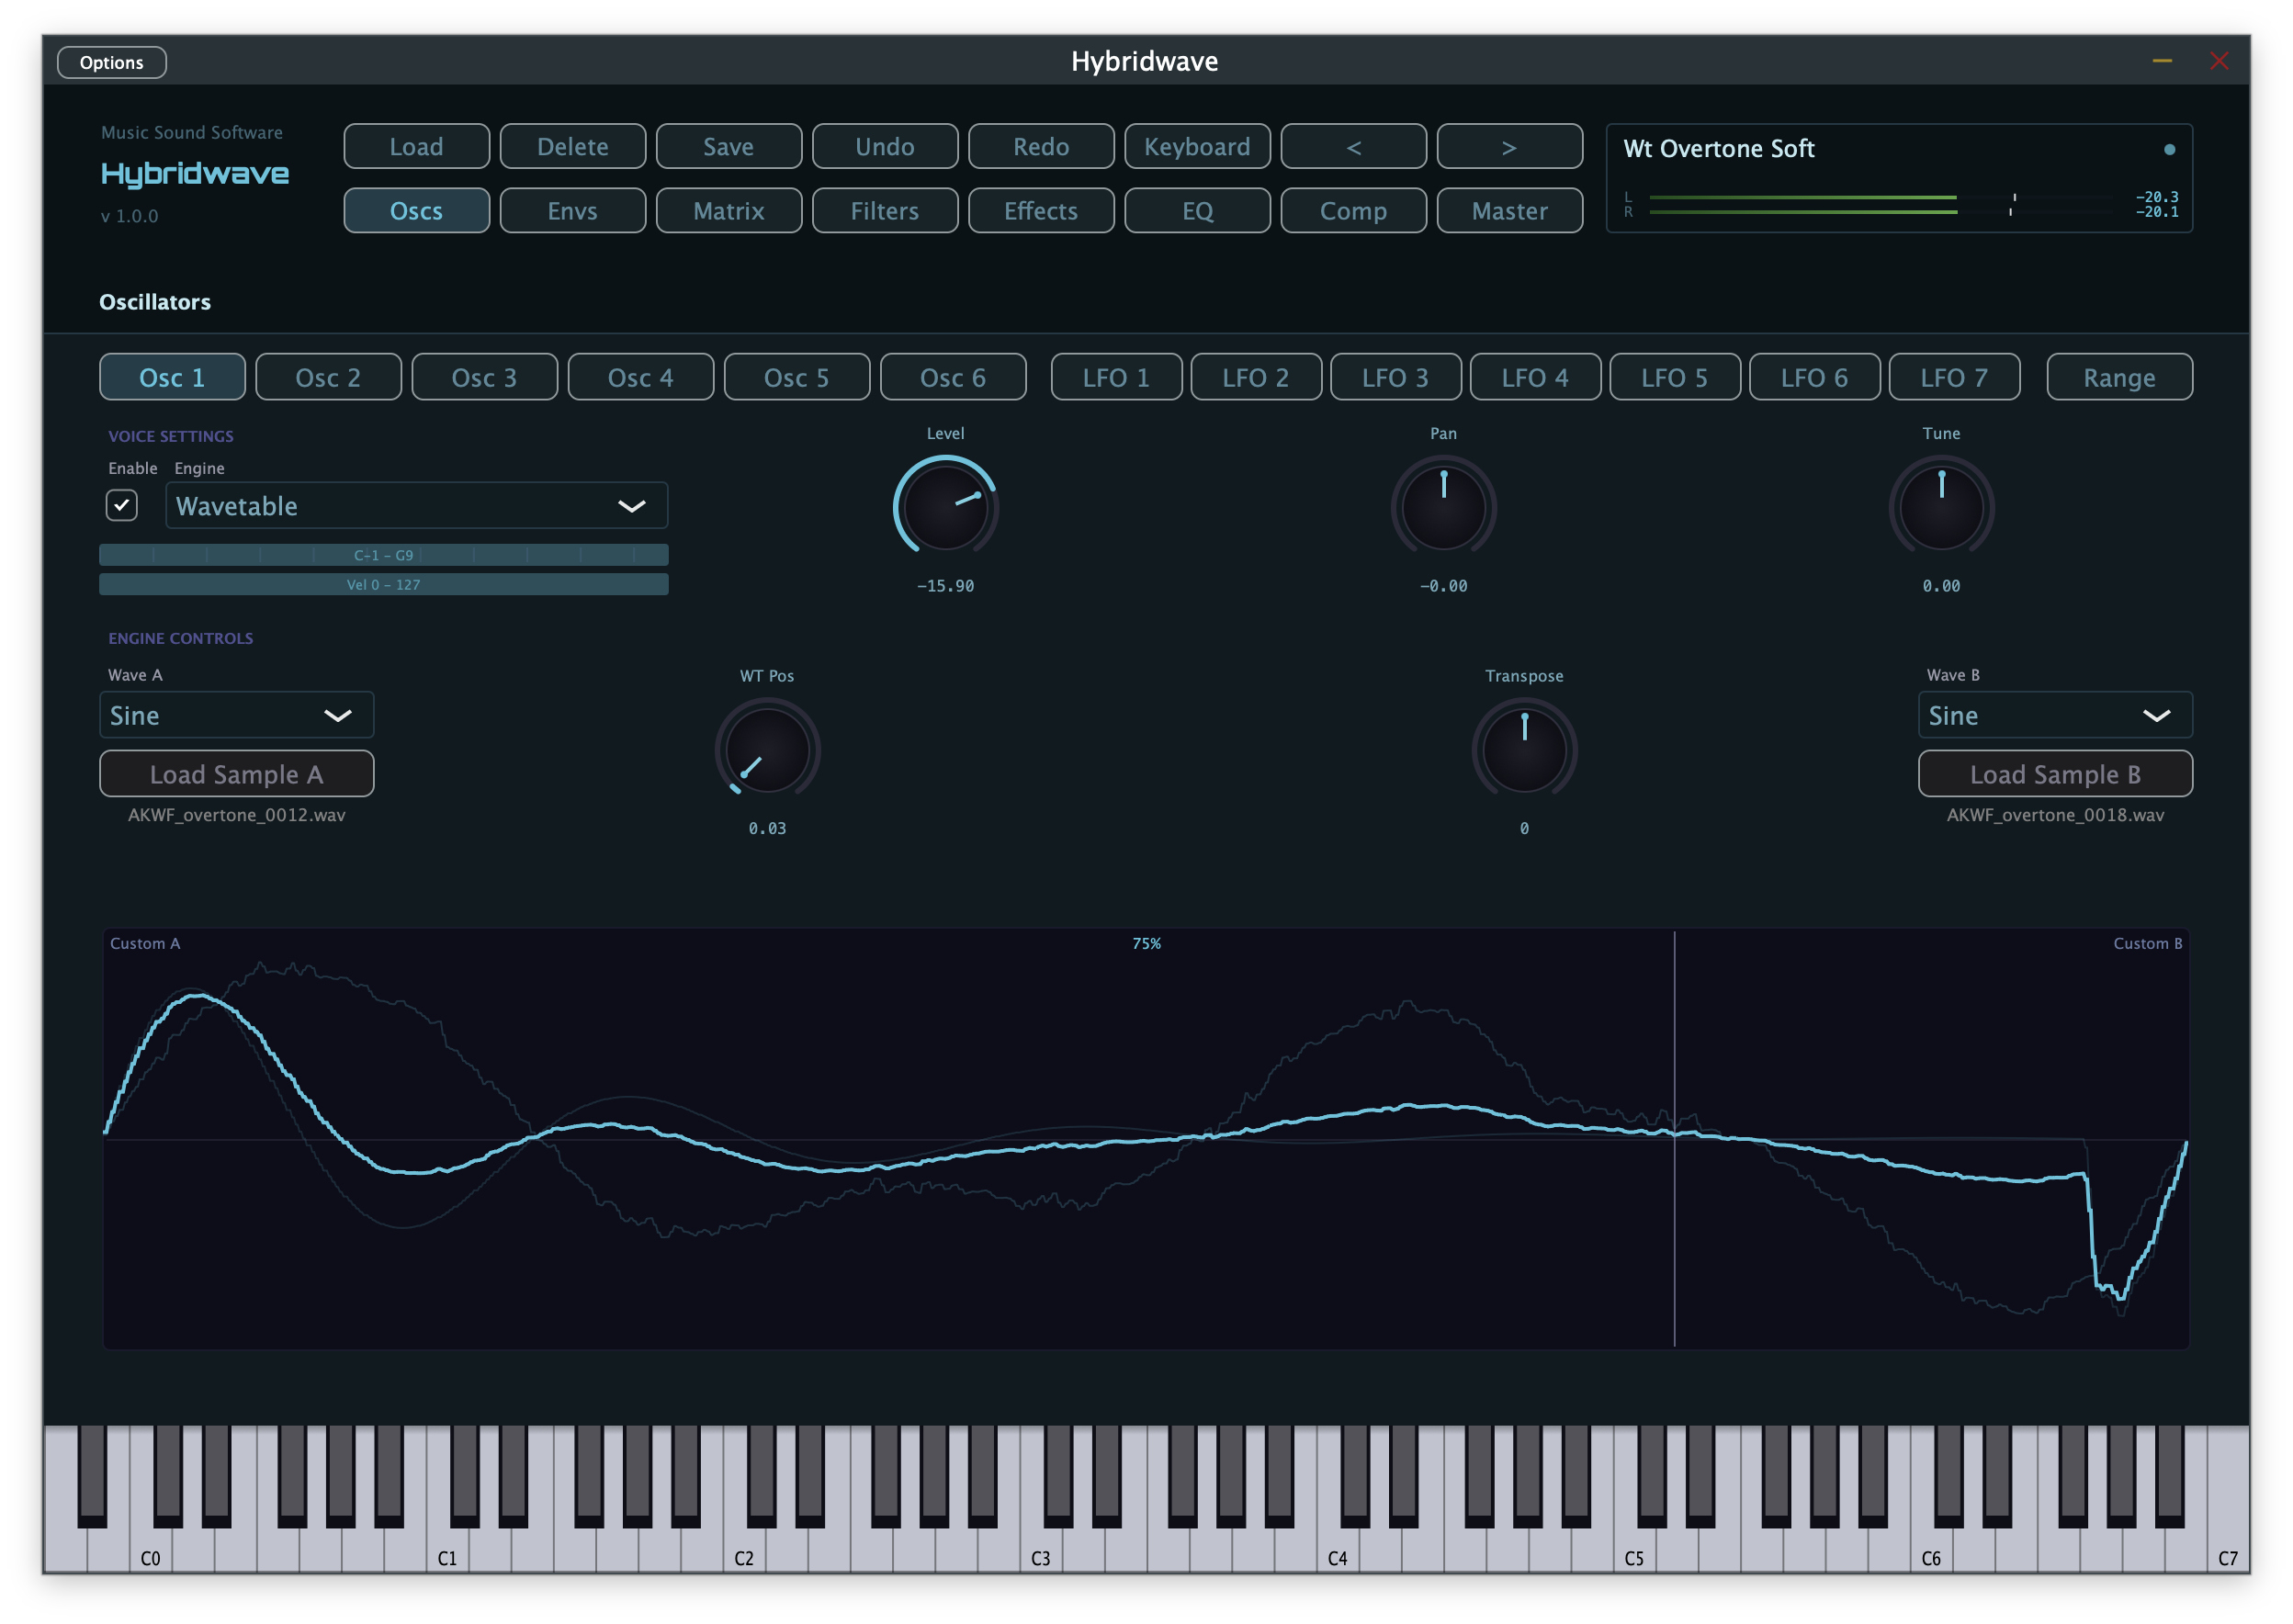
The Osc 1–6 tabs along the top of the Oscillators page select which slot you're editing. Each slot has its own Enable checkbox and an Engine dropdown — changing the engine here swaps every control below it to match, while Level, Pan, and Tune stay in the same place regardless of which engine is active, since every engine shares those three basics.
The thin strip under the engine dropdown shows the slot's current key range and velocity range at a glance — useful for spotting layers and splits without opening the full Range editor.
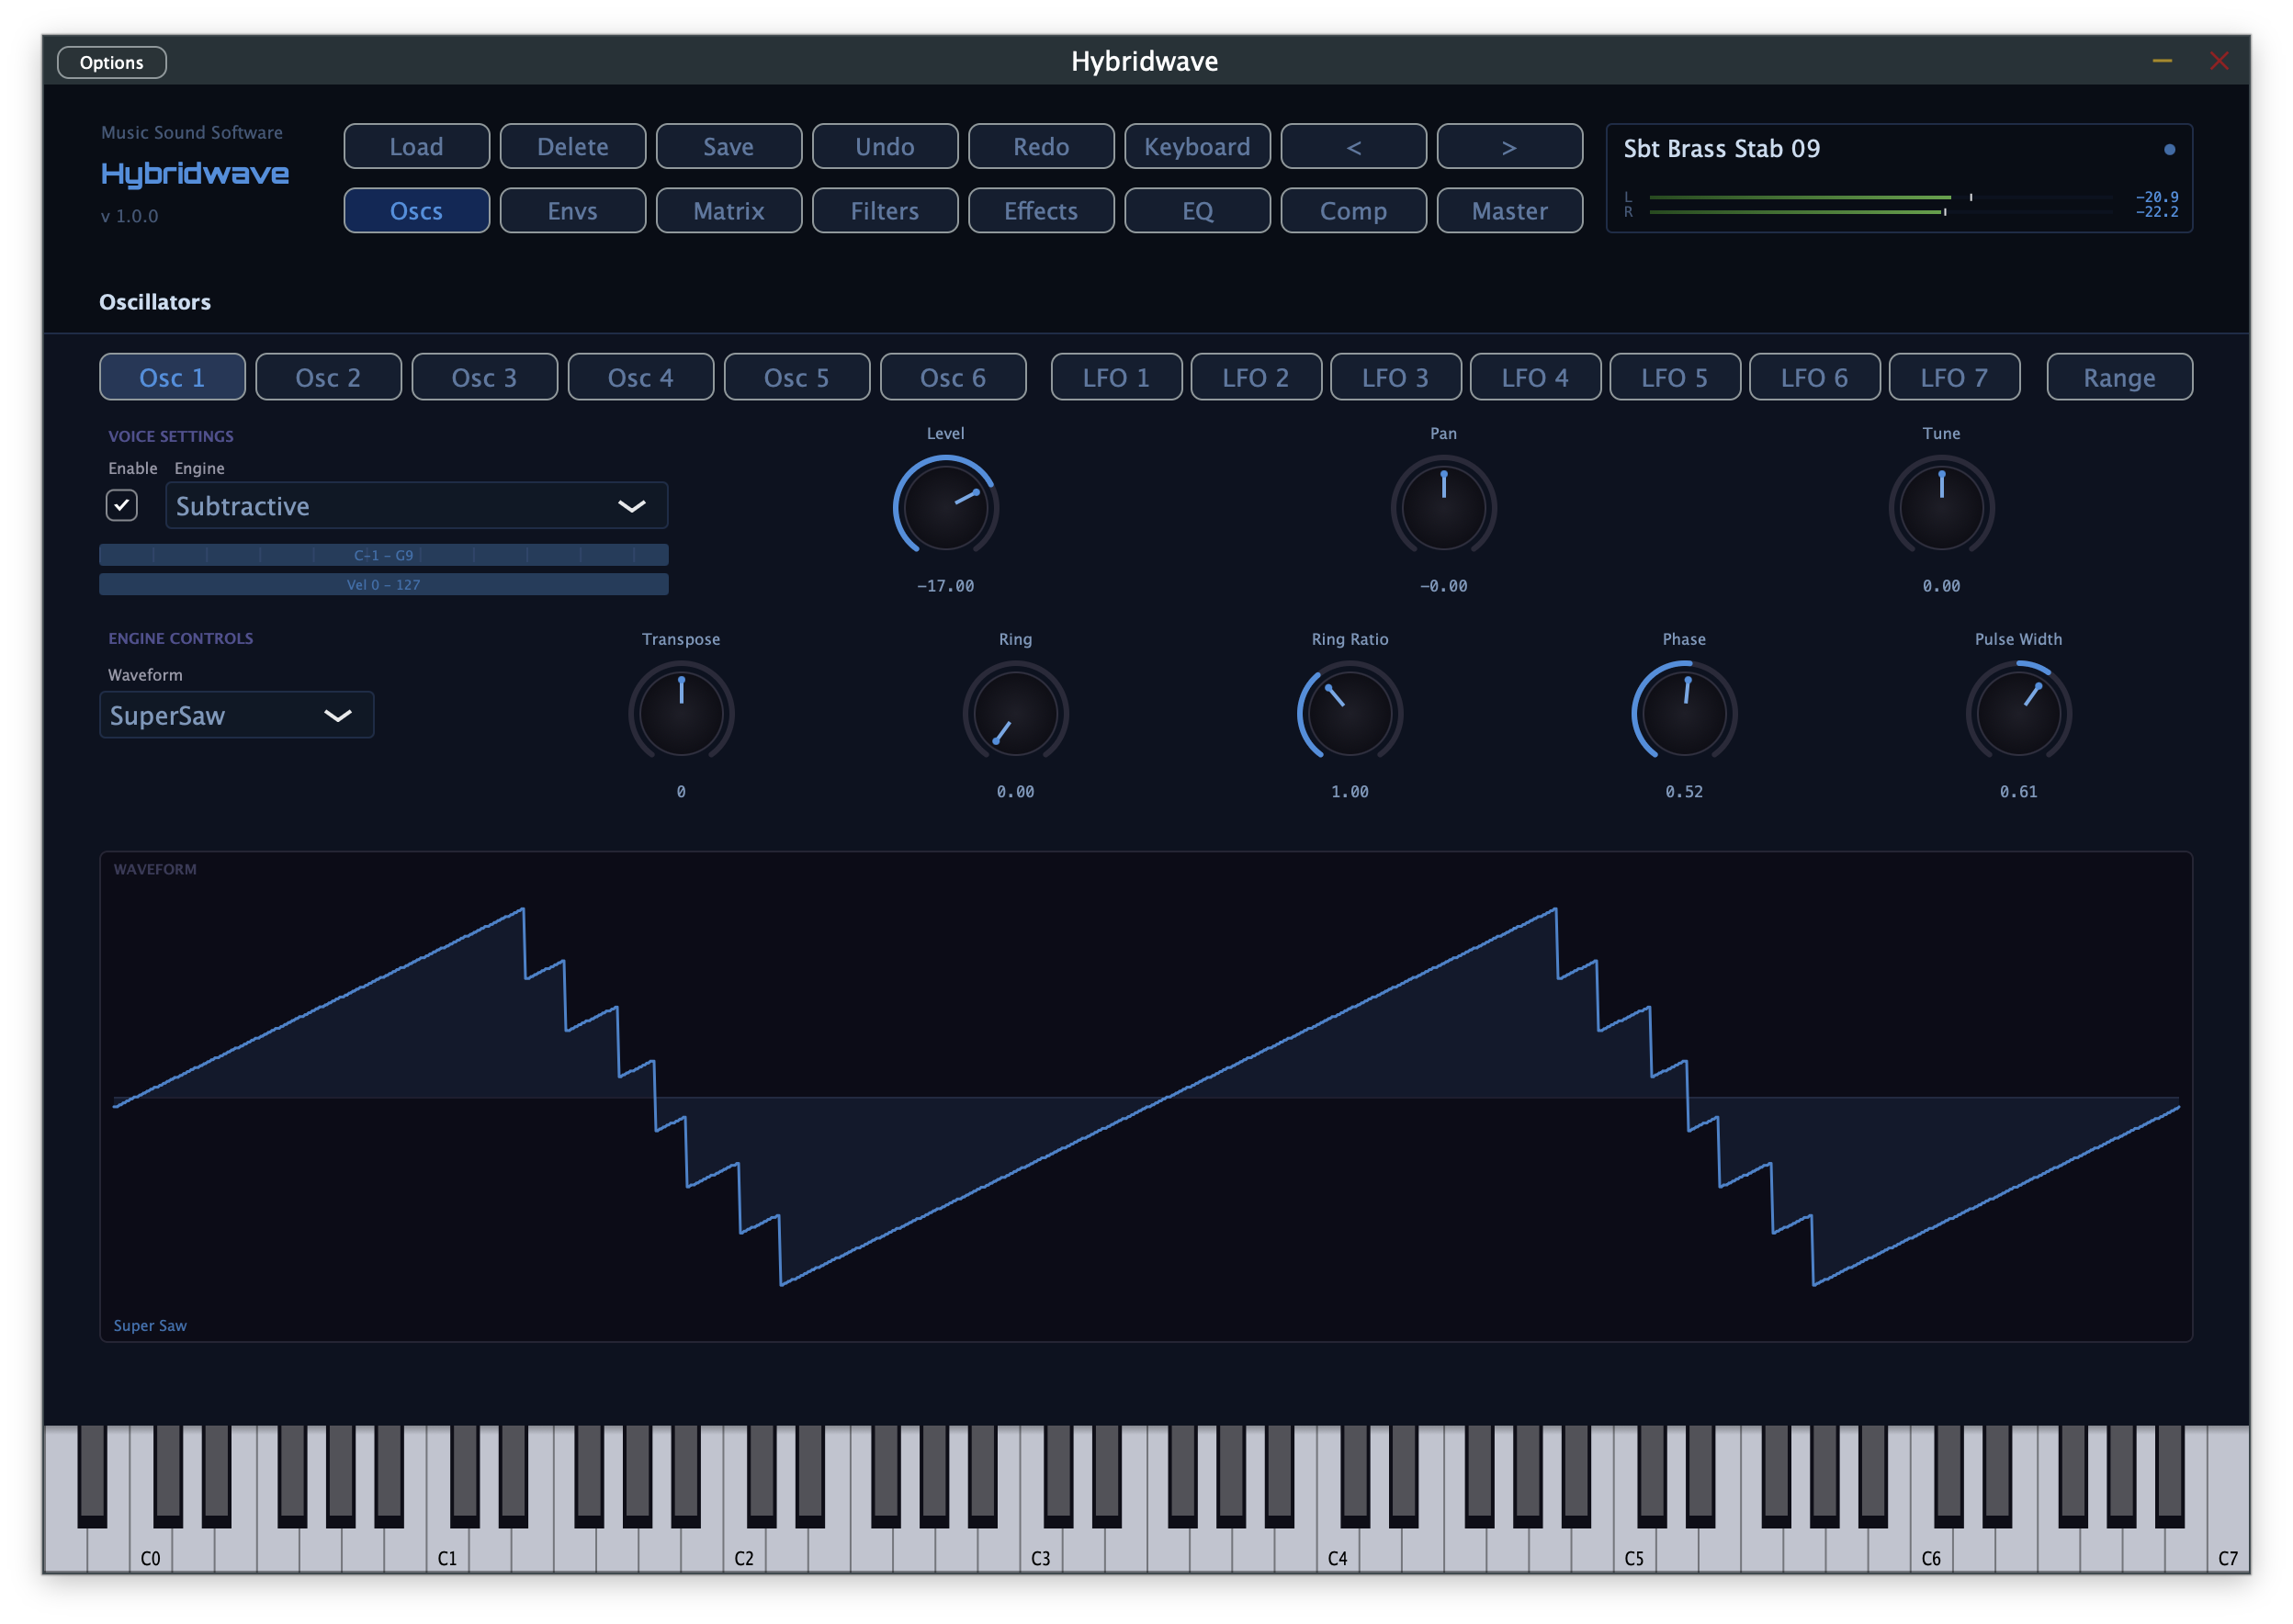
Subtractive
Classic analogue-style synthesis: pick a waveform, shape it downstream with the filters. This is the engine to reach for when you want a familiar, predictable starting point.
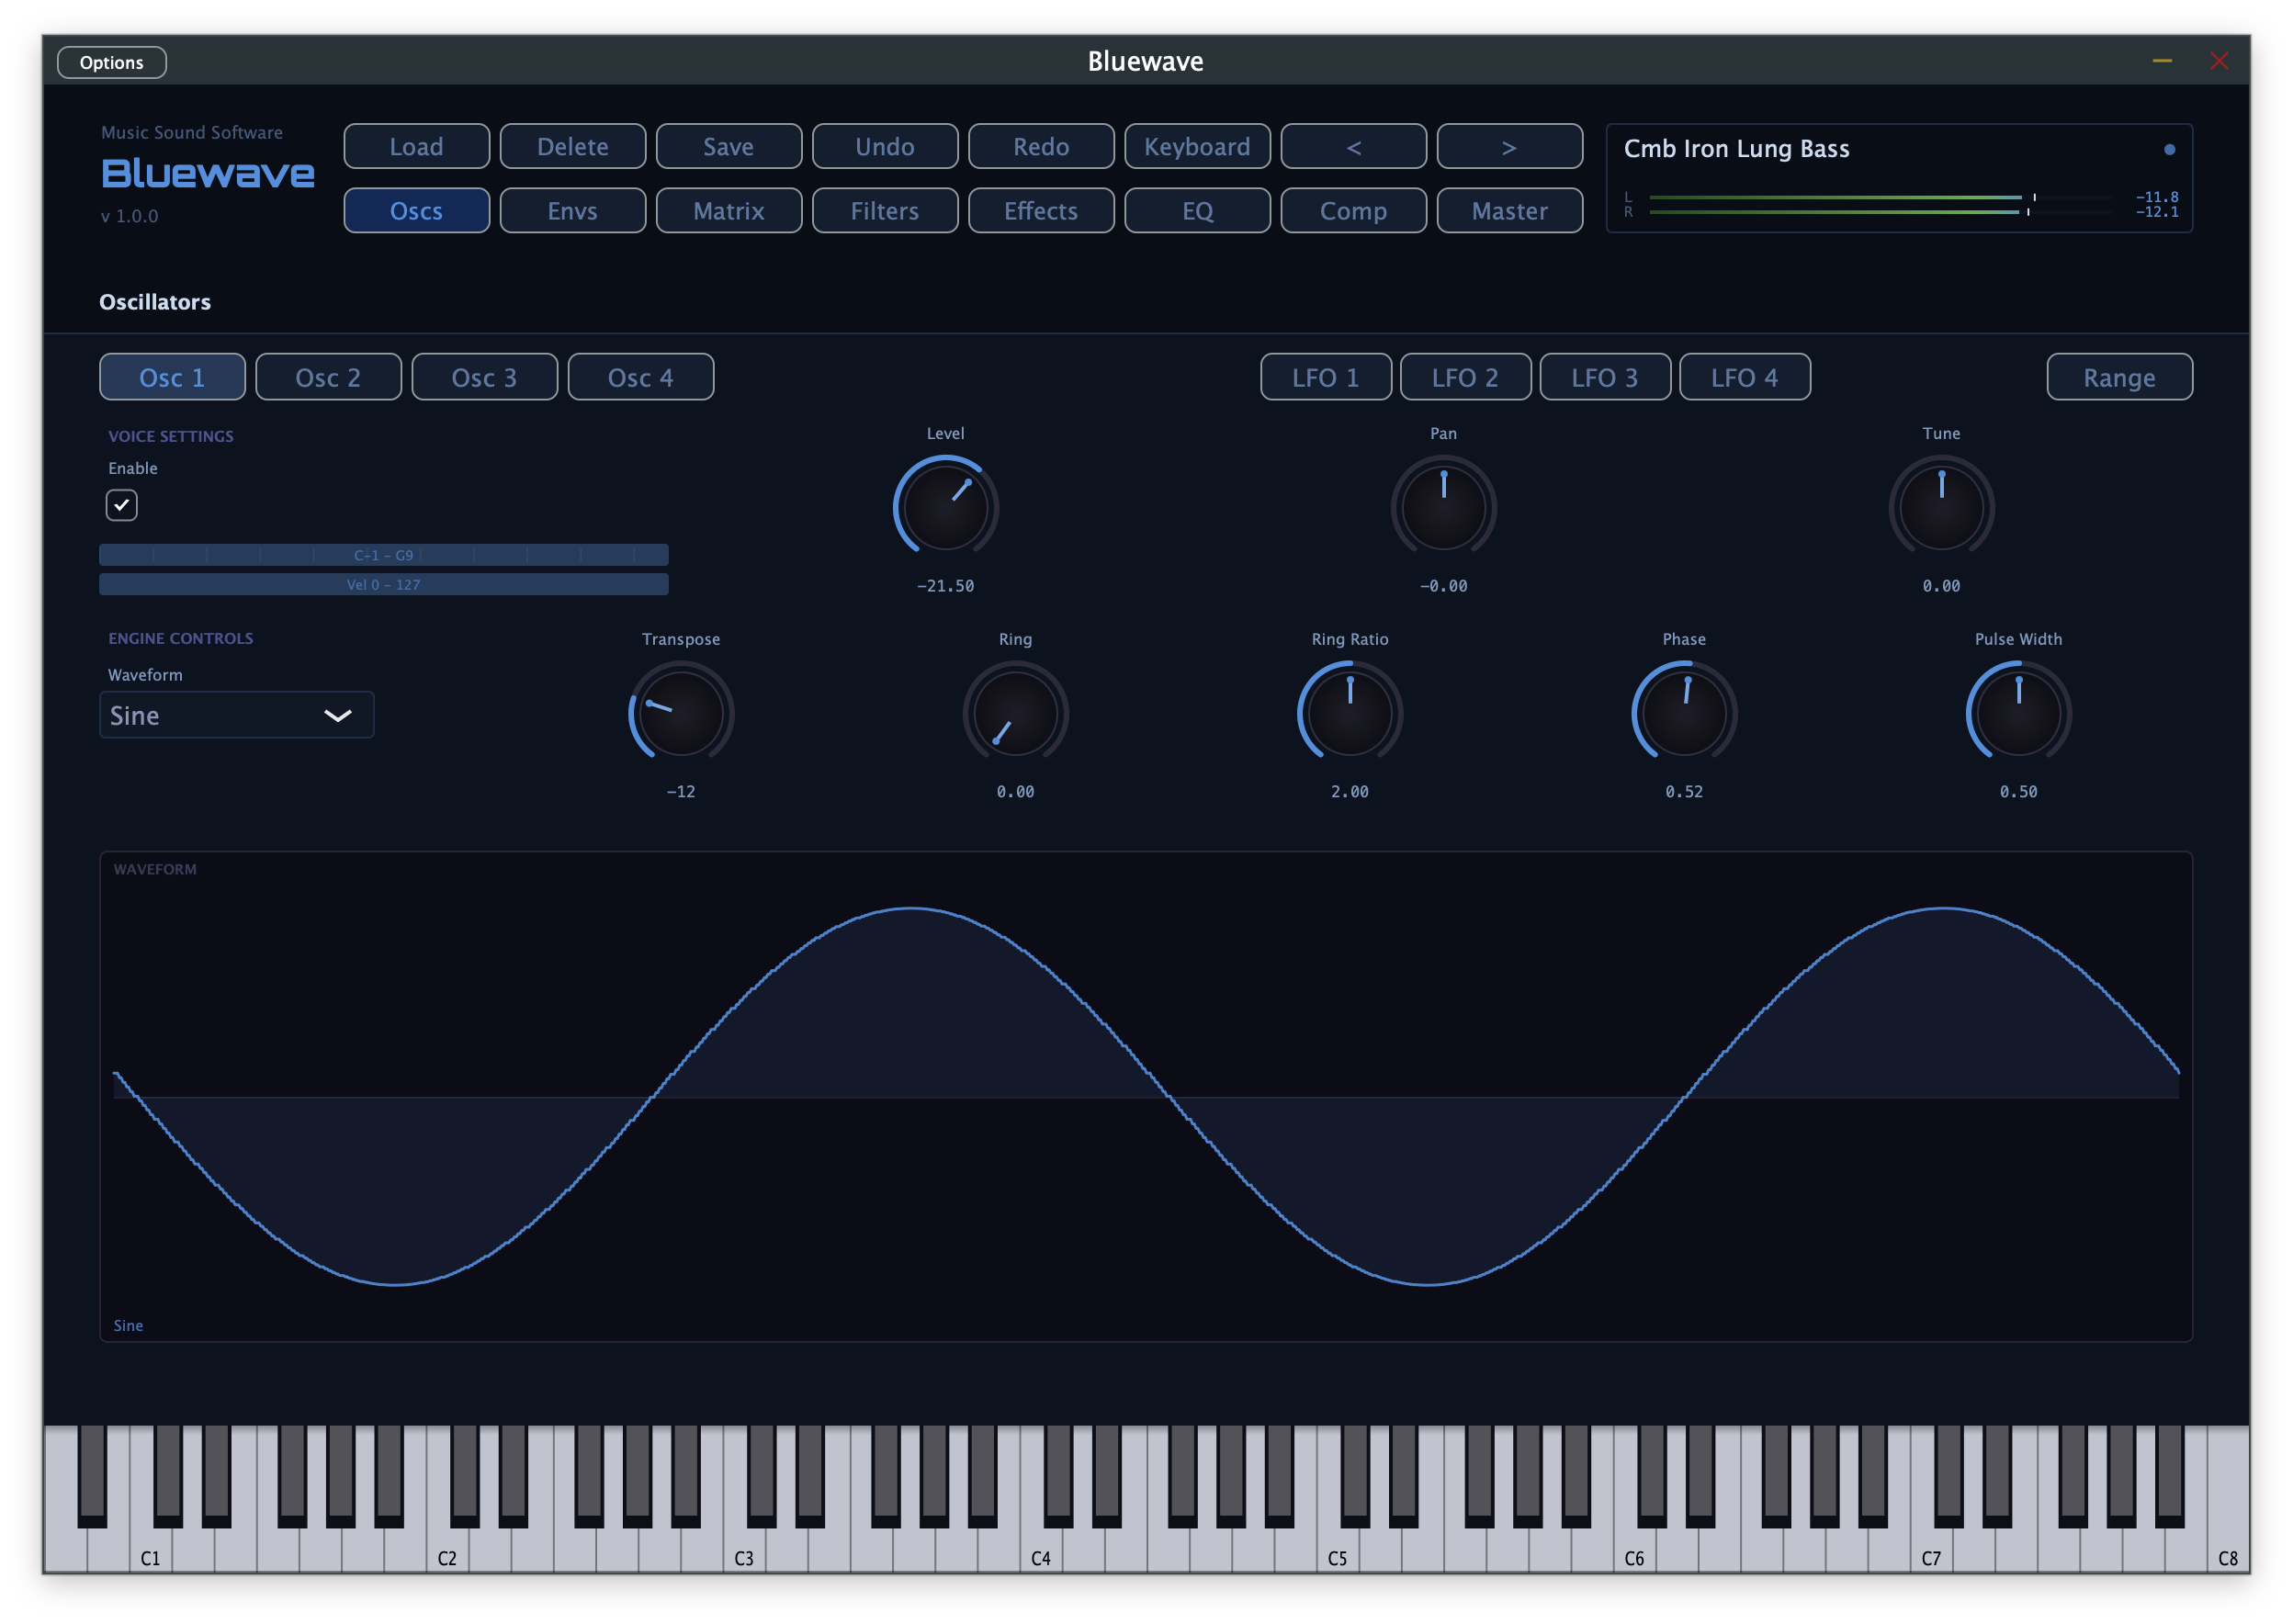
| Waveform | Character |
|---|---|
| Sine | Pure fundamental, no harmonics — good for sub-bass or as an FM-style modulator target. |
| Sawtooth | Bright and buzzy, full harmonic content — the default general-purpose waveform. |
| Square | Hollow, clarinet-like tone; only odd harmonics. |
| Triangle | Softer and rounder than a square, still hollow-sounding but gentler. |
| SuperSaw | Seven detuned sawtooths stacked together, JP-8000-style — wide, lush trance/EDM stacks. |
| Pulse | Variable-width pulse — the Transpose control doubles as pulse width for this waveform, changing its tone from thin and nasal to fuller. |
| Noise | White noise — useful for percussion, breath, and texture layers. |
The Ring knob crossfades in ring modulation, multiplying the waveform by a cosine at double frequency for metallic, bell-like inharmonic tones. Transpose shifts pitch in semitones (or controls pulse width, on the Pulse waveform).
Wavetable
Two wave slots, A and B, that you morph between — for evolving, animated timbres that a single static waveform can't produce.
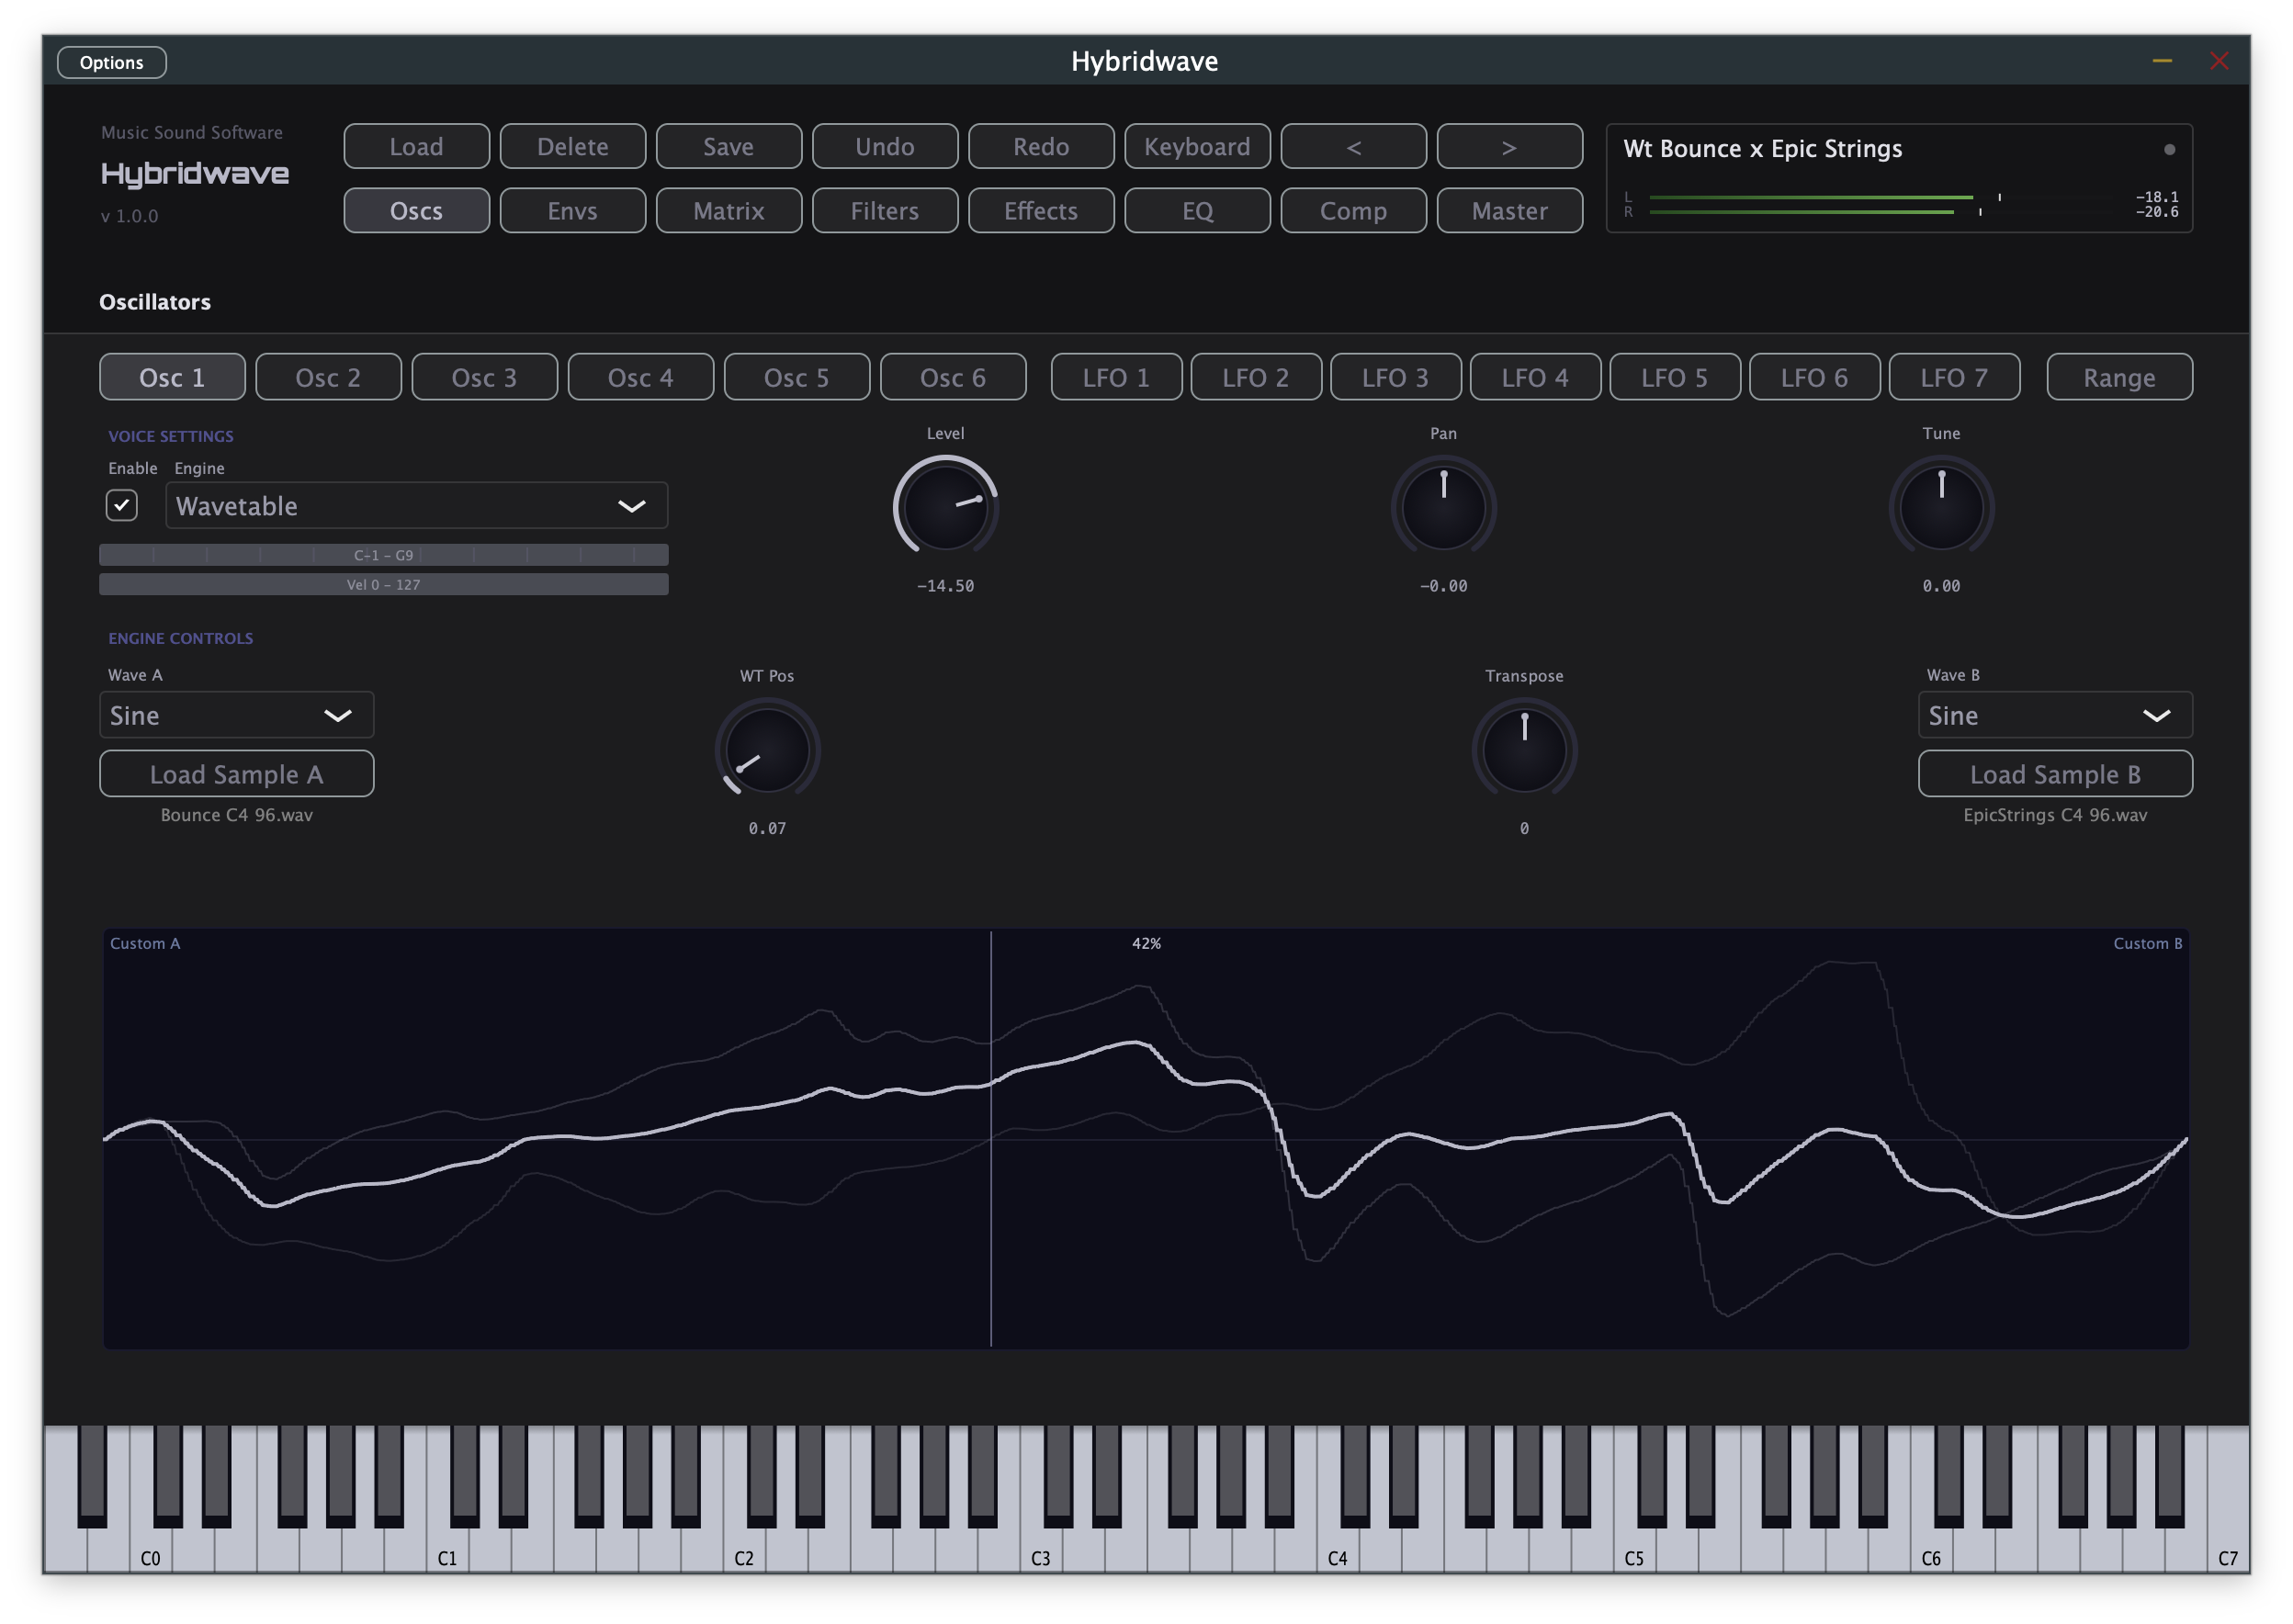
Choose a waveform for Wave A and Wave B independently — either from the built-in table list, or by clicking Load Sample under either slot to import your own single-cycle waveform or audio file. The WT Pos knob crossfades continuously between A and B; the graph beneath the controls shows both source shapes faintly with the current morphed result drawn in bold, updating live as you turn the knob or automate it. Transpose shifts pitch in semitones.
Because WT Pos is a mod matrix destination, you can drive the morph with an envelope or LFO — the classic wavetable "sweep" sound — rather than only setting it as a static knob position.
FM
A six-operator FM engine compatible with the classic DX7 algorithm set — 32 authentic operator routings, each operator with its own envelope, ratio, and feedback.
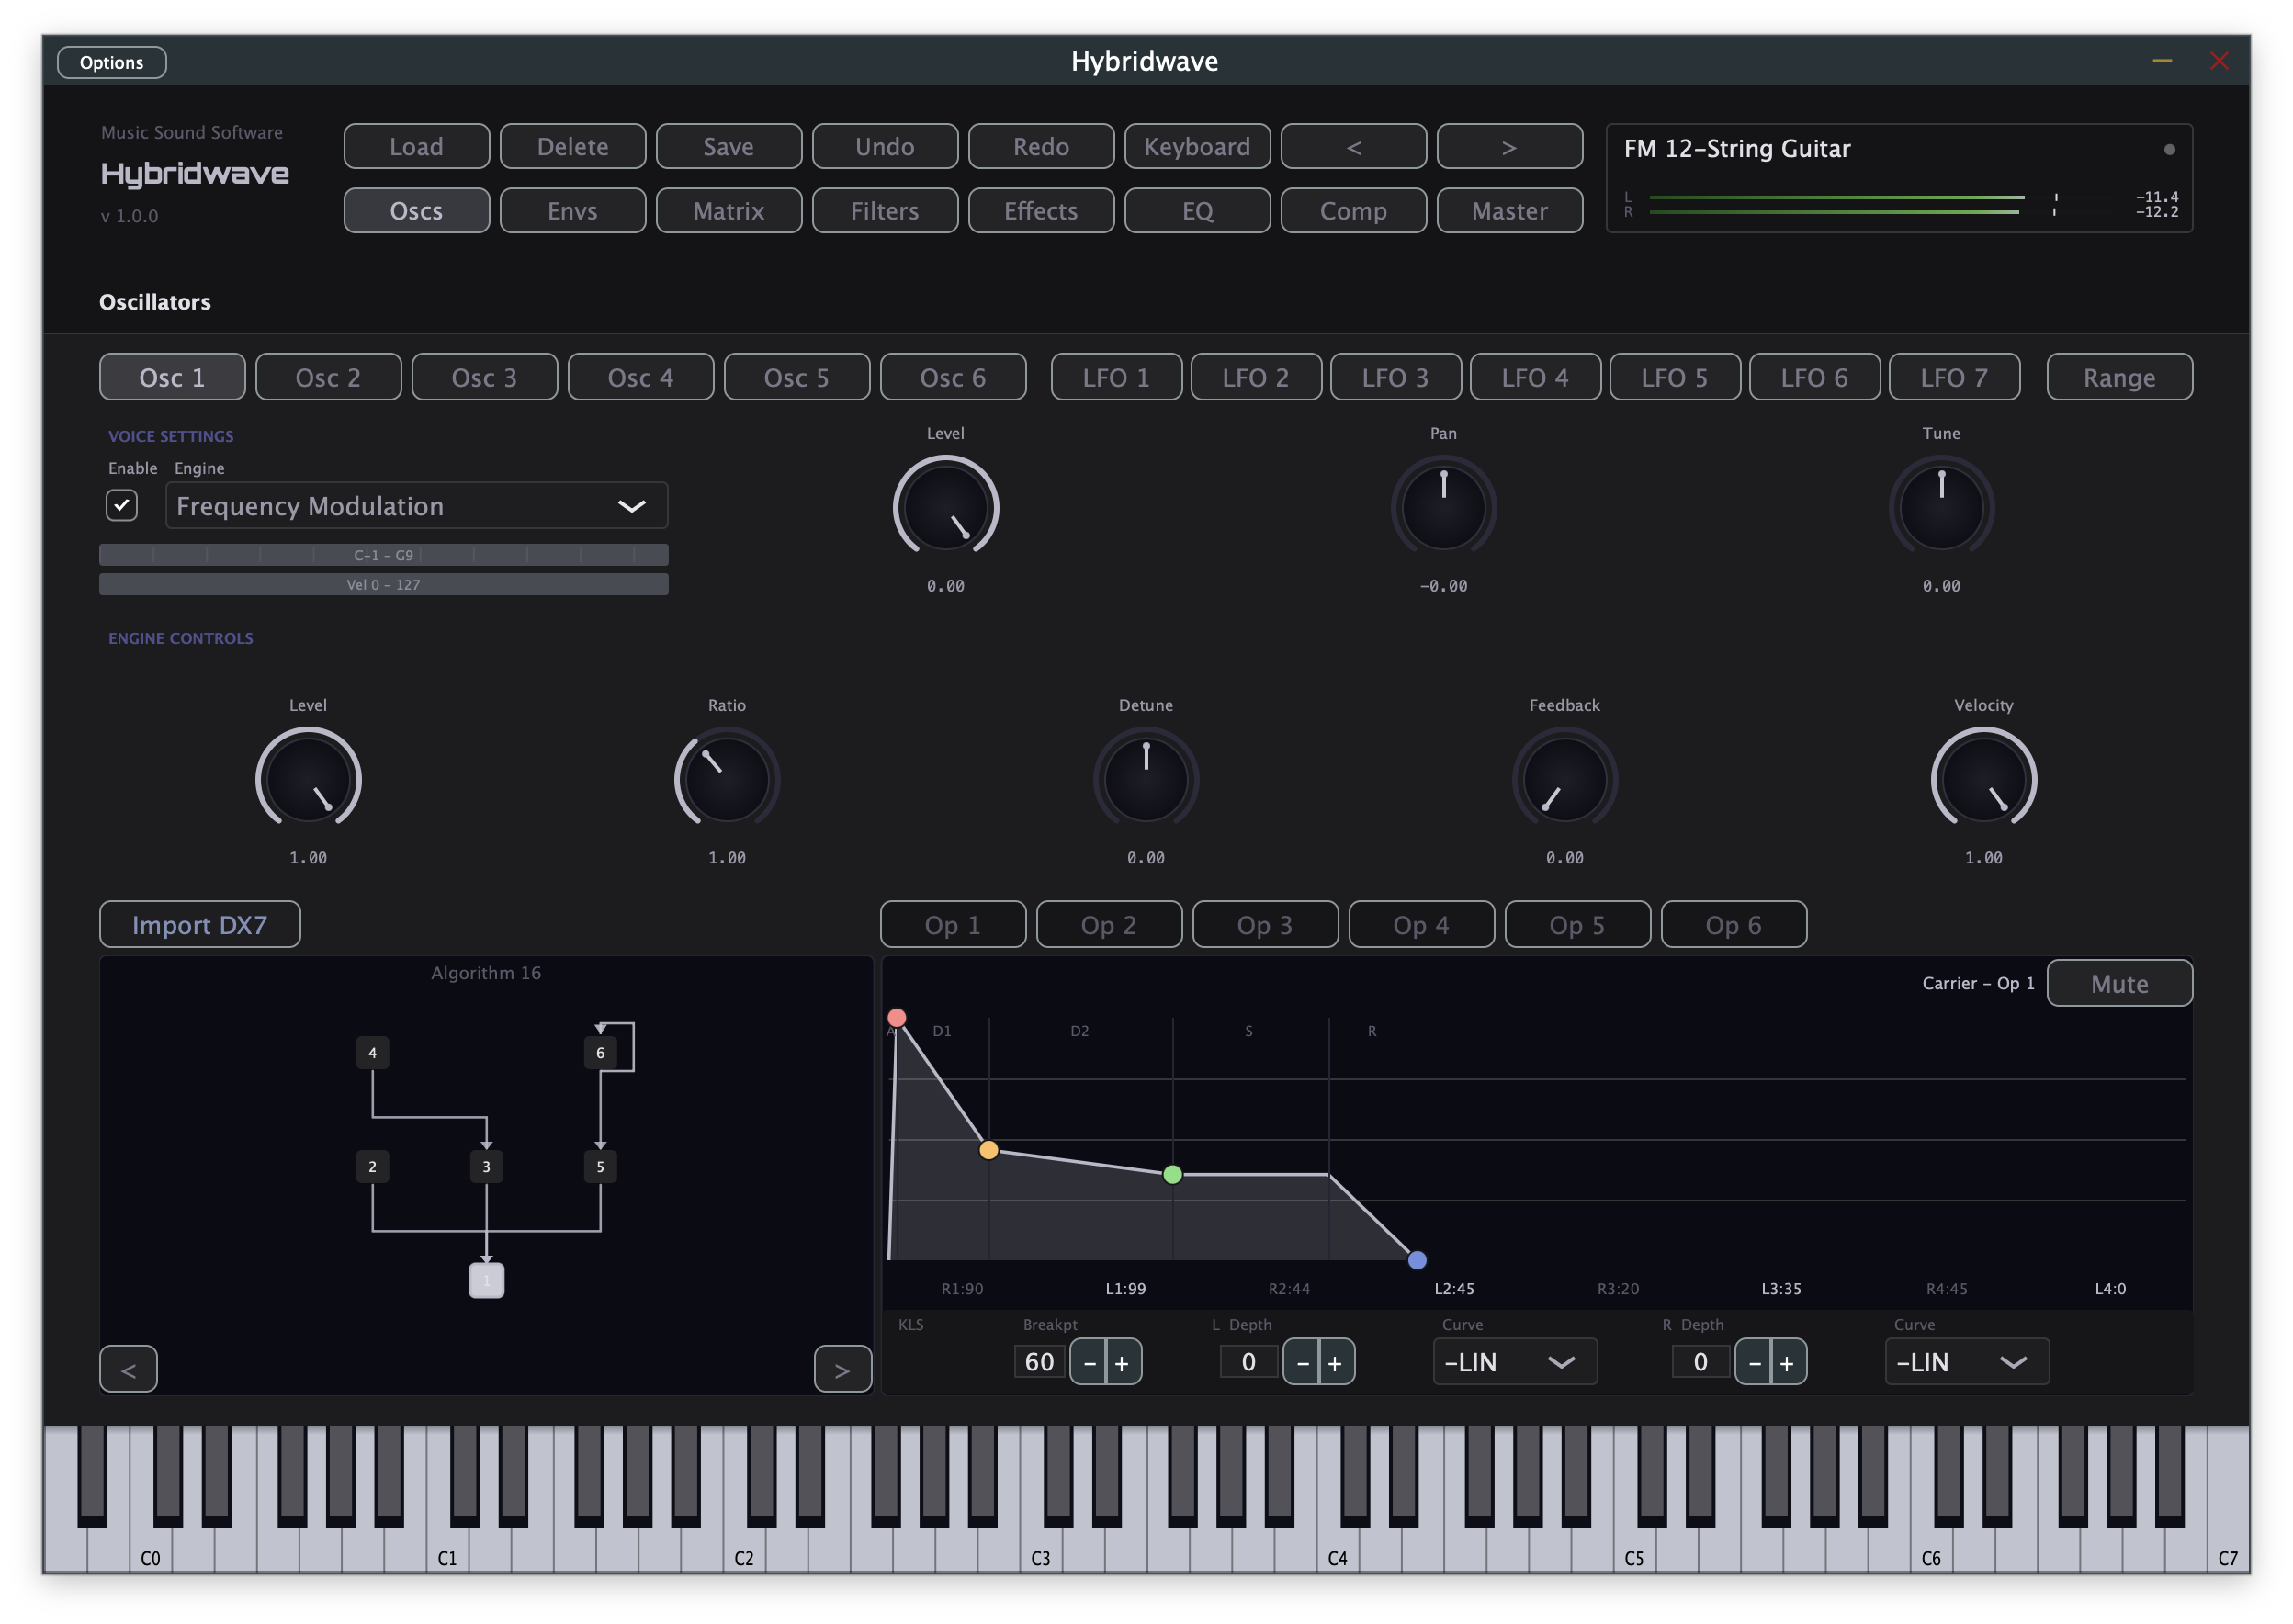
The panel on the left shows the current Algorithm — the routing diagram of which operators modulate which. Gold boxes are carriers (the operators you actually hear); grey boxes are modulators (operators that shape a carrier's tone rather than sounding on their own). Use the arrows below the diagram to browse all 32 algorithms.
The Op 1–6 tabs select which operator you're editing on the right. Each operator has its own four-stage rate/level envelope (drag the breakpoints directly on the graph), plus:
| Control | What it does |
|---|---|
| Ratio | The operator's frequency relative to the note played. Whole-number ratios stay harmonic; non-integer ratios produce clangorous, bell-like tones. |
| Detune | Fine offset from the ratio, in cents — useful for subtle beating or deliberate inharmonicity. |
| Feedback | Feeds the operator's own output back into its phase input. Small amounts add edge and grit; higher amounts push toward noise. |
| Velocity | How strongly playing velocity affects this operator's output level — higher settings give a more percussive, dynamic response to hard playing. |
Below the envelope graph, KLS (keyboard level scaling) settings let an operator's output fade in or out across the keyboard — the standard DX7 technique for keeping bass notes clean while brass or plucked presets ring more brightly higher up.
If you have existing DX7 patches, Import DX7 reads a SysEx bank or single-patch dump and maps it directly onto Hybridwave's operators, algorithm, and envelopes.
FM presets are famously non-intuitive to reason about from numbers alone — small ratio or feedback changes can produce very different results depending on the algorithm. Start from a factory FM preset close to what you want and adjust from there rather than building from scratch.
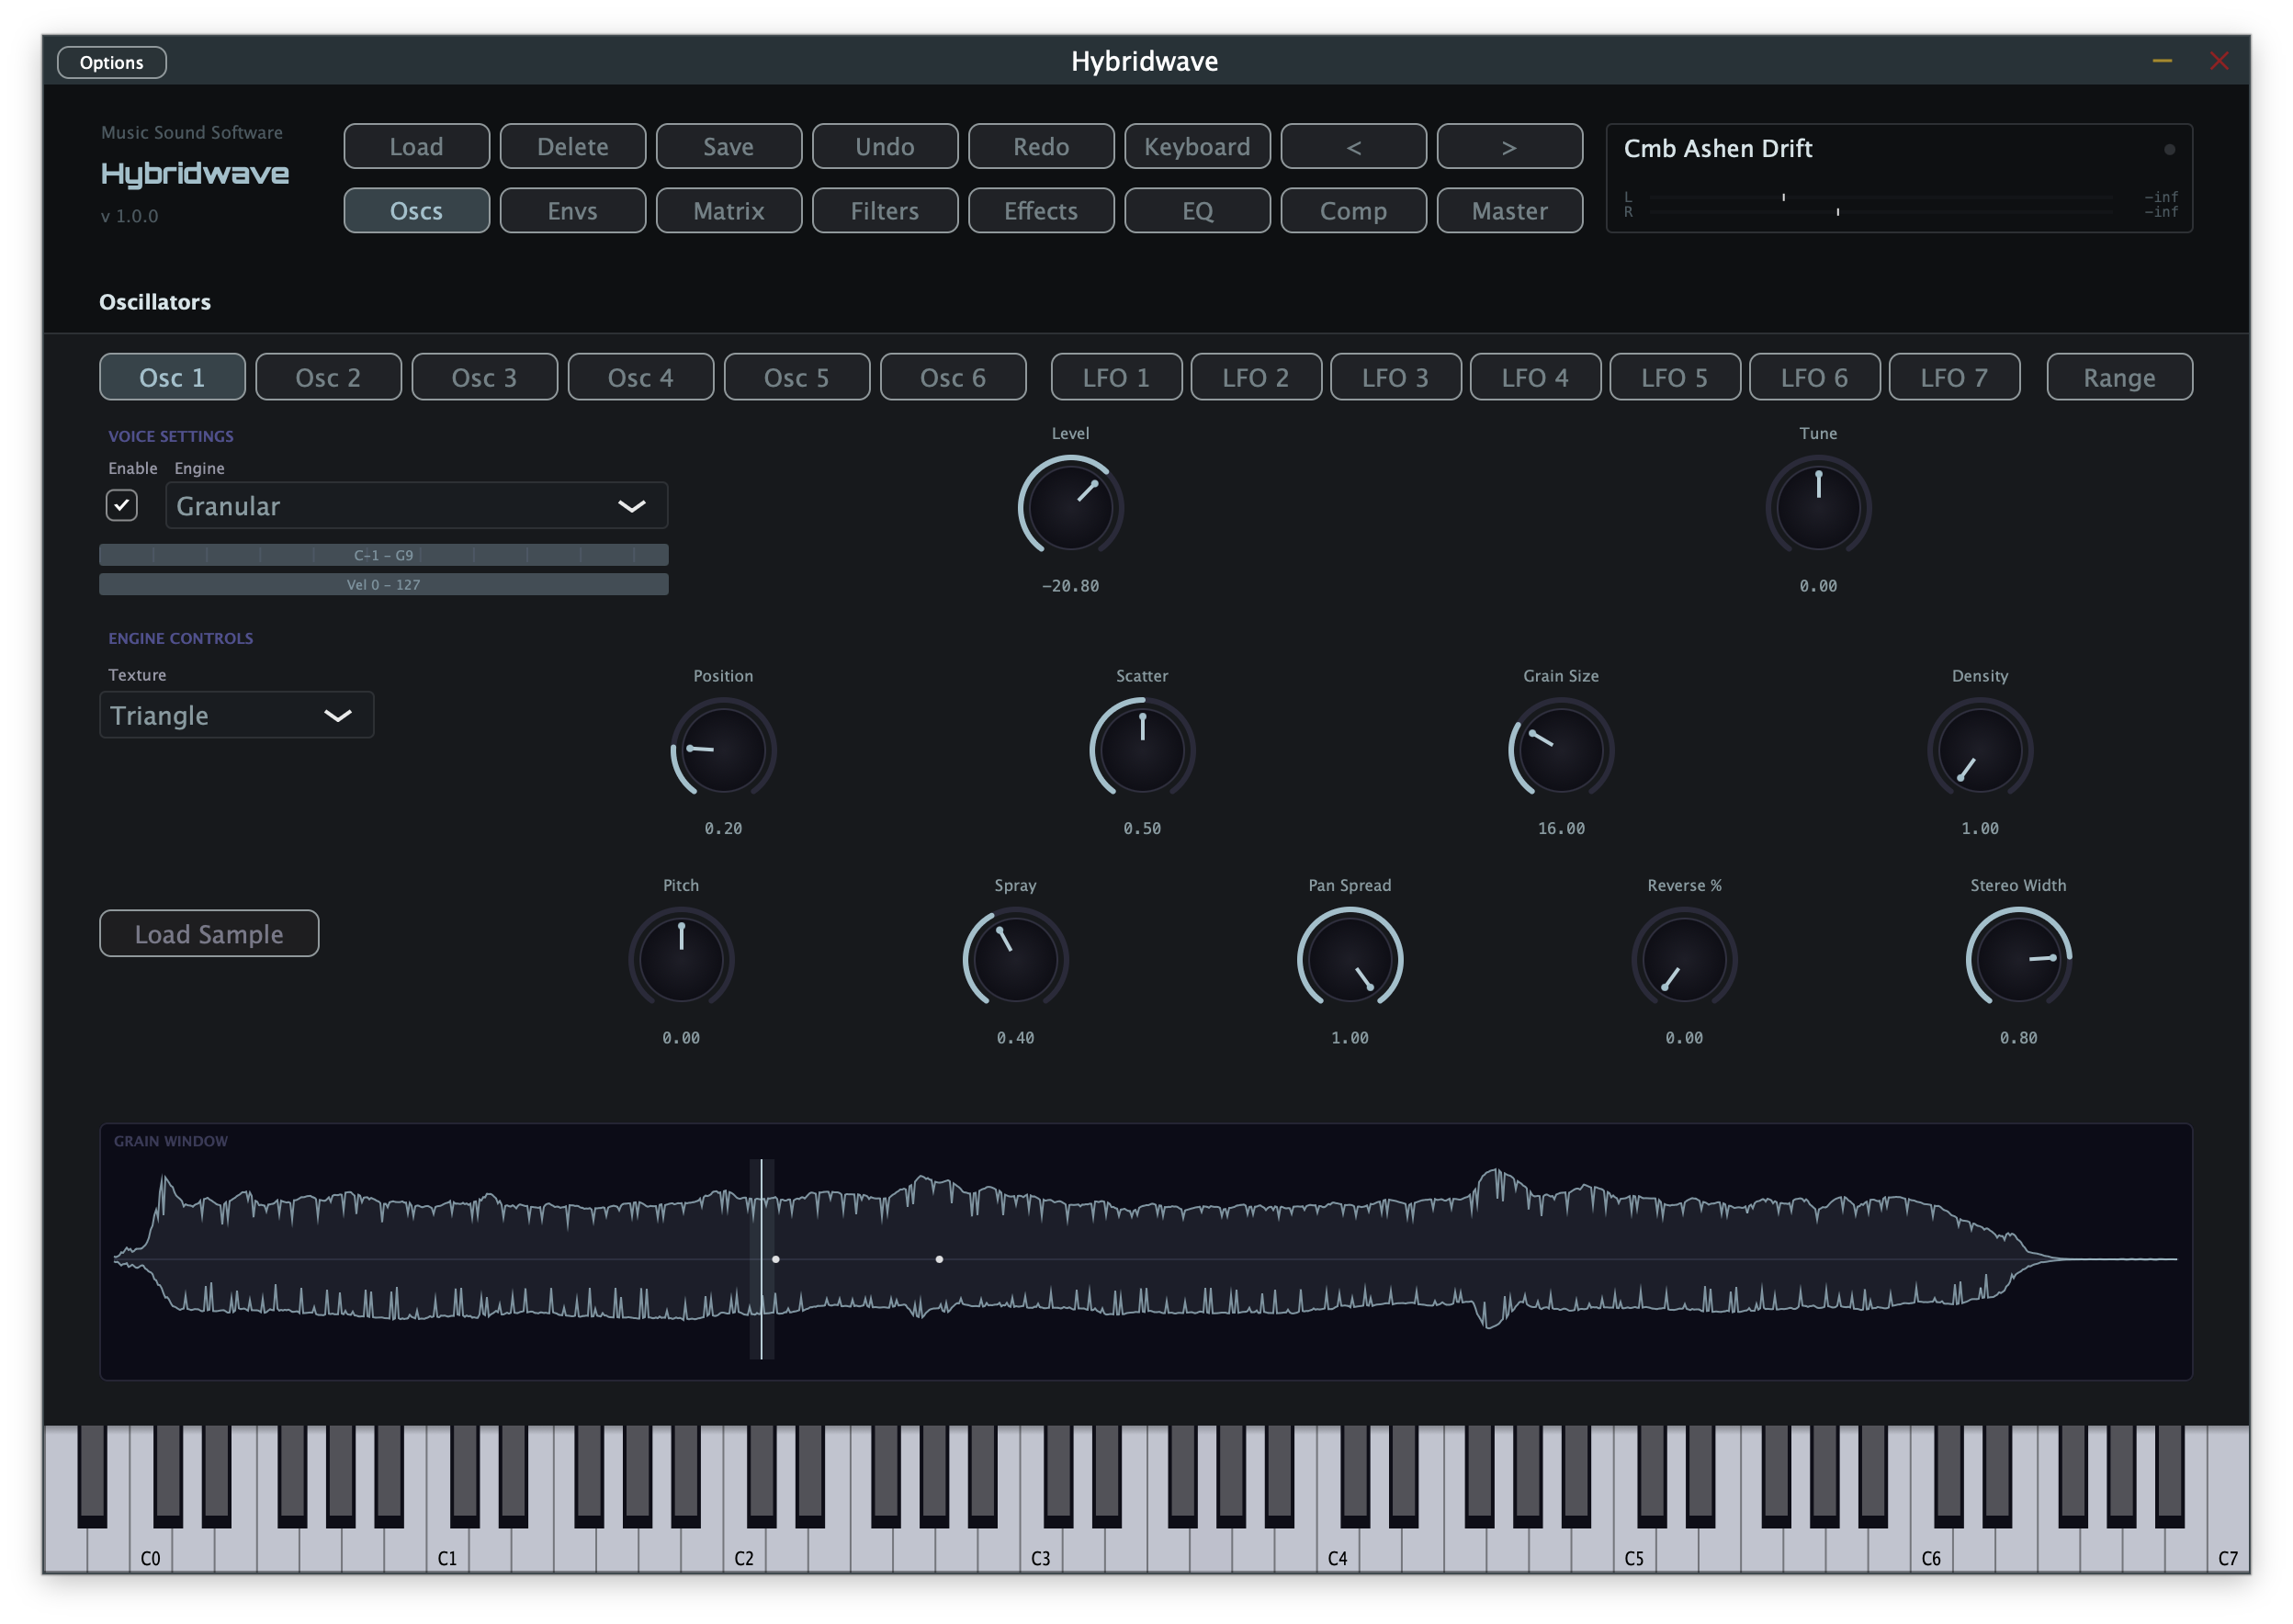
Granular
Builds sound from many small, overlapping "grains" of audio. Load a sample and scrub through it in slow motion, or leave it empty for a synthesised texture bed.
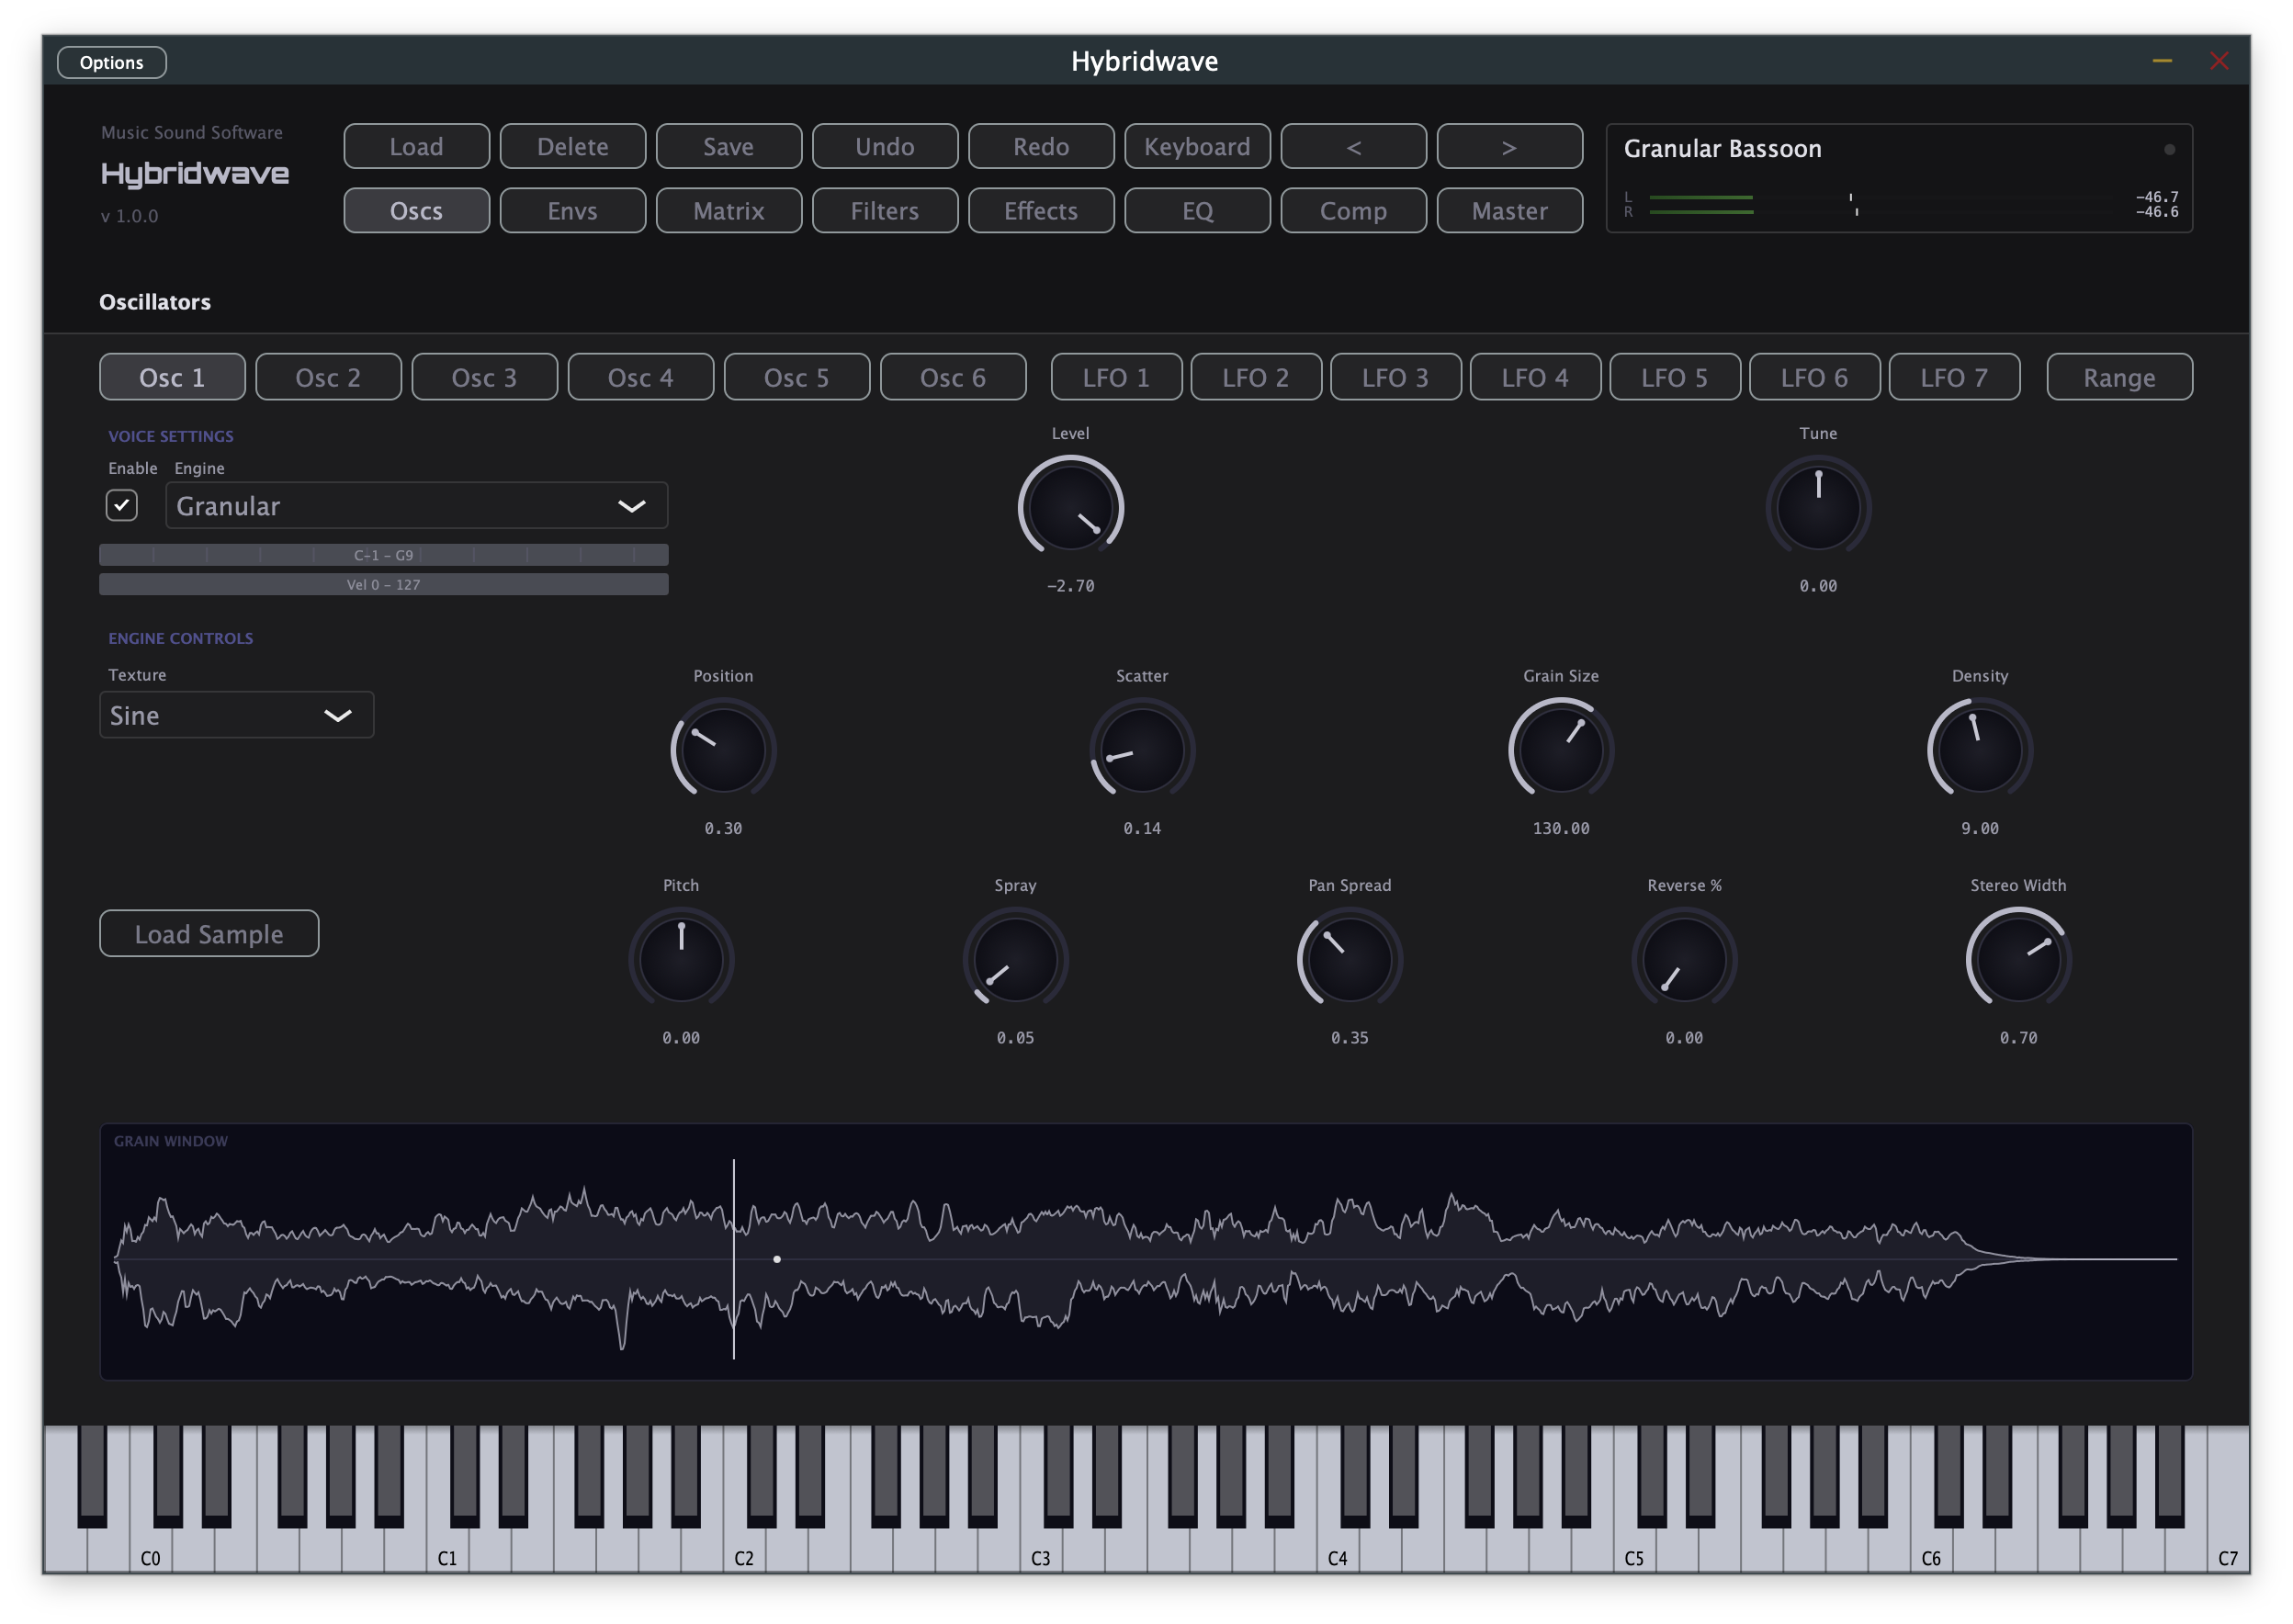
With no sample loaded, the Texture dropdown picks a synthesised waveform (Sine, Triangle, Square, Sawtooth, or Noise) as the grain source. Click Load Sample to switch to sample mode, where grains instead read from your loaded audio file.
| Control | What it does |
|---|---|
| Position | Where in the loaded sample grains read from (0 = start, 1 = end). In texture mode this has no audible effect. |
| Scatter | Randomises each grain's amplitude — adds organic, uneven texture instead of a perfectly even grain stream. |
| Grain Size | Duration of each grain, from short and granular-sounding to long and smooth. |
| Density | How many grains play per second — higher values sound thicker and more continuous. |
| Pitch | Coarse pitch offset in semitones. |
| Spray | Randomises each grain's pitch — small amounts add chorus-like thickness, large amounts get noisy. |
| Pan Spread | How far individual grains scatter across the stereo field. |
| Reverse % | Probability that any given grain plays backwards. |
| Stereo Width | Scales the overall stereo spread set by Pan Spread. |
Because Position, Grain Size, and Density all respond to modulation, this engine is a natural fit for slowly evolving pads and atmospheres — try routing an LFO to Position for a gentle scrub through a loaded sample.
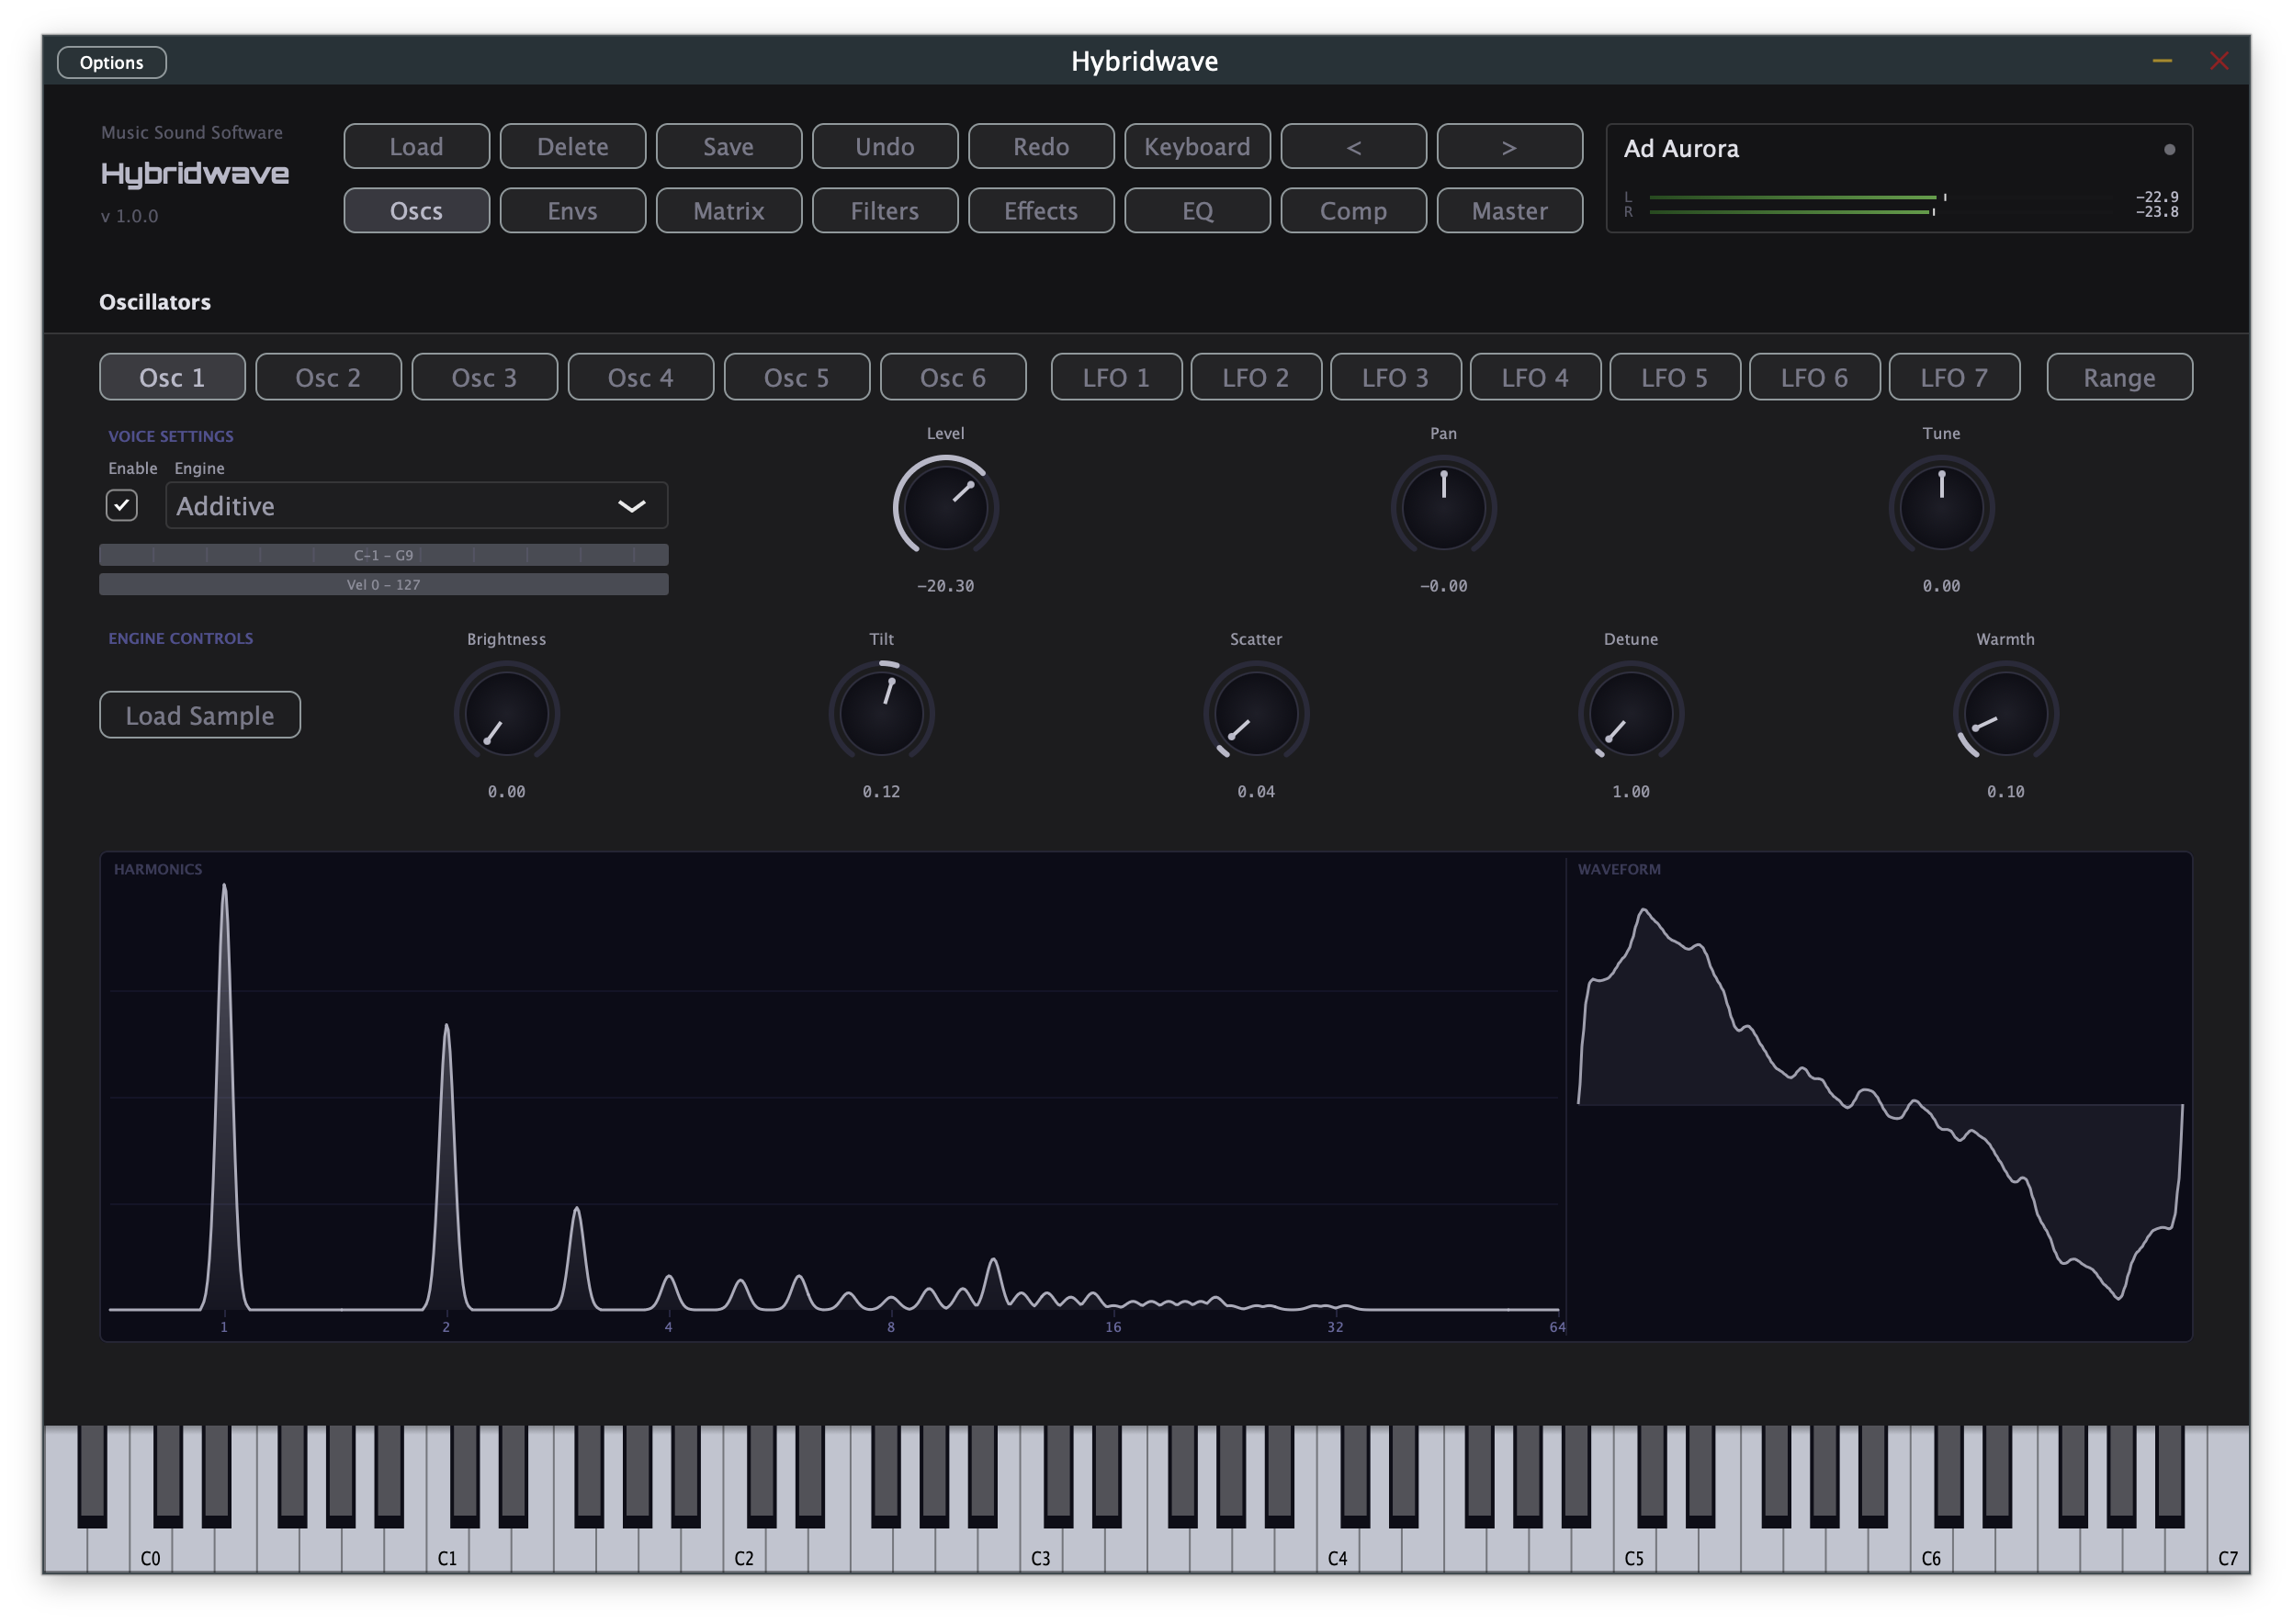
Additive
Builds a tone from up to 64 individual harmonics, drawn by hand or extracted from a real recording — full control over the exact overtone content of the sound.
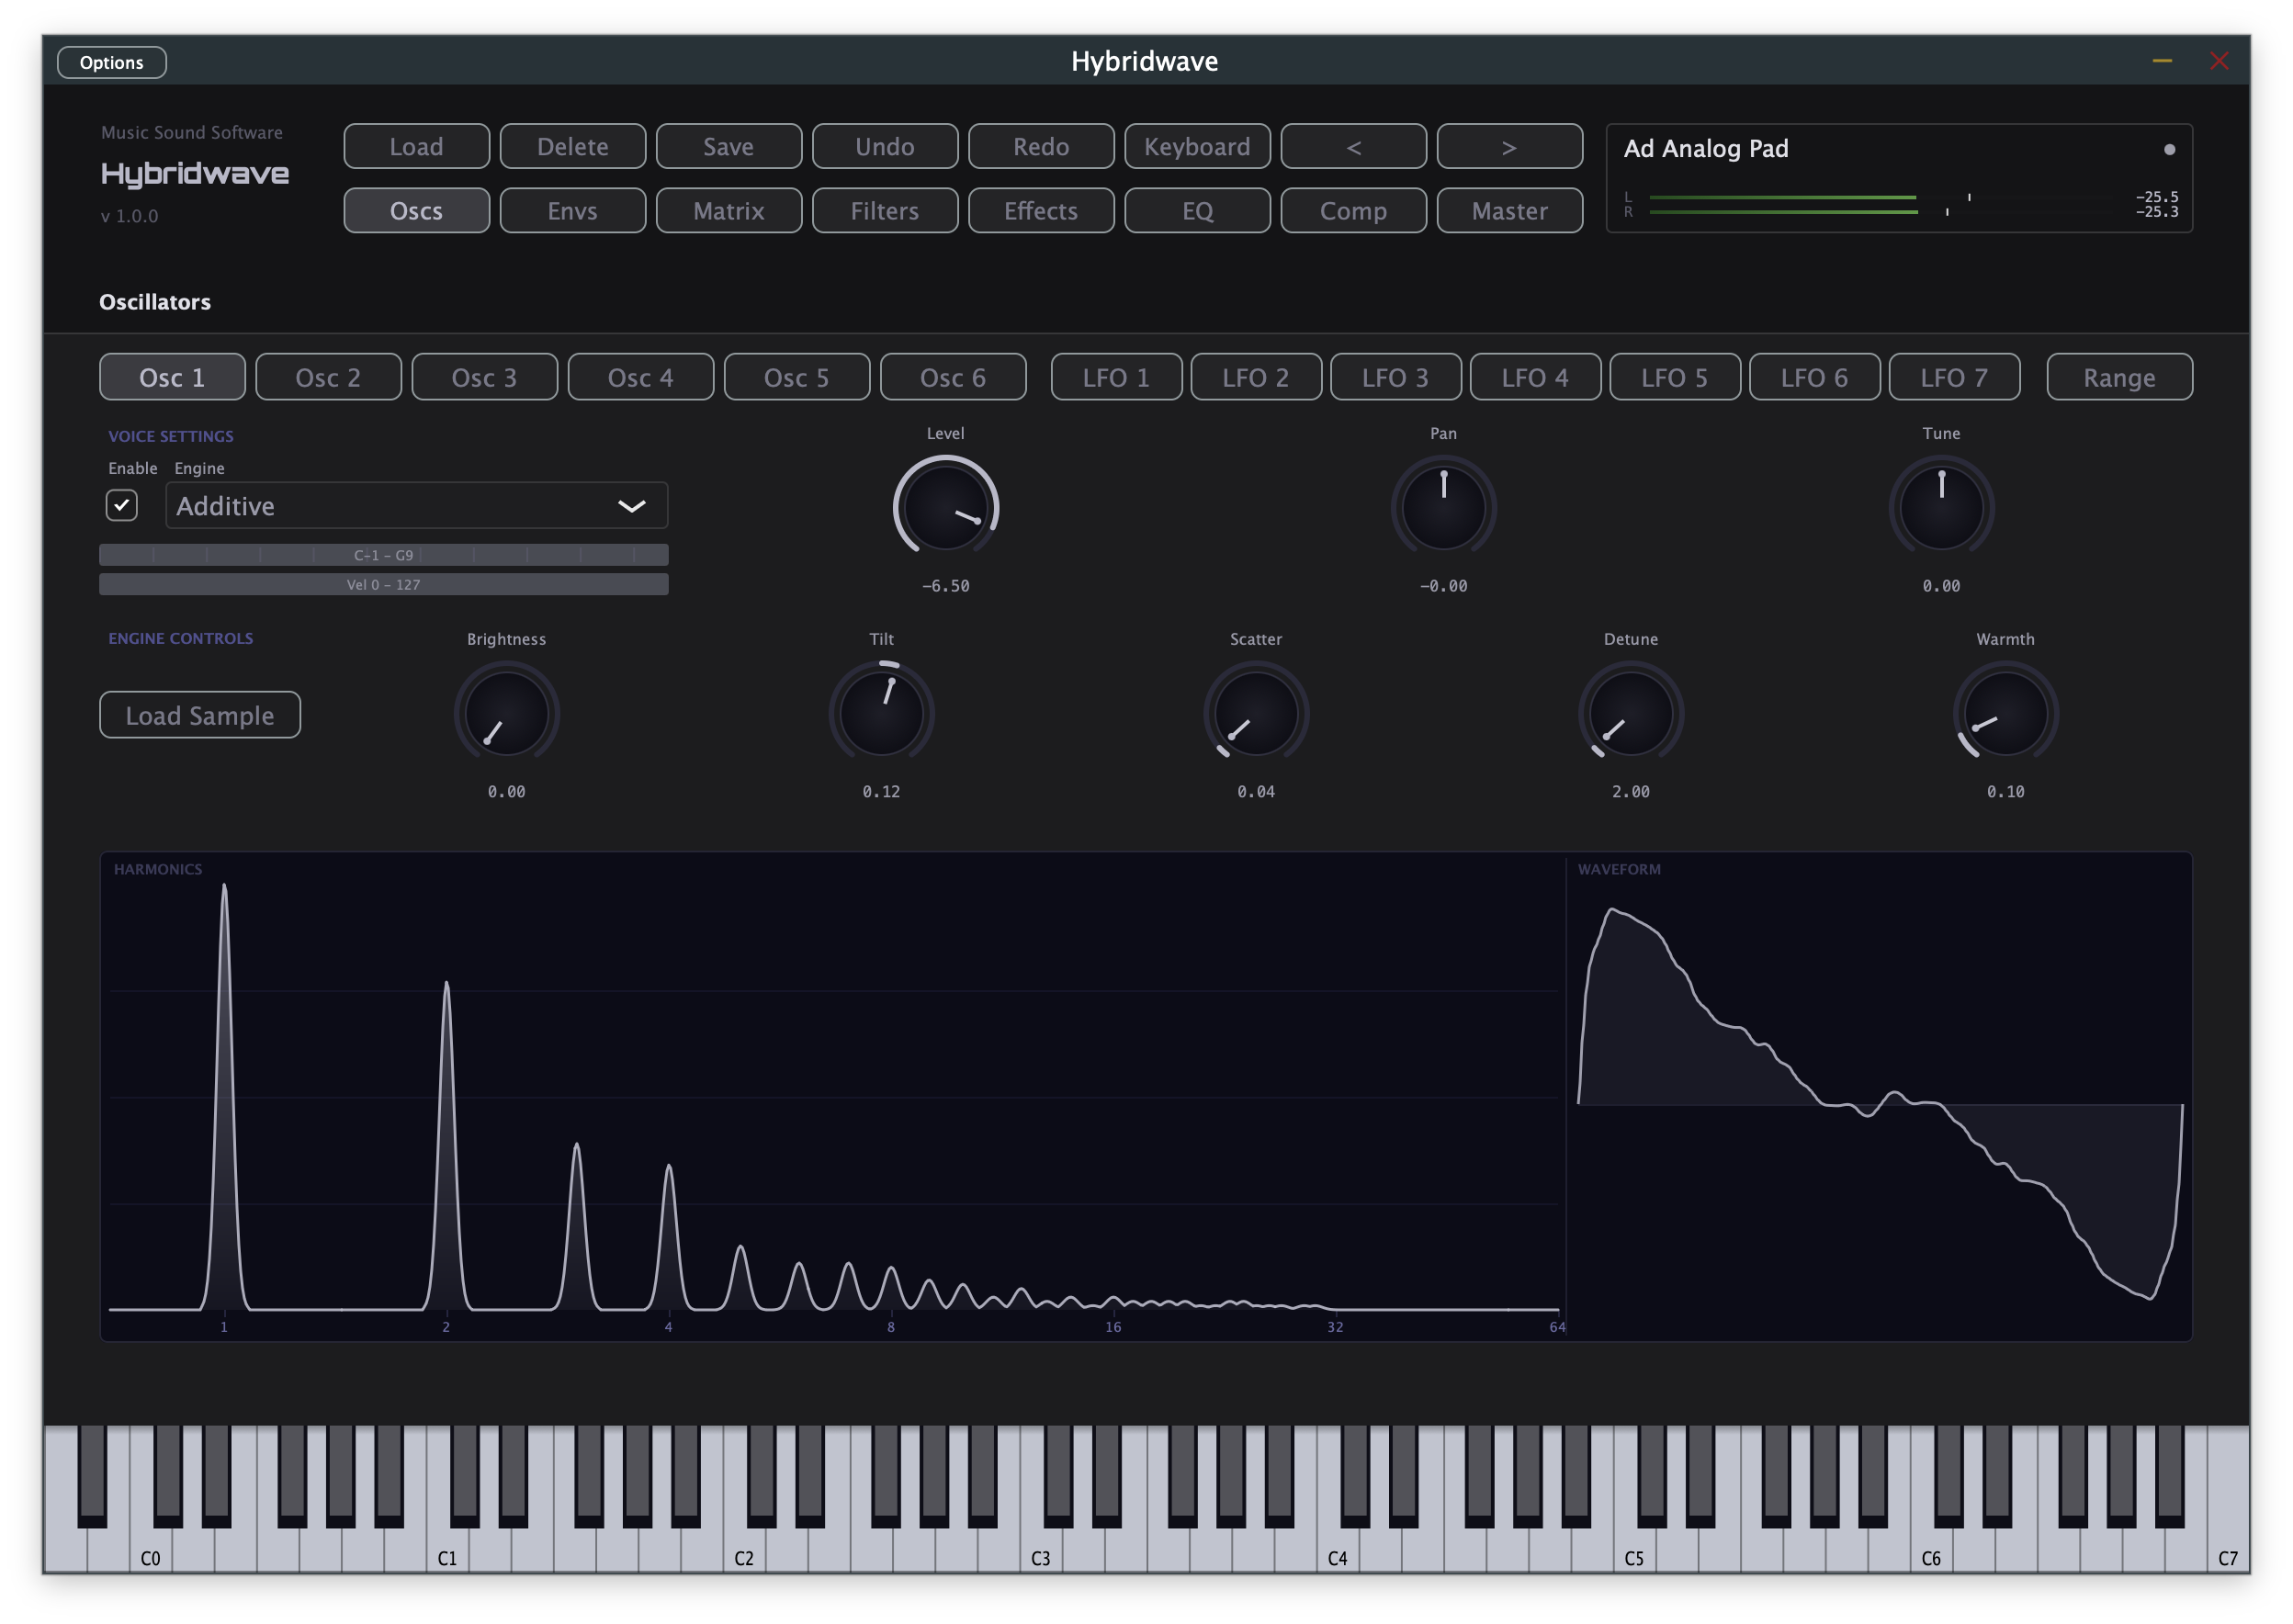
The Harmonics graph on the left shows the level of each of the 64 partials as a bar; the Waveform panel on the right shows the resulting single-cycle shape those harmonics add up to, updated live. Click Load Sample to analyse a real audio file — Hybridwave runs an FFT on the most stable, sustained portion of the recording and derives a 64-harmonic approximation of it automatically, giving you a real instrument's overtone fingerprint as a starting point to sculpt further.
| Control | What it does |
|---|---|
| Brightness | Overall tilt toward or away from the upper harmonics. |
| Tilt | A second, independent brightness tilt — combine with Brightness for finer shaping. |
| Scatter | Randomises harmonic levels slightly for a less mechanically perfect, more organic tone. |
| Detune | Adds a second, detuned copy of the harmonic stack for thickness. |
| Warmth | Softens the upper harmonics for a rounder, less clinical tone. |
Every harmonic is recalculated directly, sample by sample, rather than baked into a static wavetable ahead of time. That means Brightness, Tilt, and Scatter can all be modulated in real time by an envelope or LFO with no artifacts — the harmonic content genuinely moves, rather than jumping between a handful of pre-rendered snapshots.
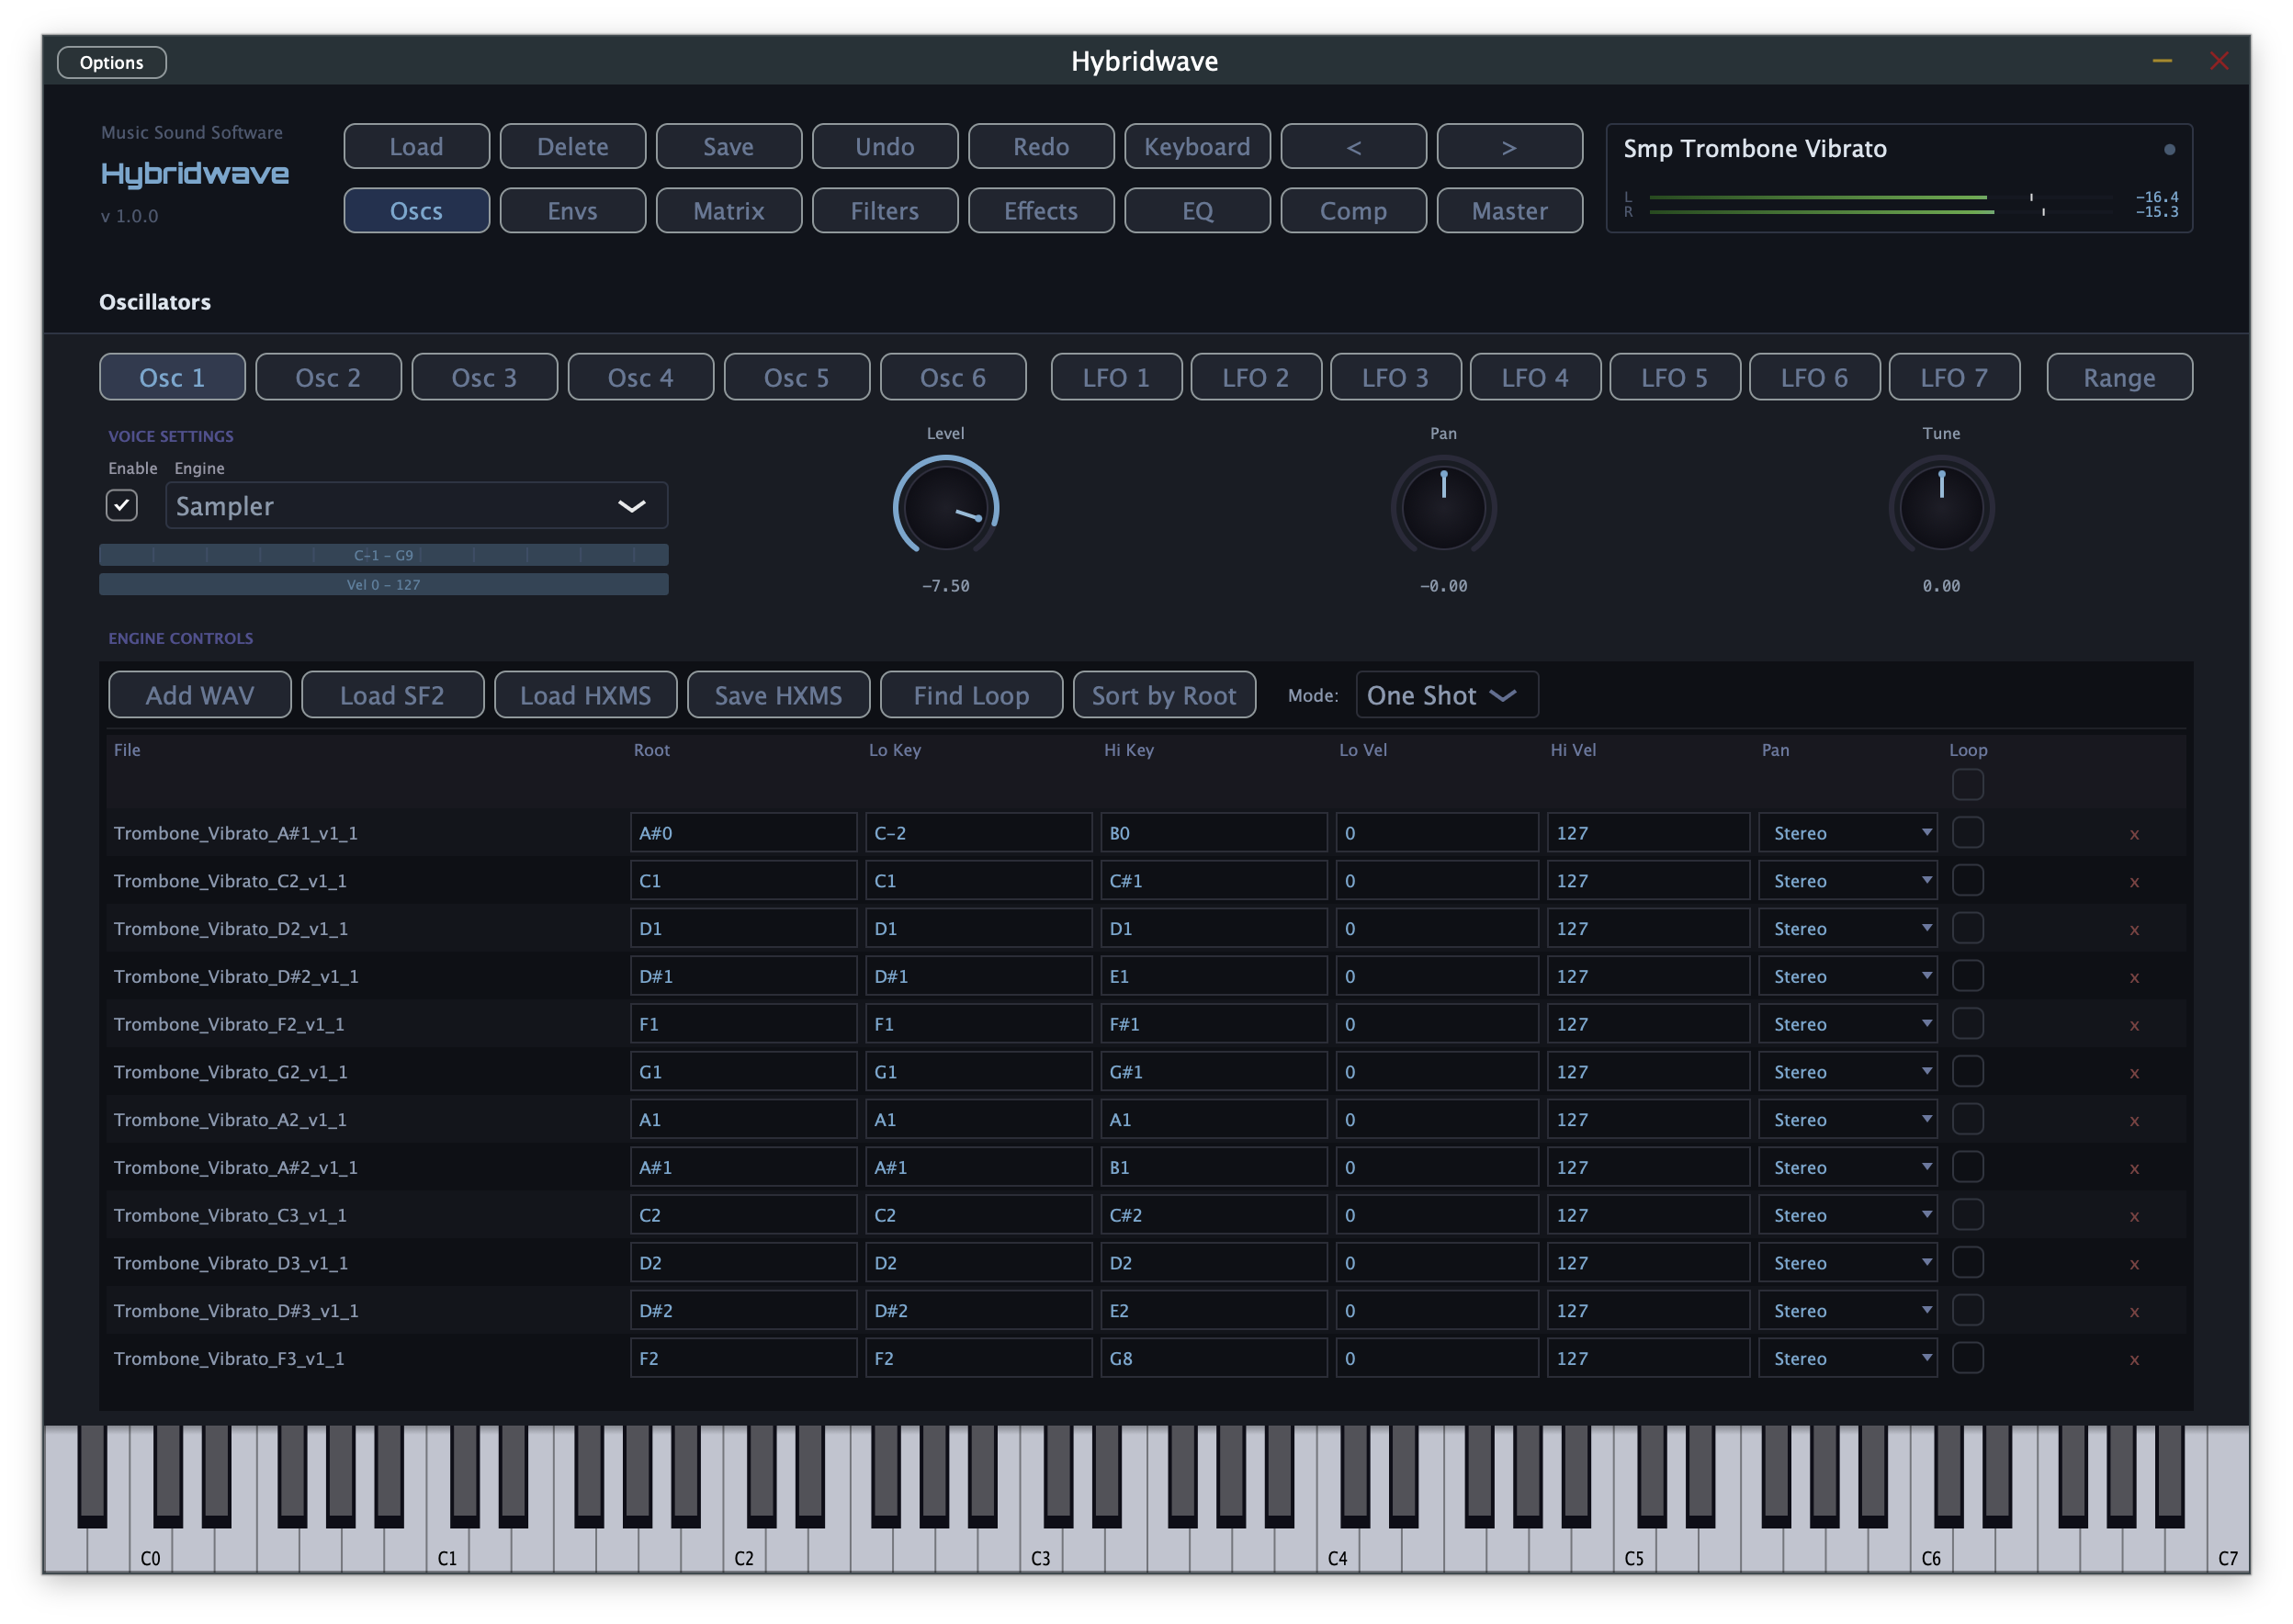
Sampler
Multi-sample playback with full keymapping — load individual WAVs, an SF2 SoundFont, or Hybridwave's own native multi-sample format, and map each sample to the exact keys and velocities it should respond to.
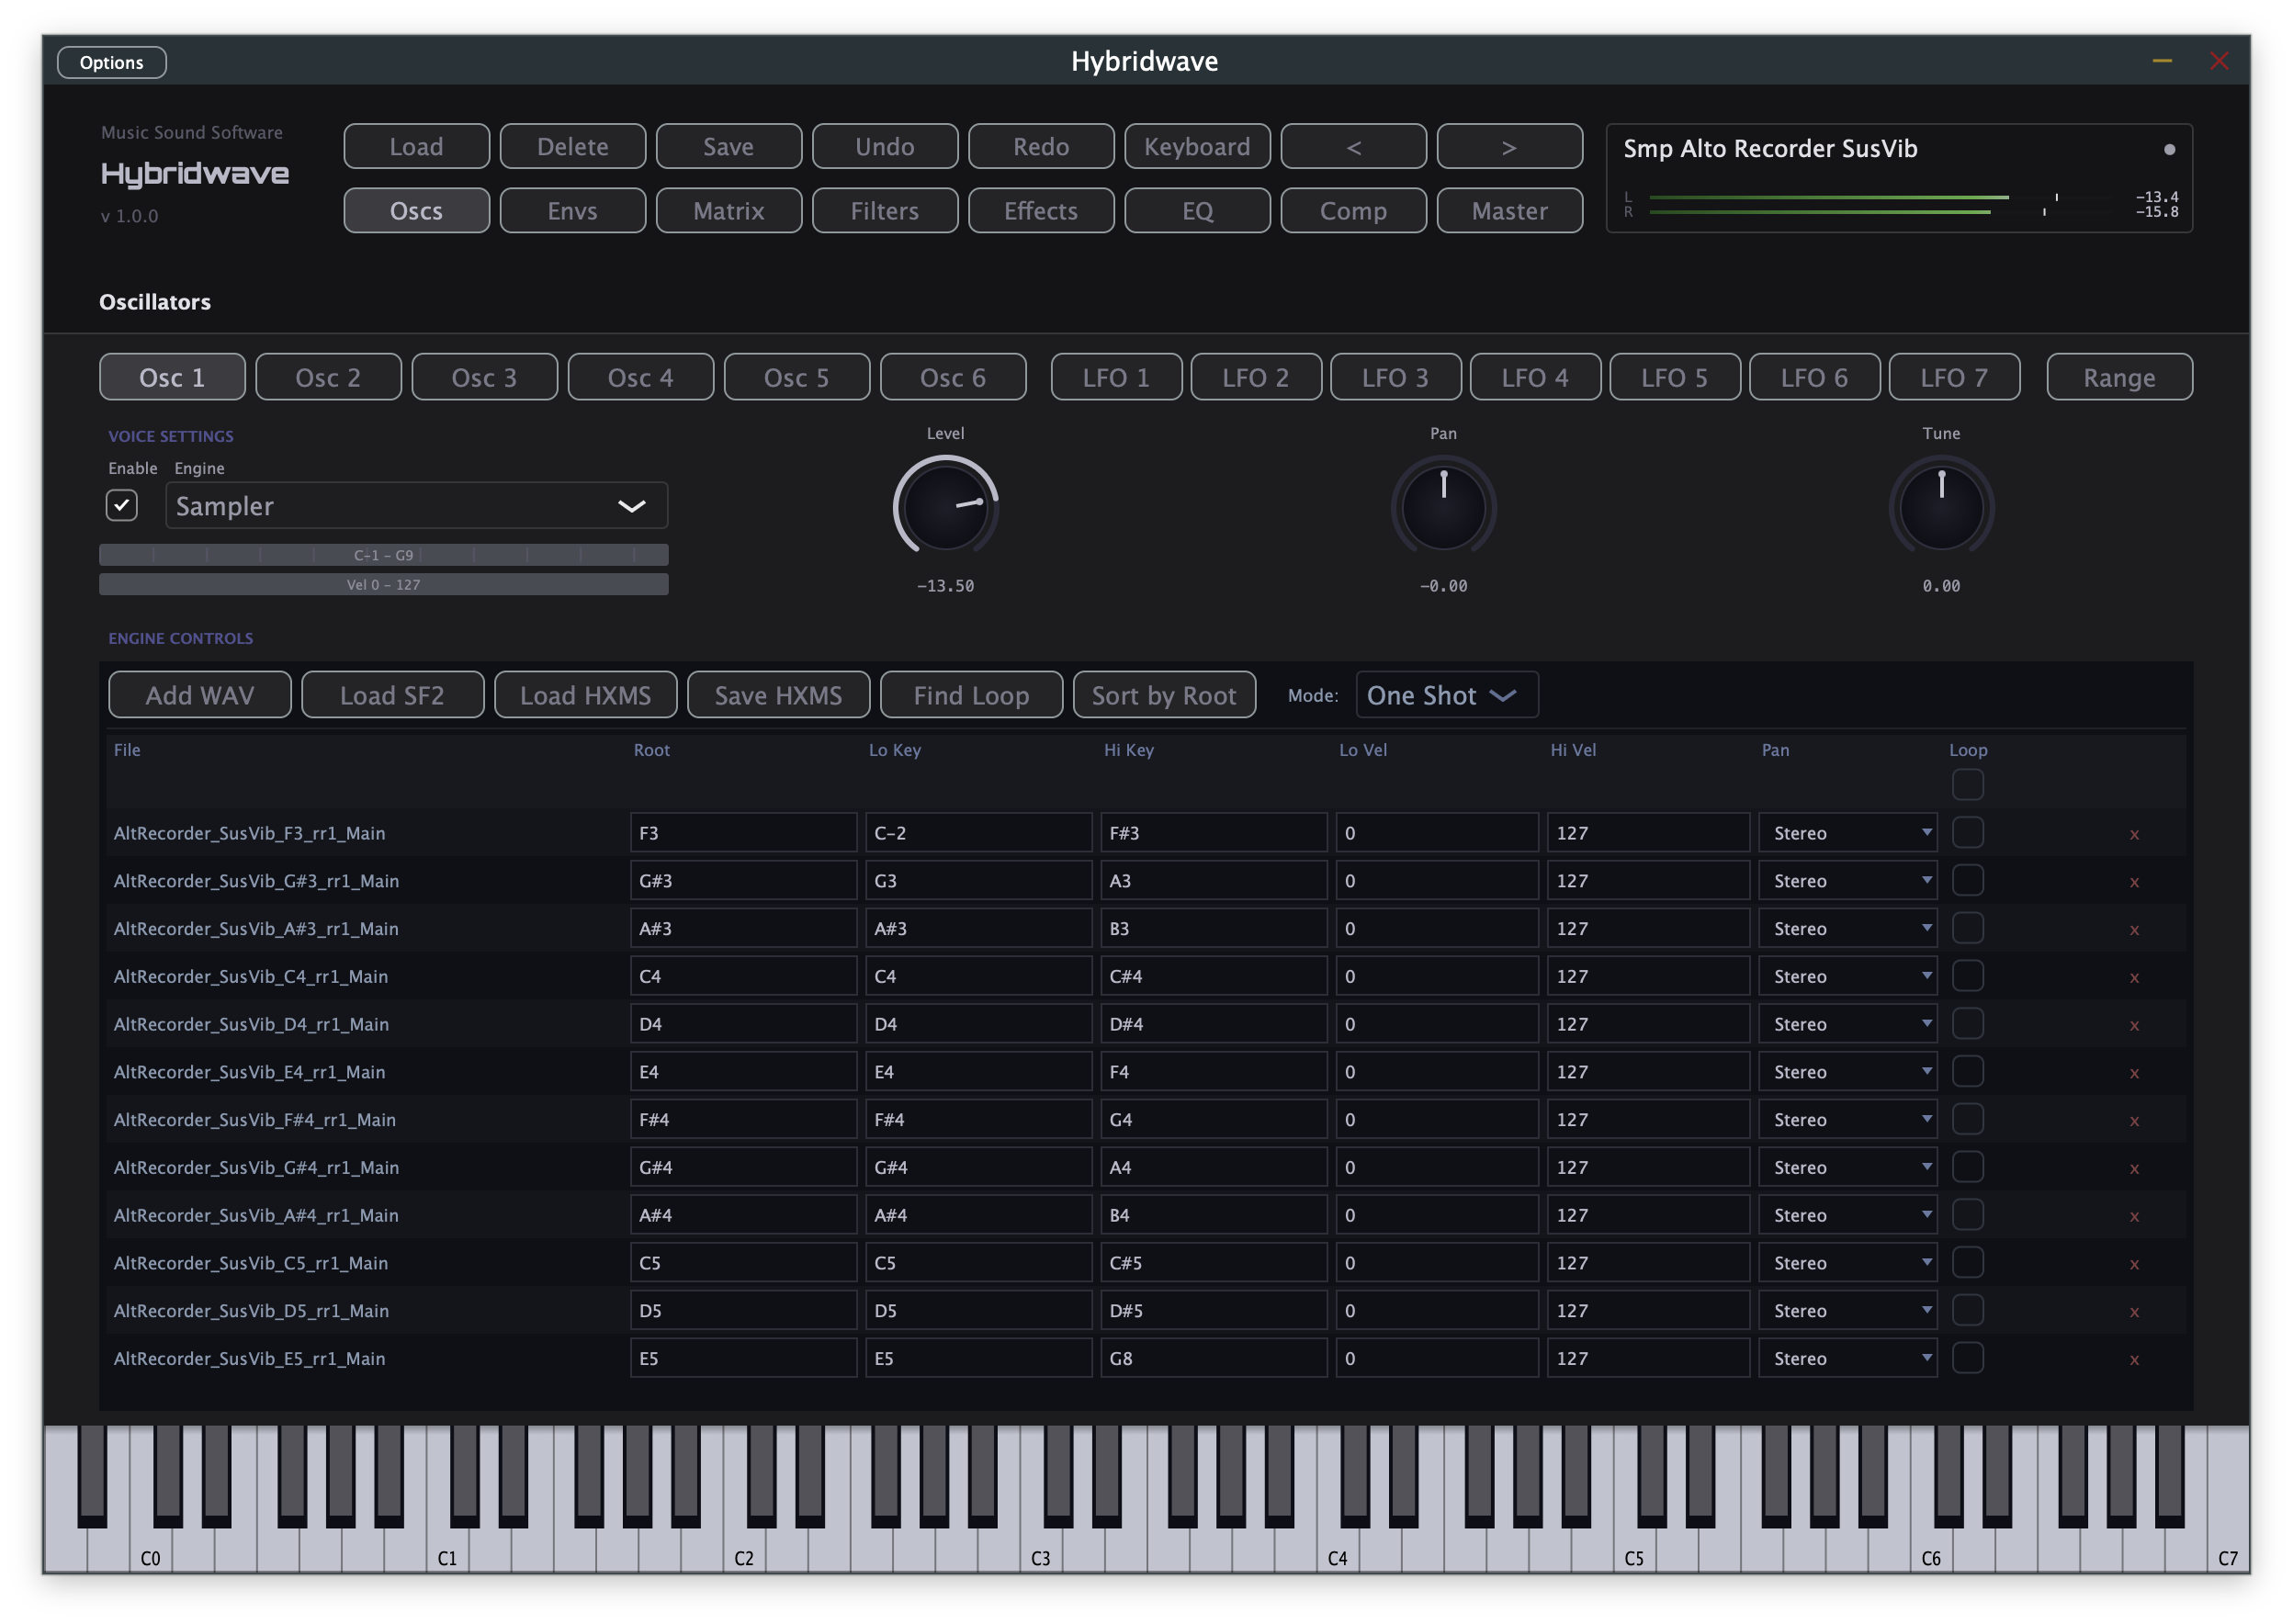
The toolbar across the top loads content in three ways: Add WAV for individual audio files (each becomes one zone), Load SF2 to import a SoundFont with its keymap intact, and Load HXMS / Save HXMS for Hybridwave's own portable multi-sample format. Find Loop attempts to detect a clean loop point automatically; Sort by Root tidies the zone list by root key.
Each row in the zone table is one sample: its root key, the key and velocity range it covers, pan, and loop settings. Overlapping velocity ranges at the same key let you build velocity-layered instruments — quiet notes trigger a soft-mic'd sample, hard notes trigger a brighter one, exactly like the piano example above.
| Play mode | Behaviour |
|---|---|
| One Shot | Plays to the end of the sample regardless of how long the key is held; ignores note-off. |
| Loop | Loops between the loop points while the key is held, then plays out the tail on release. |
| Ping-Pong | Loops back and forth between the loop points instead of jumping back to the start. |
| Note Gate | Plays only while the key is held, and stops immediately on release. |
Wavefolding
Built for expressive West Coast-style sound design, and shared between Firewave and Hybridwave (as Engine 08). A simple waveform is progressively folded back on itself to generate rich, dynamic harmonic content — a different route to complex timbre than the subtractive filtering used elsewhere in the range. Bluewave and Shearwave don't have this engine.
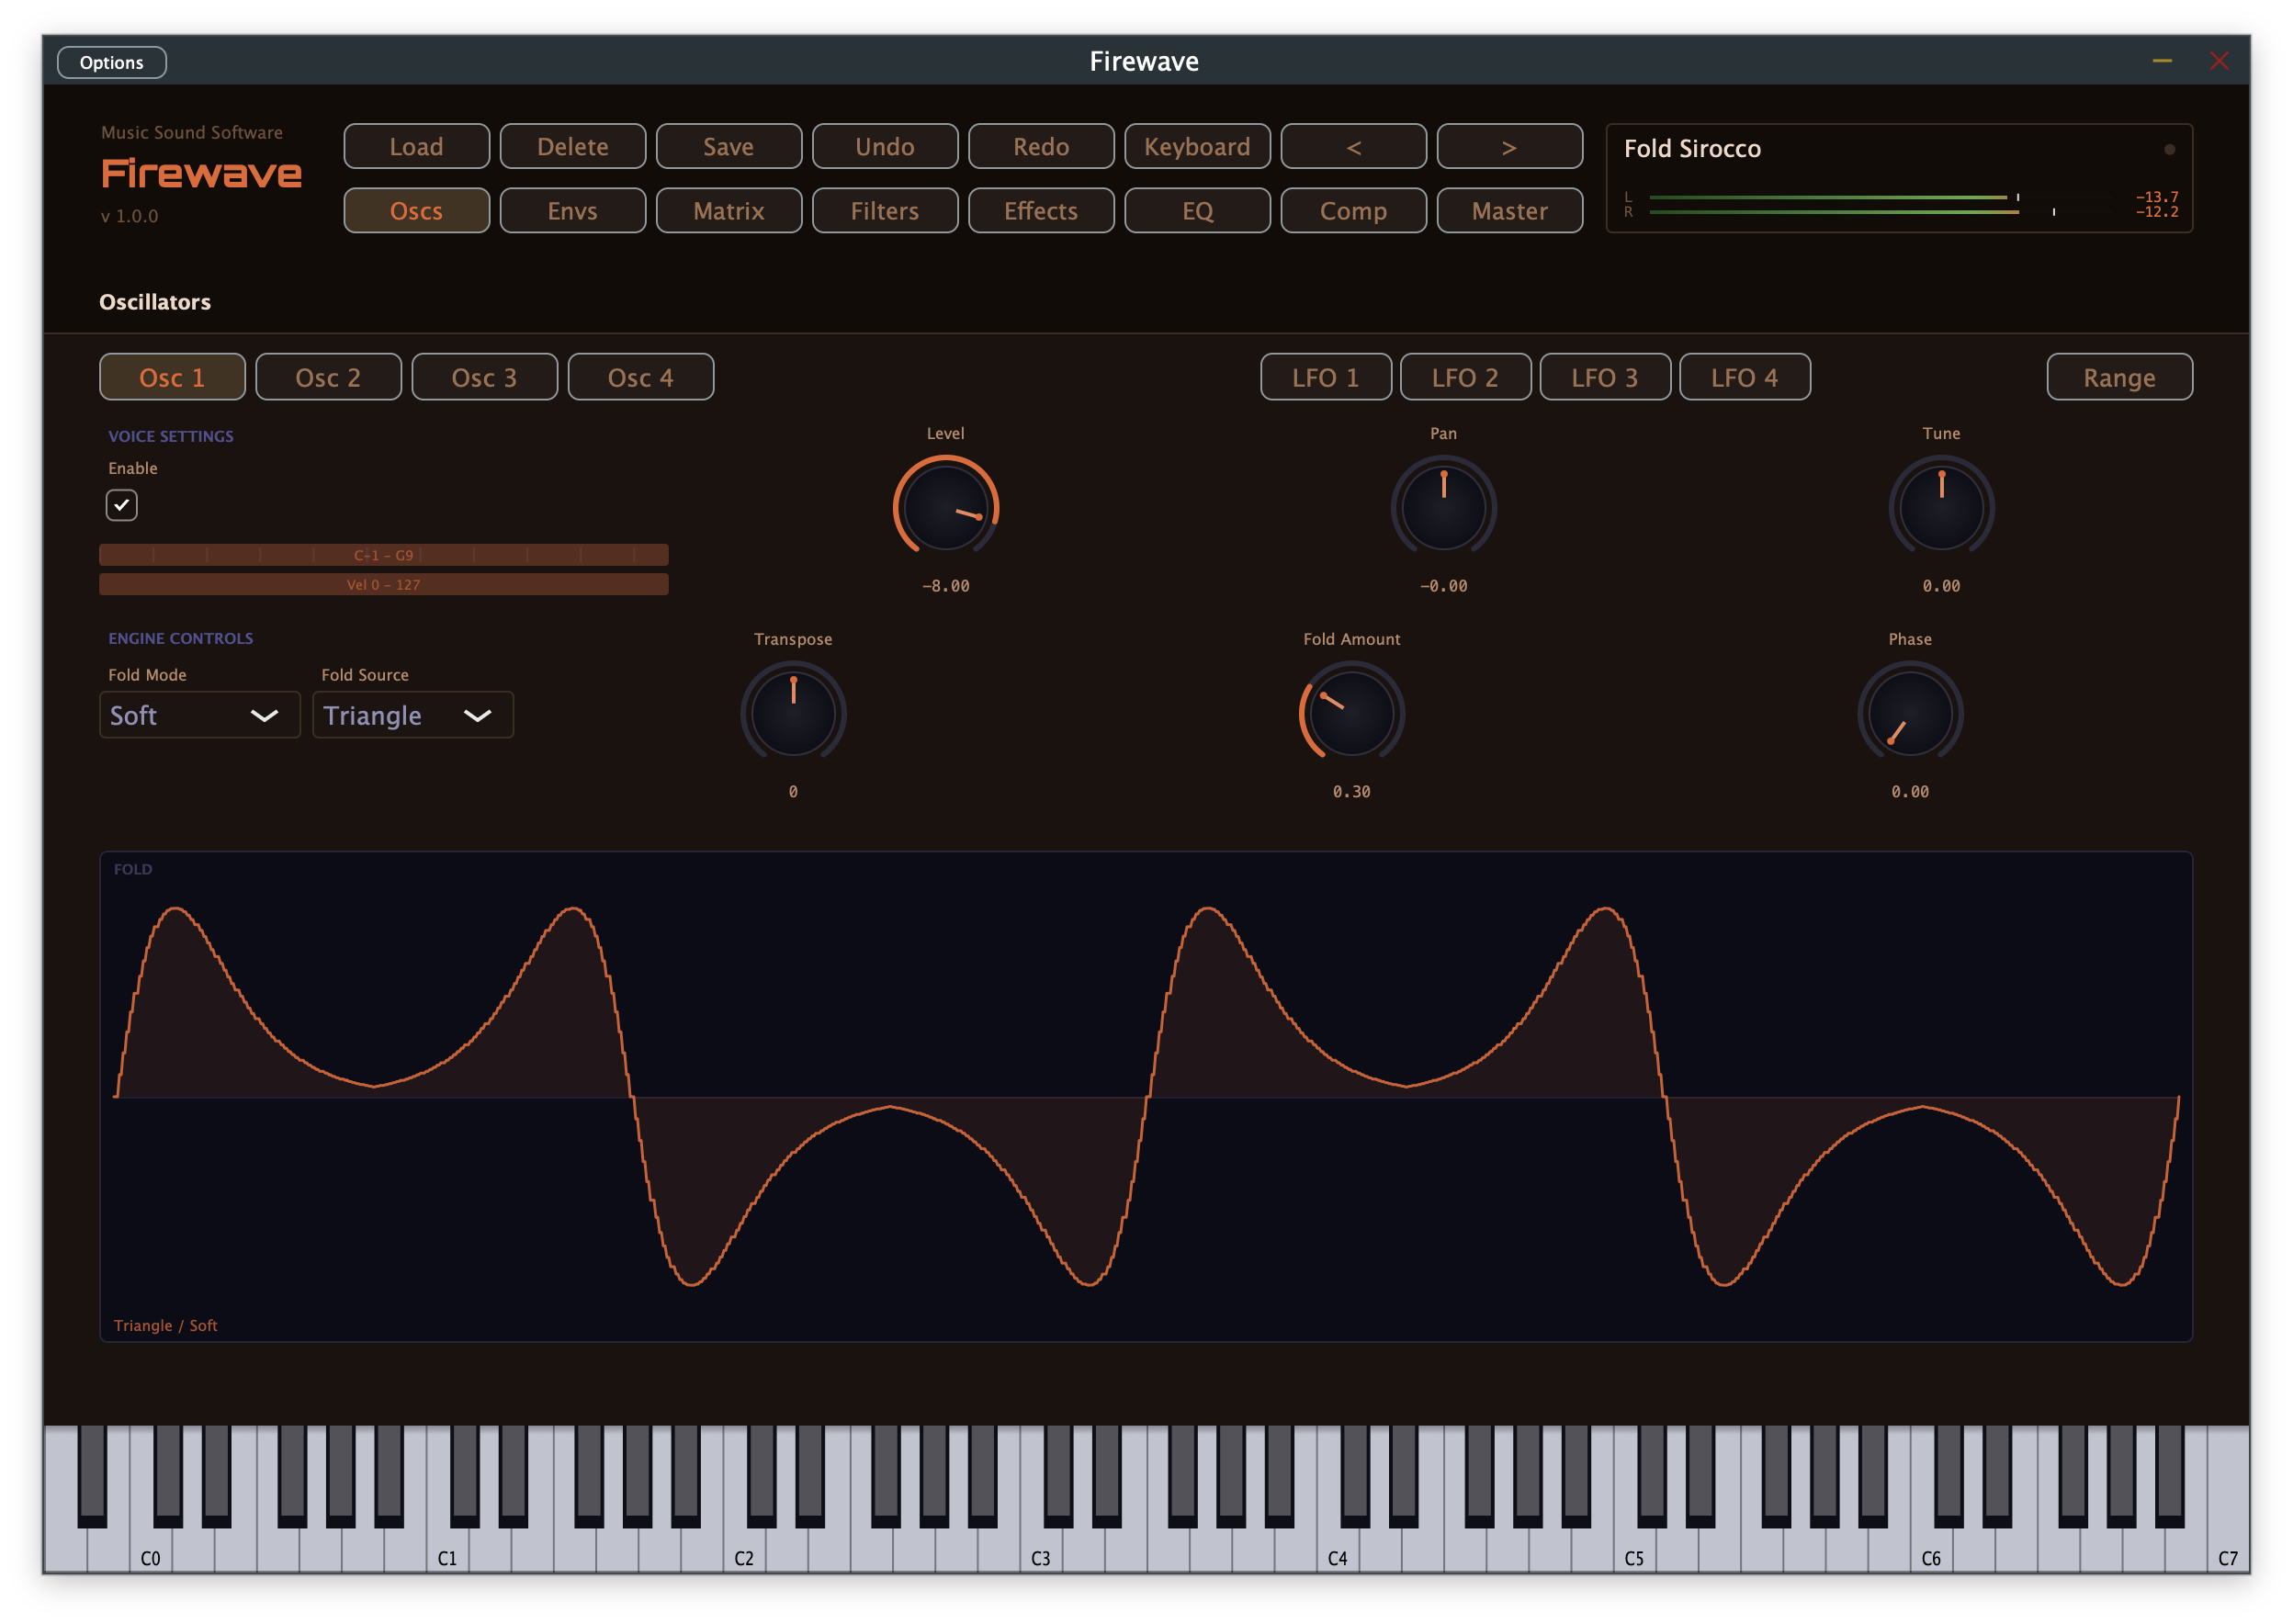
| Control | What it does |
|---|---|
| Fold Mode | Selects the folding algorithm and character — different modes fold the waveform differently, from smooth and subtle to sharp and aggressive. |
| Fold Amount | Controls the intensity and depth of the wavefolding, and with it the harmonic complexity of the resulting tone. Low settings add gentle harmonic enhancement; high settings produce dense, complex textures. |
| Fold Source | Selects what's driving the fold — the oscillator itself, or an external or modulation source — for dynamic, responsive folding that reacts to what you play. |
| Phase | Direct phase control over the waveform being folded, for further shaping of the harmonic result. |
The panel on the right is a dedicated real-time visualiser: it draws the waveform as it's actually being folded, so you can see the harmonic transformation happening as you turn the Fold Mode, Fold Amount, and Phase knobs, rather than judging the result by ear alone.
Start with Fold Amount low and increase it gradually while watching the visualiser — it's the fastest way to build an intuition for how each Fold Mode responds before reaching for more extreme settings.
Phase Distortion
Built in the classic Casio CZ-series tradition, and shared between Shearwave and Hybridwave (as Engine 07). Instead of filtering a bright waveform down, or having oscillators modulate one another, this engine warps the rate a wavetable is read at — a plain sine, read unevenly, blooms into everything from glassy plucks to snarling basses to resonant, semi-vocal leads. Bluewave and Firewave don't have this engine.
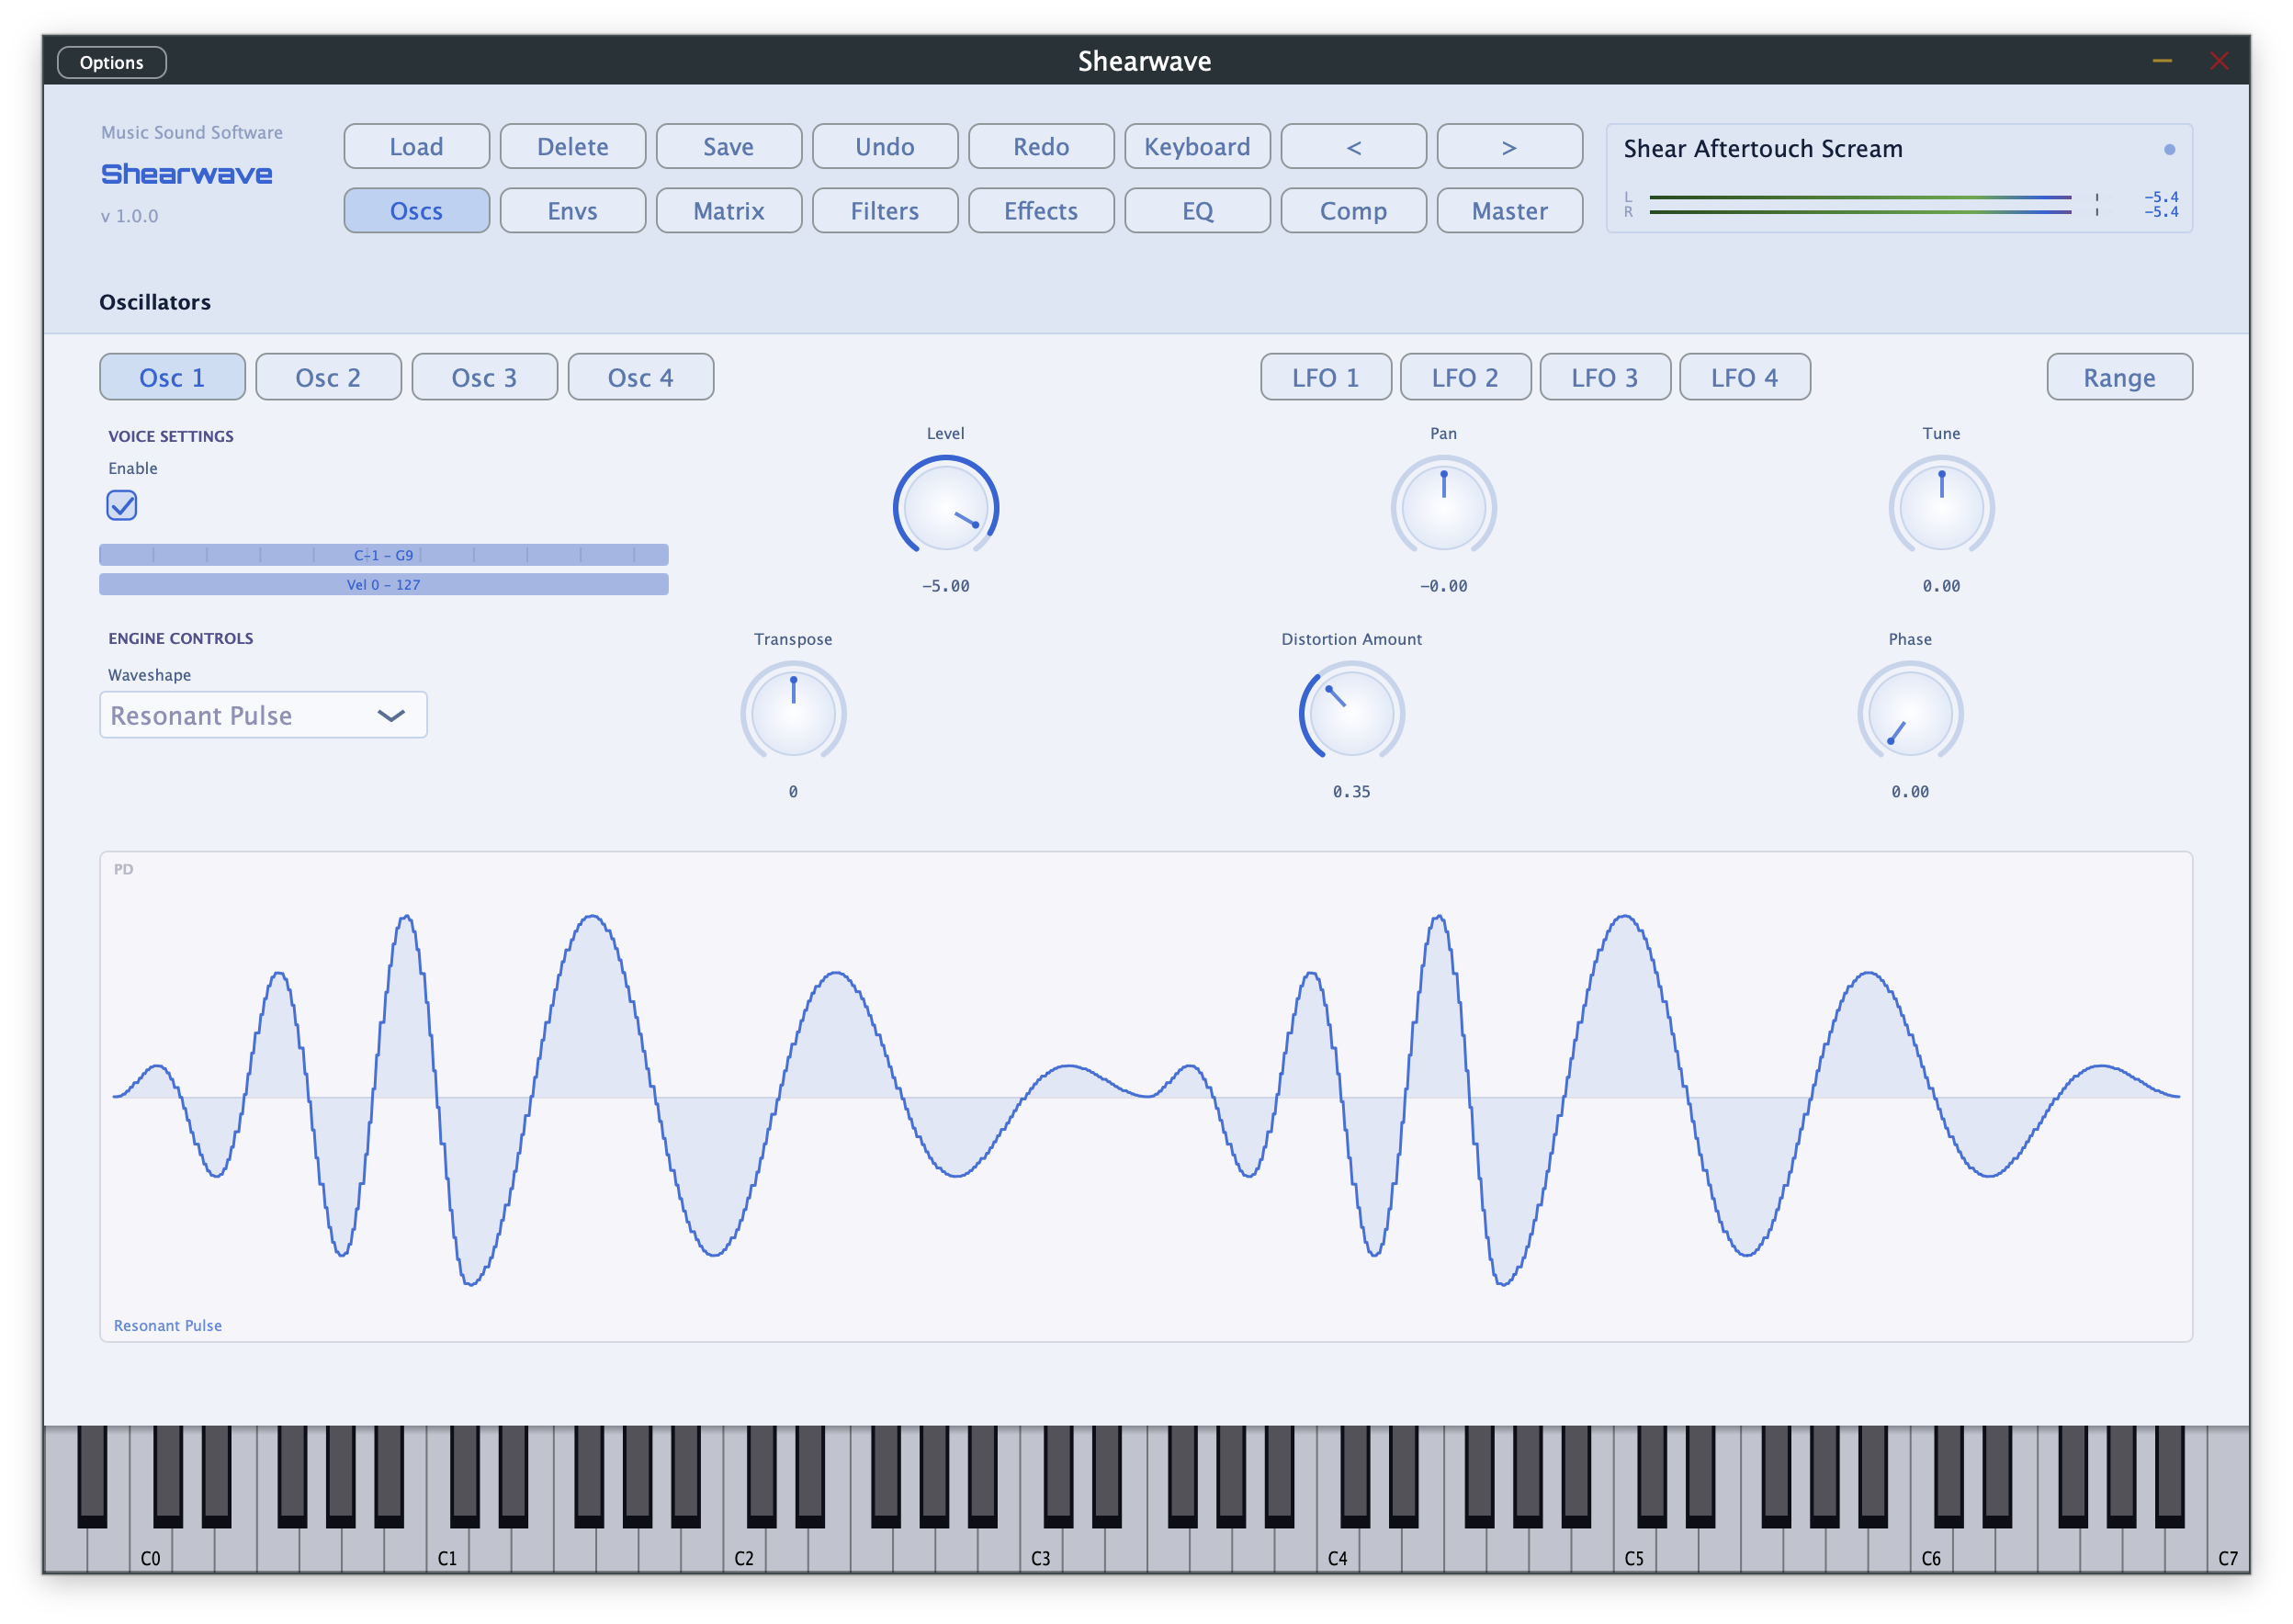
| Control | What it does |
|---|---|
| Waveshape | Selects one of five waveshapes — including two resonant variants built around a swept sine carrier, for the unmistakable CZ-style resonant character. |
| Distortion Amount (DCW) | The heart of the engine. One control takes the waveform from a pure sine to a bright, harmonically dense edge by warping the rate the wavetable is read at. |
| DCW Modulation | DCW can be driven live by an envelope, an LFO, velocity, aftertouch, or a macro, for the classic CZ "brightness that moves" character — route it through the Mod Matrix like any other destination. |
All four oscillators share the same waveshape and DCW architecture, and can be mixed, detuned, and routed through Shearwave's dual filters, mod matrix, and effects chain exactly like any other engine in the range.
For classic CZ-style plucks and basses, route an envelope to DCW so brightness decays independently of amplitude — that's the source of the "biting" attack CZ synths are known for. For semi-vocal leads, try one of the resonant waveshapes with a slow LFO on DCW.
Physical Modeling
Hybridwave's ninth engine, built around Karplus-Strong synthesis — the classic algorithm behind digital plucked-string and percussion emulation. Rather than reading a waveform, it excites a resonant feedback loop with a burst of energy and lets that energy decay naturally over time, the same way a real plucked string, struck bar, or blown pipe behaves. The result is a genuinely different character from Hybridwave's oscillator-based engines: every note has a natural attack-and-decay shape built into the physics of the sound itself, rather than being purely envelope-driven.
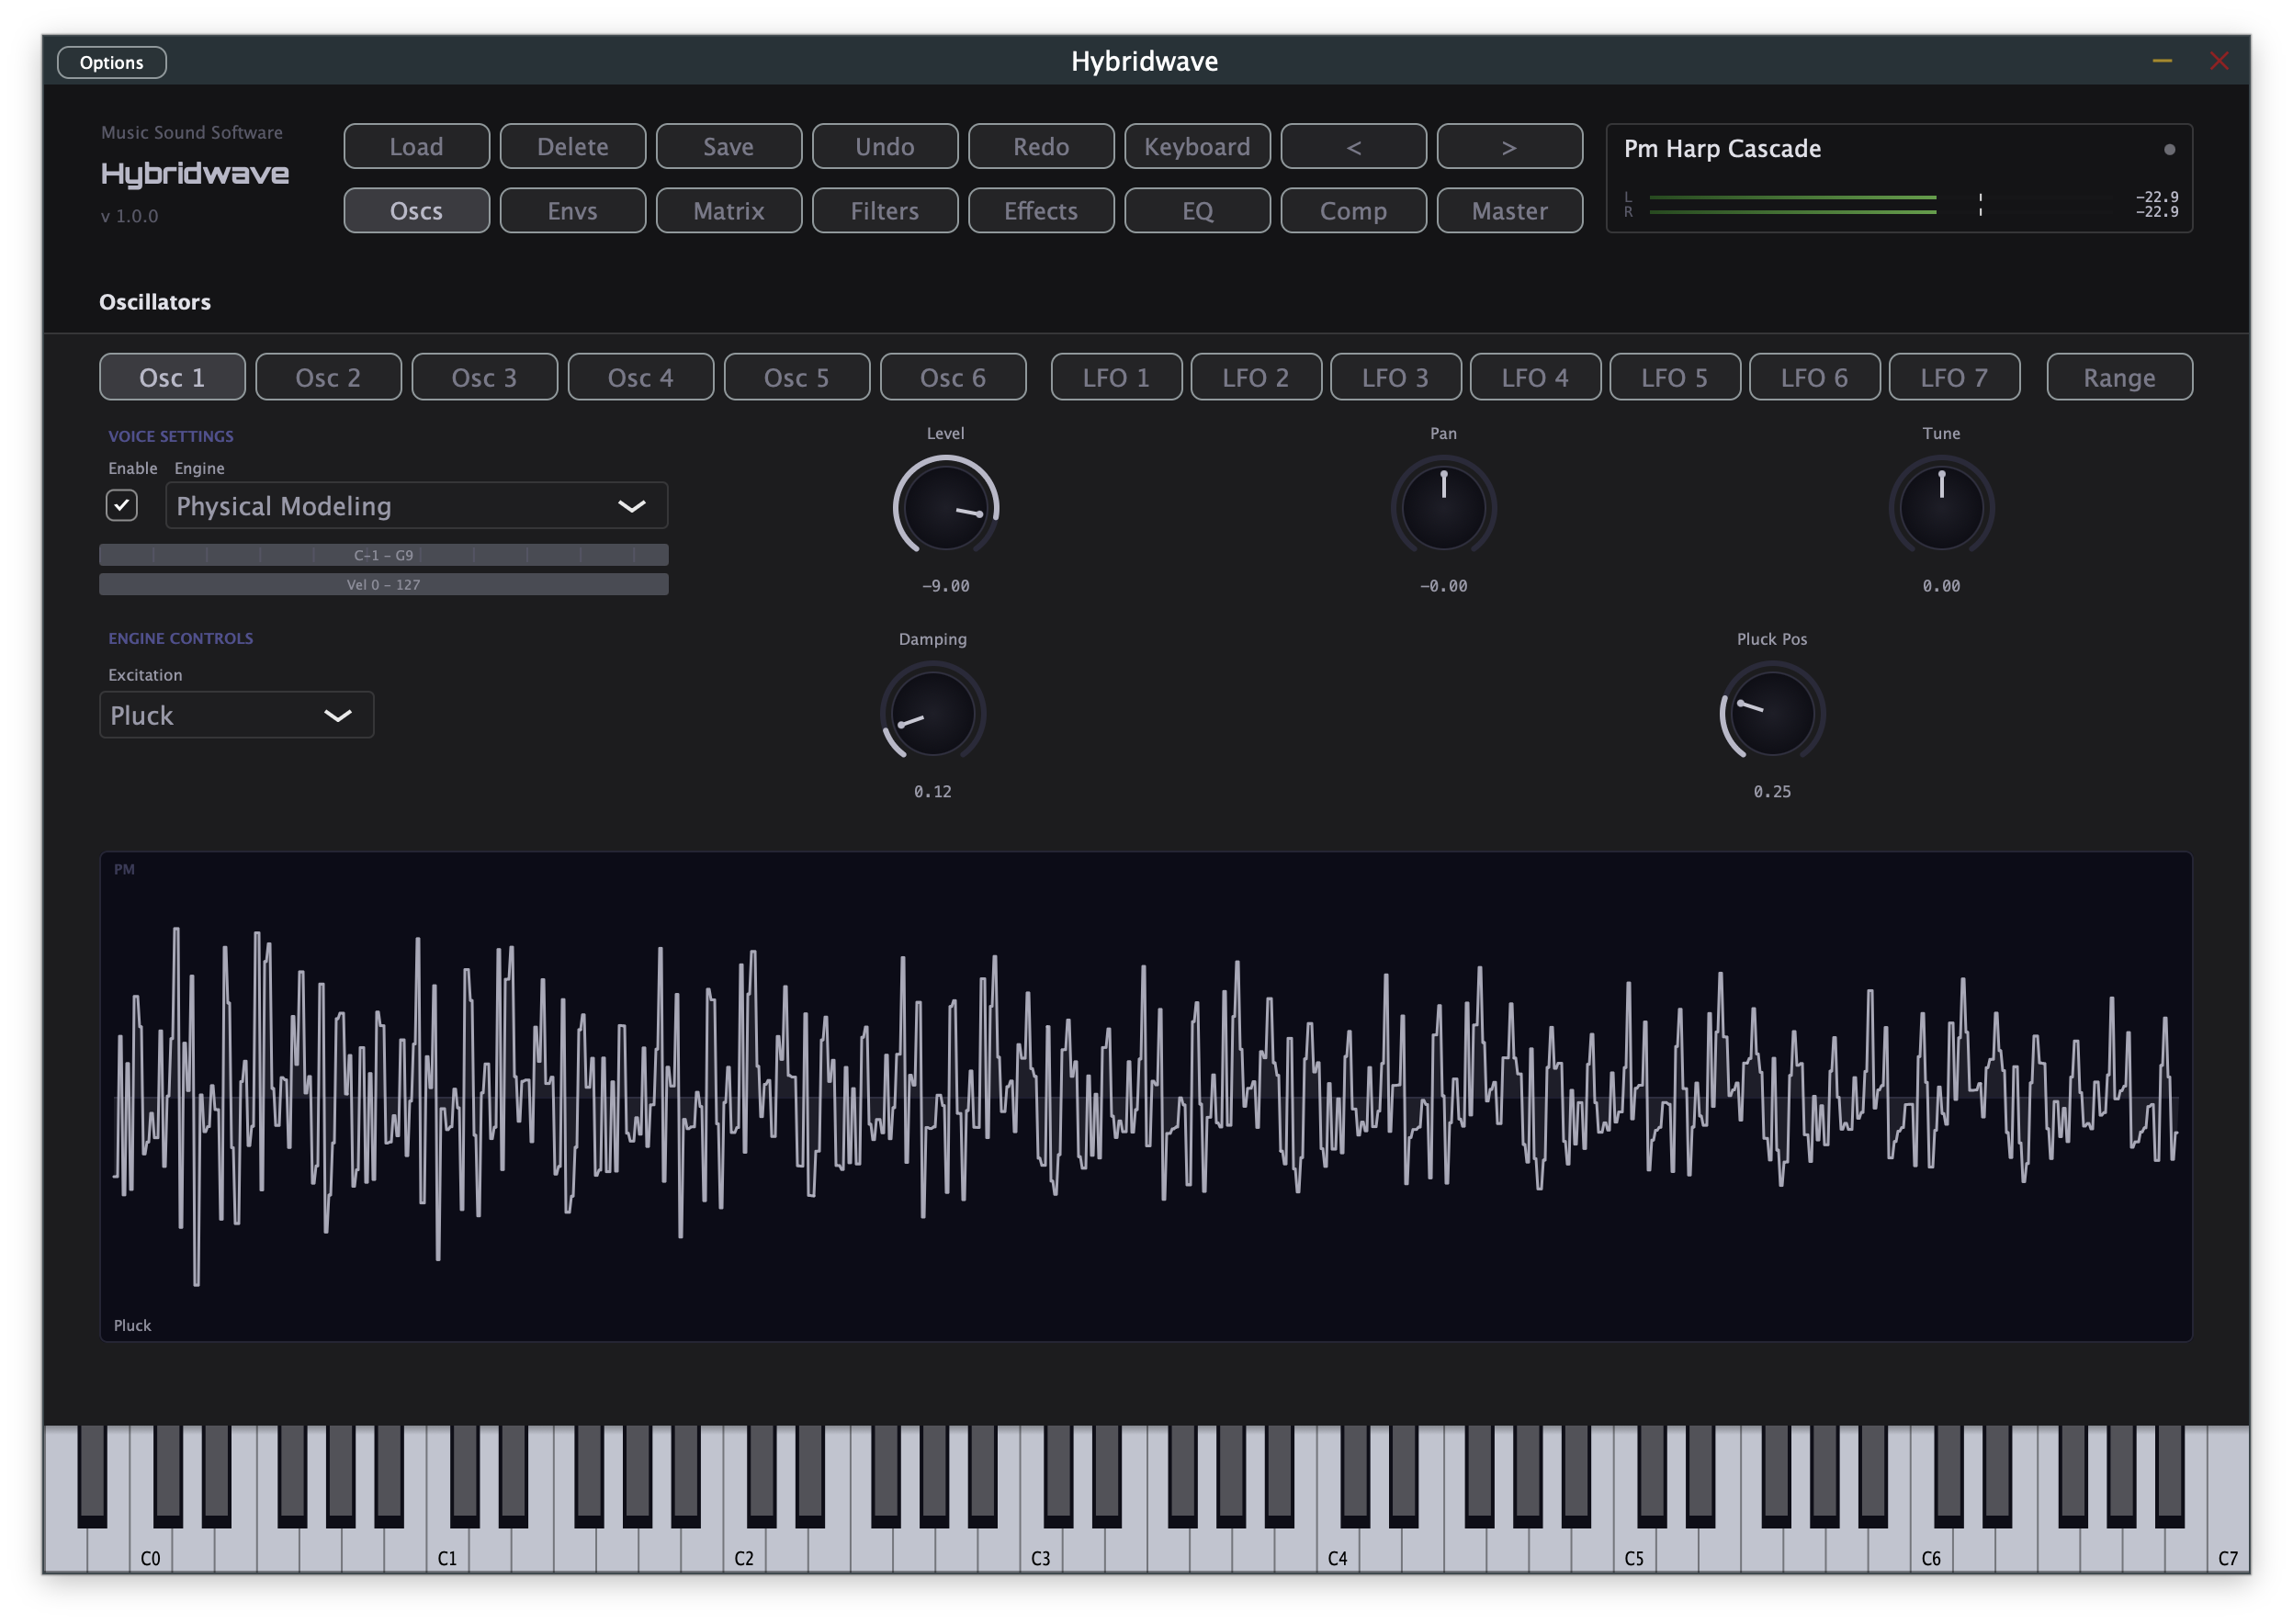
| Control | What it does |
|---|---|
| Excitation Type | Four ways of exciting the resonant string, each giving a different instrument family character from the same underlying model: Pluck, a full-spectrum burst for the classic plucked-string sound (guitar, harp); Strike, energy concentrated at the very start of the burst for a sparser, more mallet-like transient (marimba, struck bar); Bow, a smoothed excitation for a rounder, more legato character; and Blow, a breathier excitation with high-frequency emphasis, suited to wind-like textures. |
| Damping | The headline control. A single knob spanning from long, bright, ringing sustain at one end to a short, dark, muted decay at the other. This is a first-class Mod Matrix destination, so it can be driven by envelopes, LFOs, or velocity — routing an envelope here reproduces the natural behaviour of a real plucked string, which is brightest at the instant of the pluck and darkens as it rings out. |
| Pluck Position | Shapes the harmonic content by simulating where along the string the excitation happens, just like a real instrument sounds different depending on whether it's plucked near the bridge or near the centre. Moving away from centre thins the tone and emphasizes different harmonics; centre gives the fullest, richest harmonic content. |
Because Damping responds so well to modulation, this engine layers naturally with the Sampler or Granular engines for hybrid plucked-instrument patches, or on its own for percussive mallet and pluck sounds.
Bow and Blow are spectral variations on the same excite-then-decay model as Pluck and Strike, rather than a continuously-driven bowed or blown simulation with ongoing energy input — expect a smoother or breathier character, not true sustained bowing. There's also no Phase control on this engine: unlike Phase Distortion or Wavefolding, a recirculating resonant loop doesn't have a continuous-phase concept the way an oscillator does.
Route velocity to Damping for plucks that ring out longer and brighter the harder you play — a natural, physically-inspired response that's hard to fake with a static waveform.
Key & Velocity Splits
Every one of the six oscillator slots can be confined to its own key range and velocity range — the foundation for keyboard splits, velocity layers, and crossfades between engines.
Click Range on the Oscillators page to open the visual editor. Each enabled oscillator appears as a coloured box: its horizontal position and width show the key range, its vertical position and height show the velocity range. Drag any edge to resize, or use the table underneath for exact numeric entry.
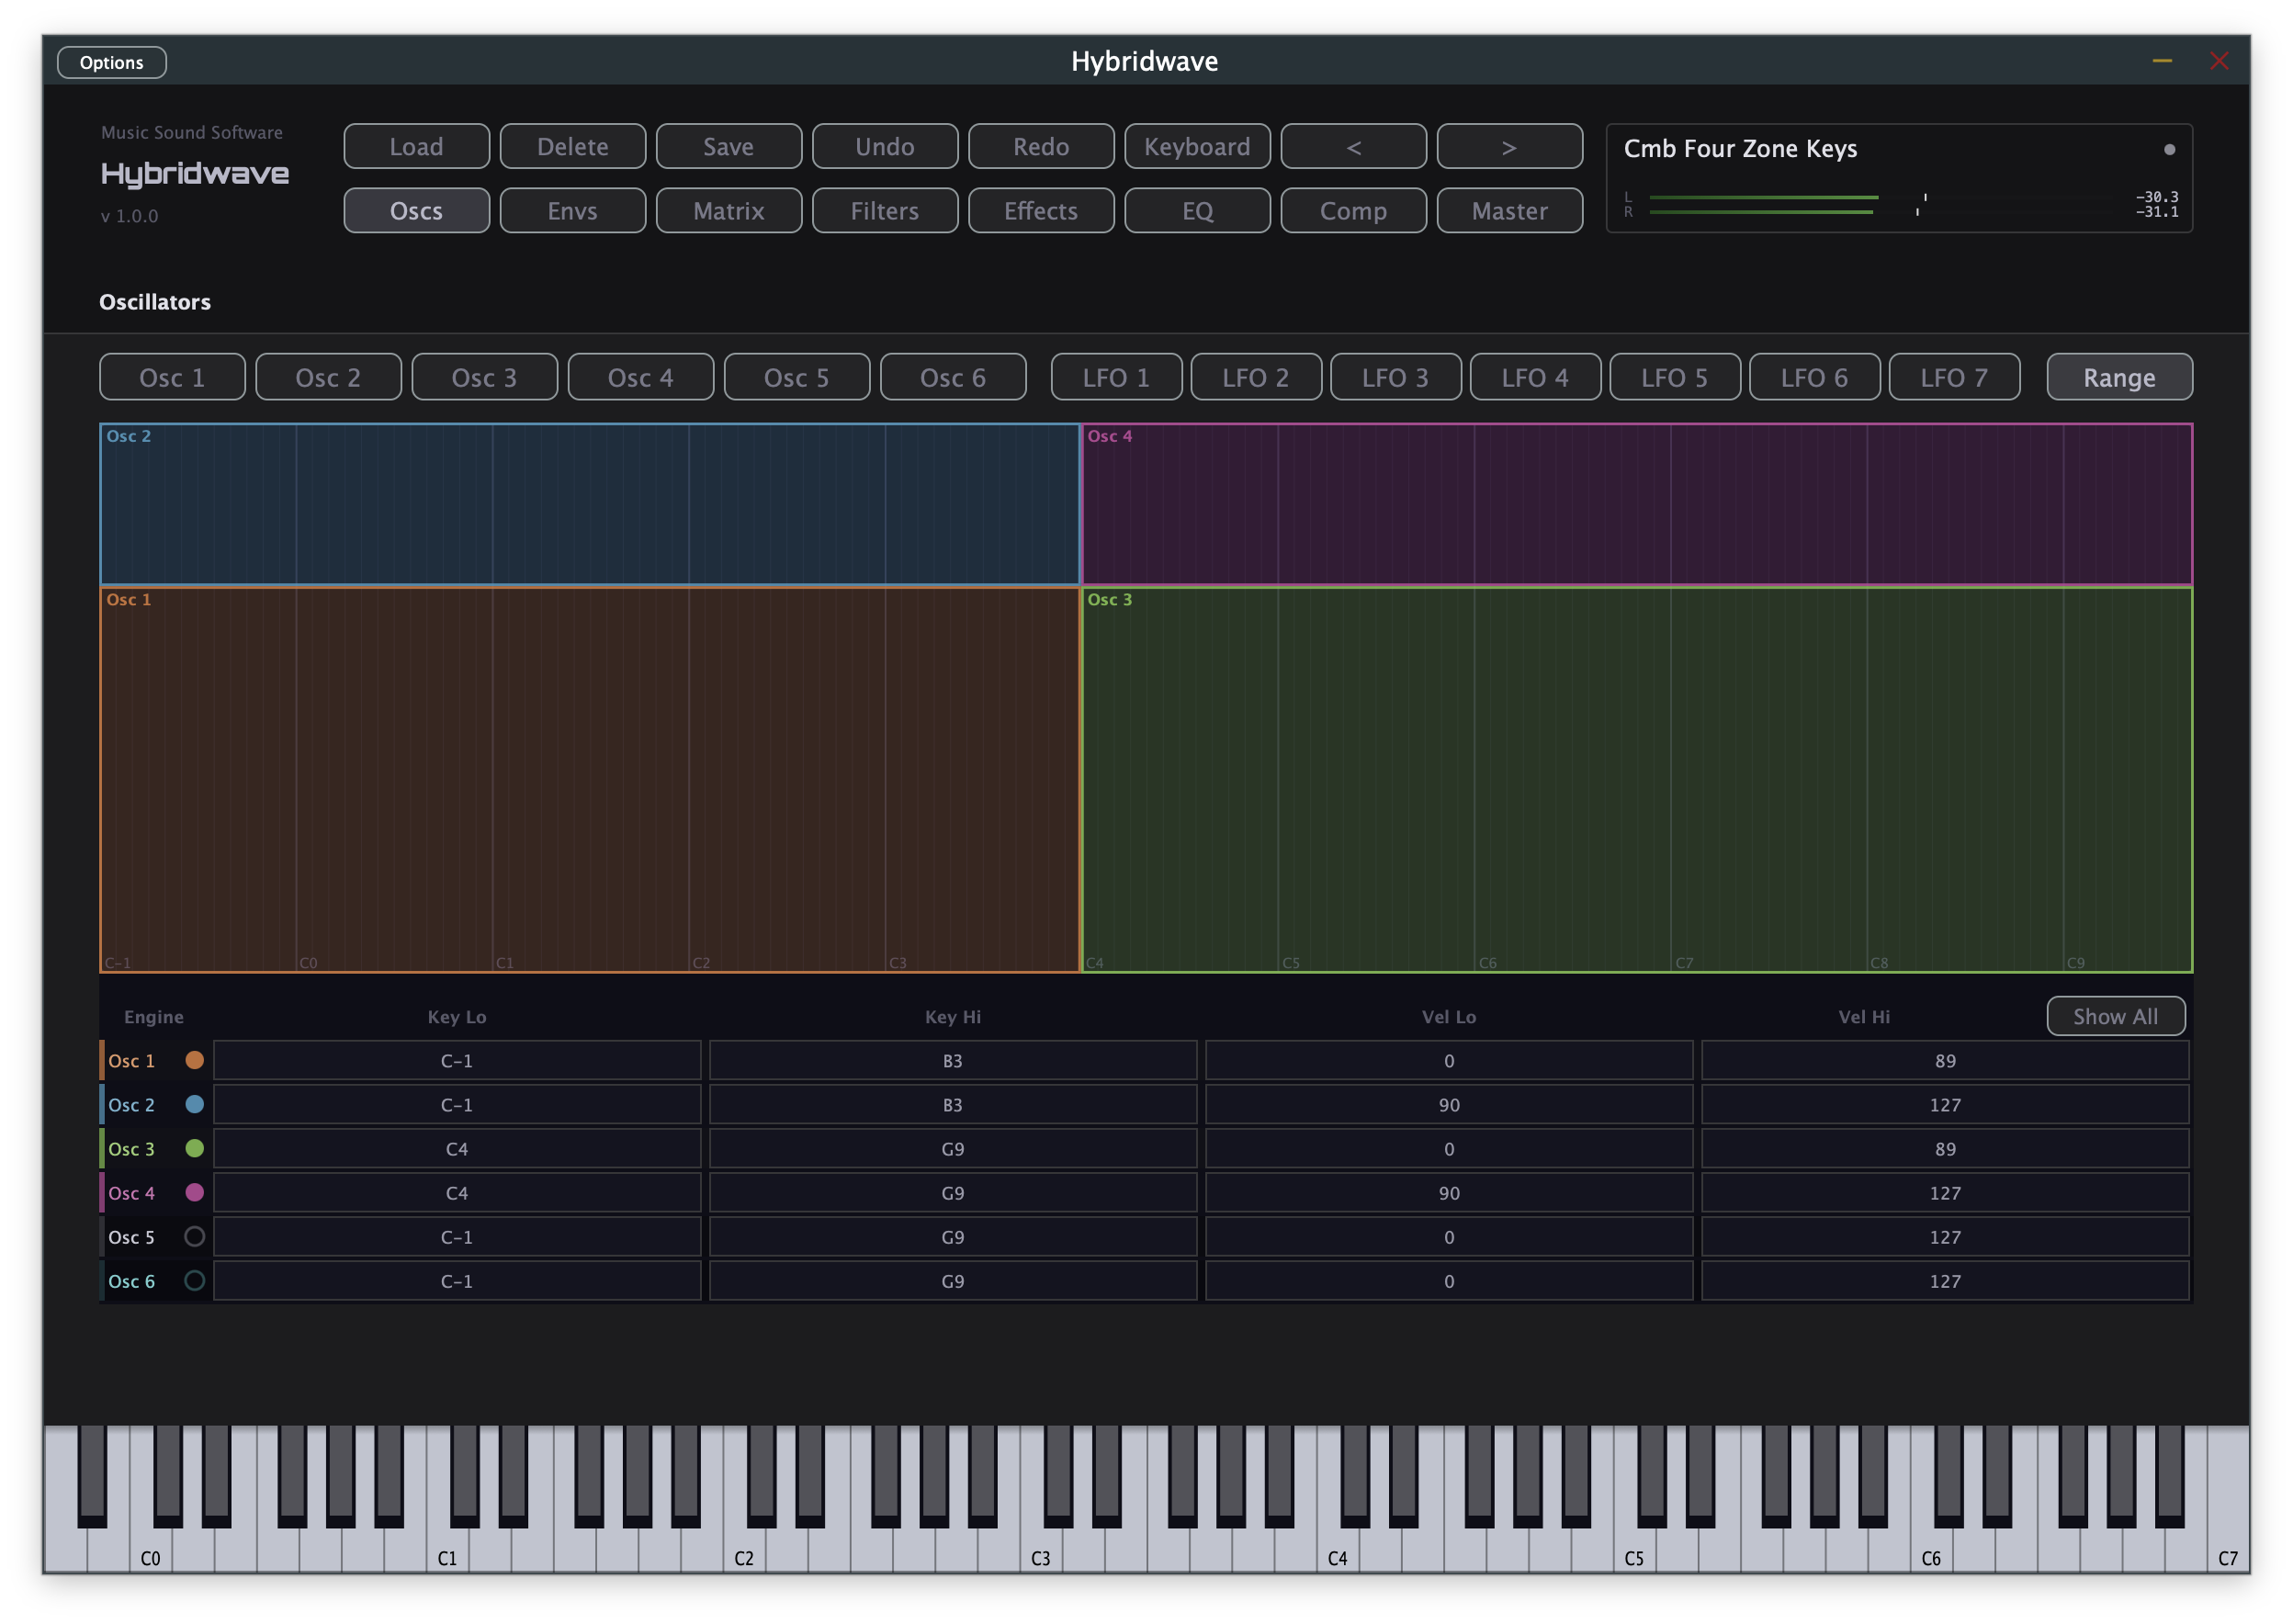
The compact strip visible on each oscillator's main tab — two thin bars, one for key range and one for velocity — mirrors whatever is set here, so you always have a quick visual reminder of a slot's range even outside the Range page.
Split the keyboard so bass notes trigger a Subtractive sub-oscillator and everything above middle C triggers a Wavetable lead. Or layer two Additive oscillators at the same key range but different velocity ranges, so playing softly gives a mellow tone and playing hard brings in a brighter layer.
LFOs
Seven low-frequency oscillators are available as modulation sources — free-running or tempo-synced, each independently routable through the mod matrix.
Select an LFO from the LFO 1–7 tabs alongside the oscillator tabs. Each has its own Waveform, Rate, Depth, and Phase offset. Three trigger modes control how the LFO's cycle lines up with new notes:
| Mode | Behaviour |
|---|---|
| Free | Runs continuously, never resetting — every voice shares the same ongoing phase. |
| Mono | Resets to its starting phase only when all voices are released and a new note begins — natural for monophonic-style playing. |
| Poly | Resets independently for every new voice, so each note gets its own fresh LFO cycle from note-on. |
Enable Sync to lock the rate to host tempo instead of Hz, then pick a note division (from whole notes down to fast subdivisions) from the rate dropdown that appears.
LFOs don't have fixed destinations — like every other modulation source, they're routed through the Mod Matrix. A single LFO can simultaneously modulate filter cutoff, an oscillator's pan, and another LFO's depth, all at different amounts.
Envelopes
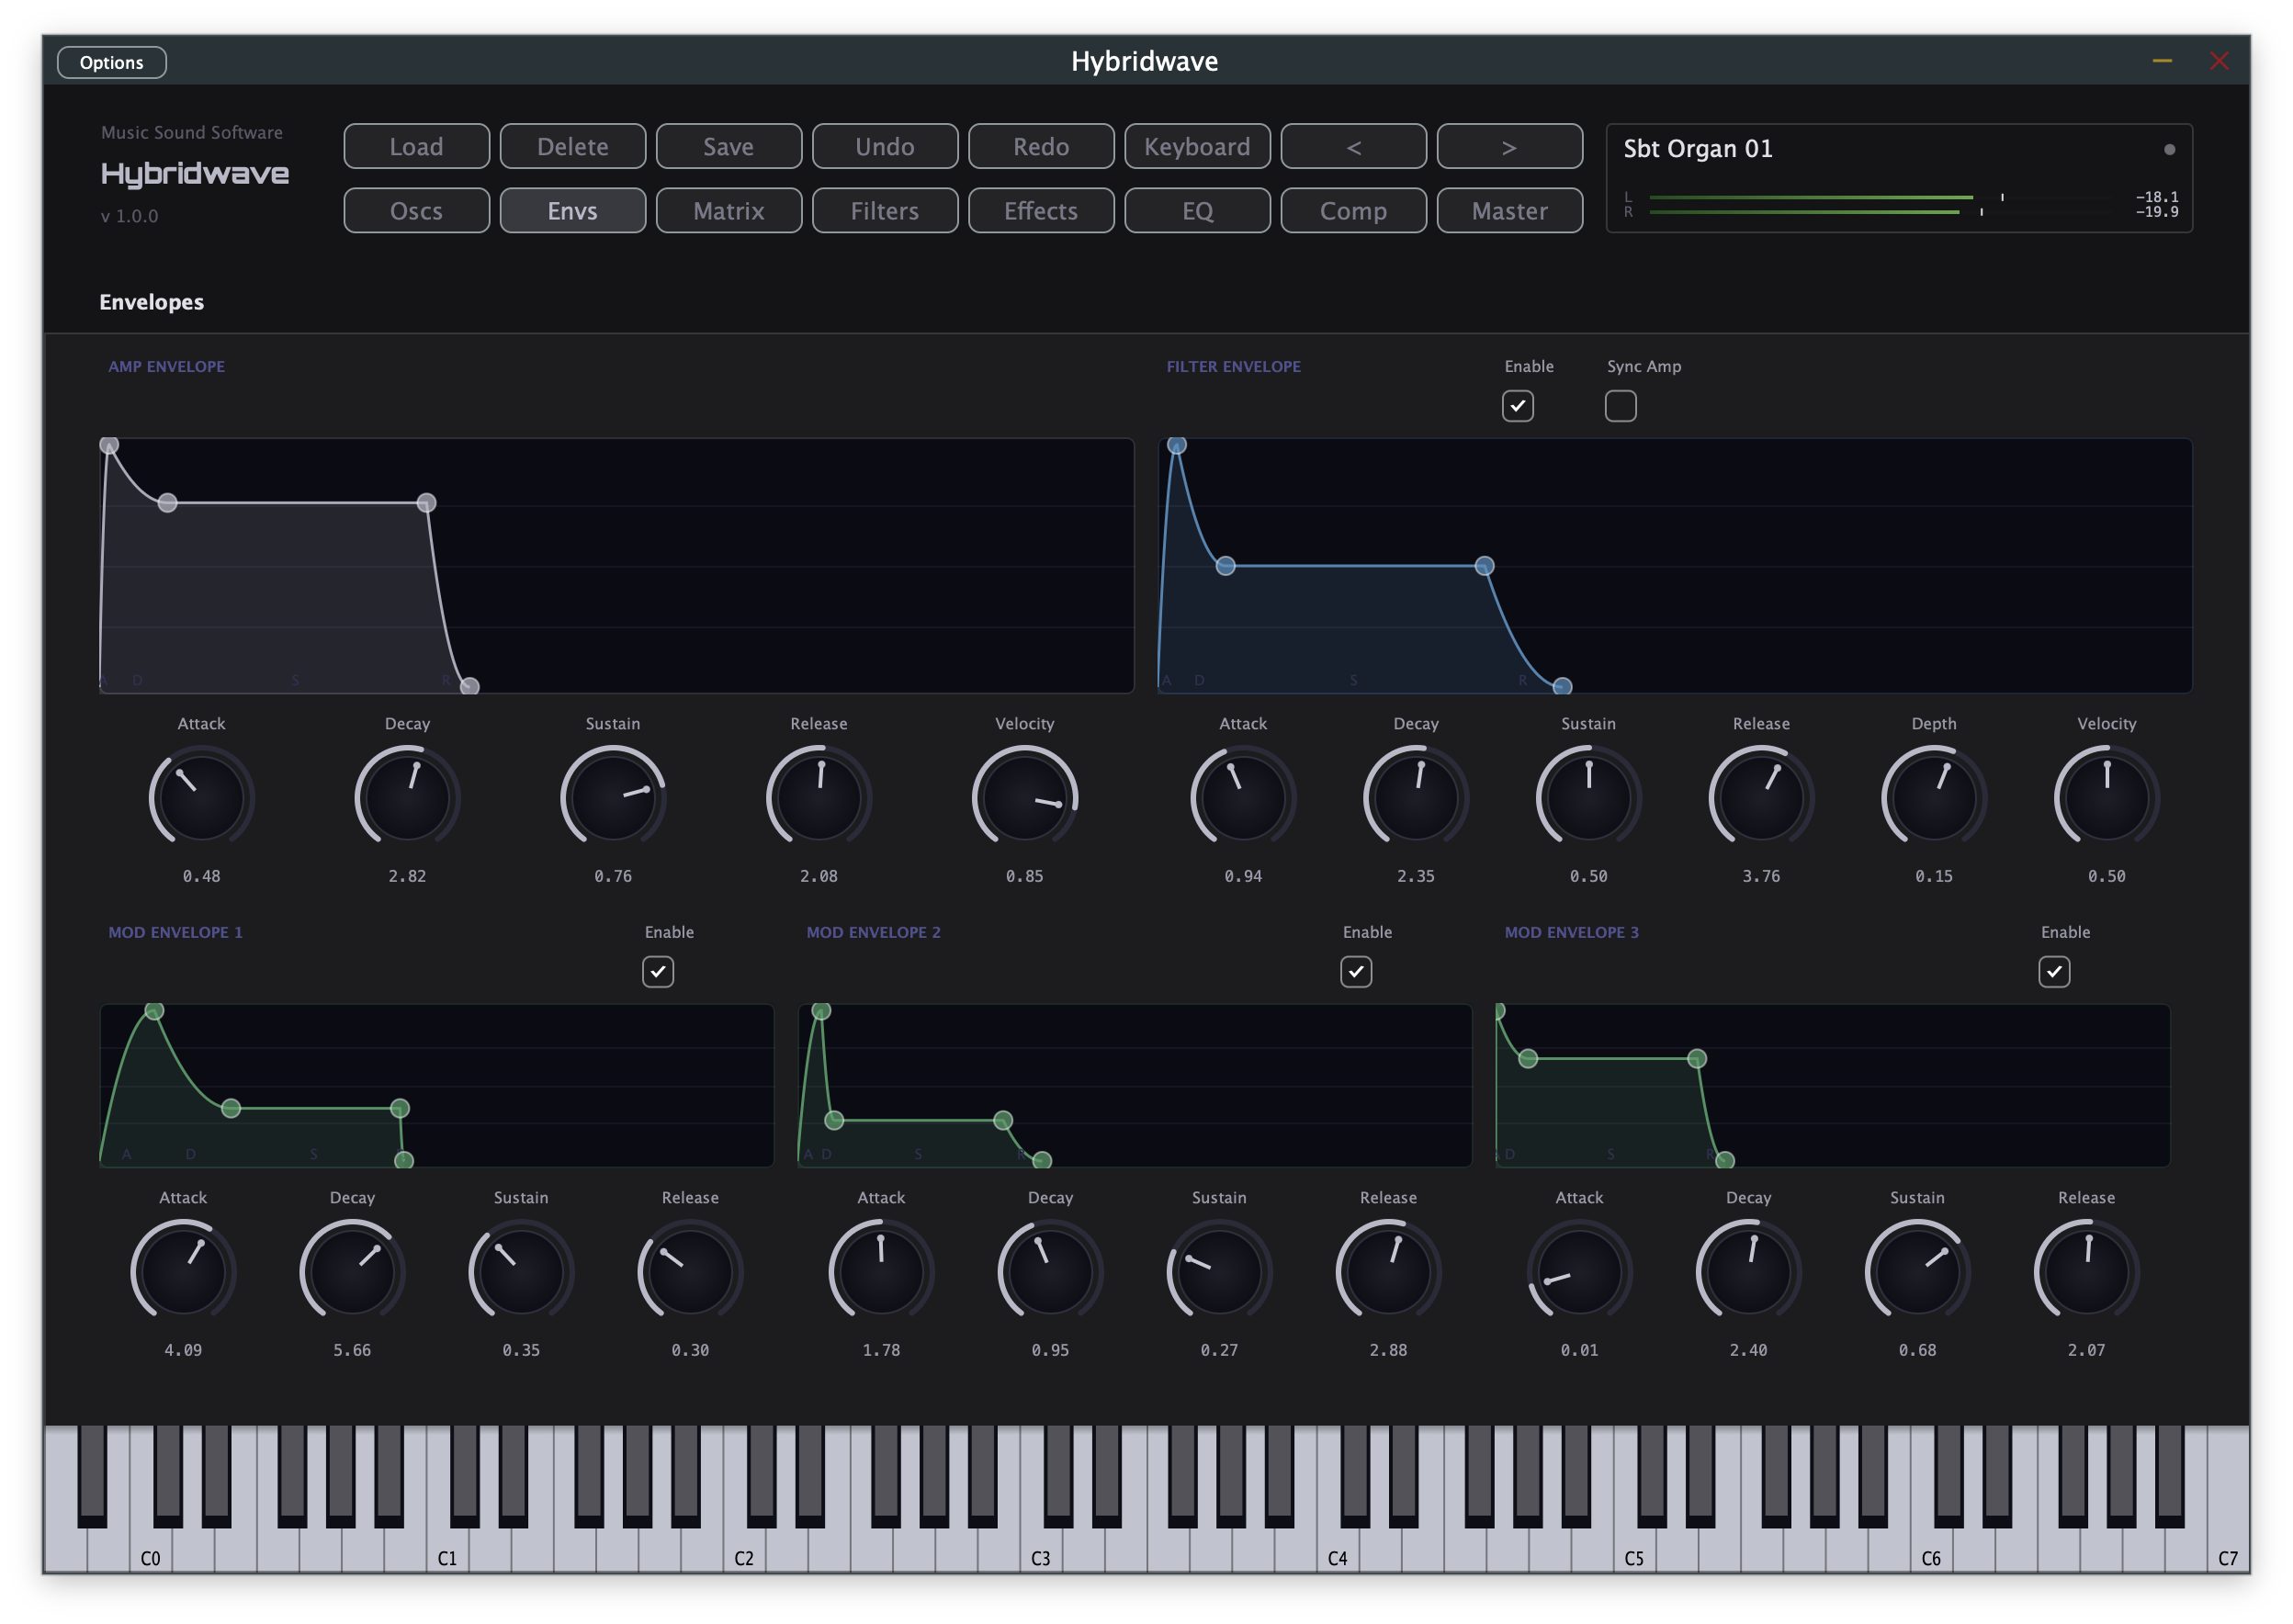
Two dedicated envelopes always shape every voice — amplitude and filter — plus three free-floating envelopes you can route anywhere.
Amp Envelope
Always active — this is what shapes every note's loudness over time. Attack, Decay, Sustain, and Release work as on any ADSR envelope; Velocity sets how strongly playing dynamics affect the envelope's overall level.
Filter Envelope
Shapes filter cutoff over time, independently of the amp envelope — the classic combination for plucky or swelling filter movements. Has the same four ADSR stages plus Depth (how far the envelope pushes cutoff) and Velocity. It only affects a filter when that filter's own Env Amt knob (on the Filters page) is turned up.
Mod Envelopes 1–3
Three additional envelopes, disabled by default, with no fixed destination of their own. Enable one and route it through the Mod Matrix to modulate anything — pan, an oscillator's wavetable position, an effect's parameter, whatever the preset calls for.
Mod Matrix
The connective tissue of the whole synth — twelve modulation slots, each routing one source to one destination at an adjustable amount.
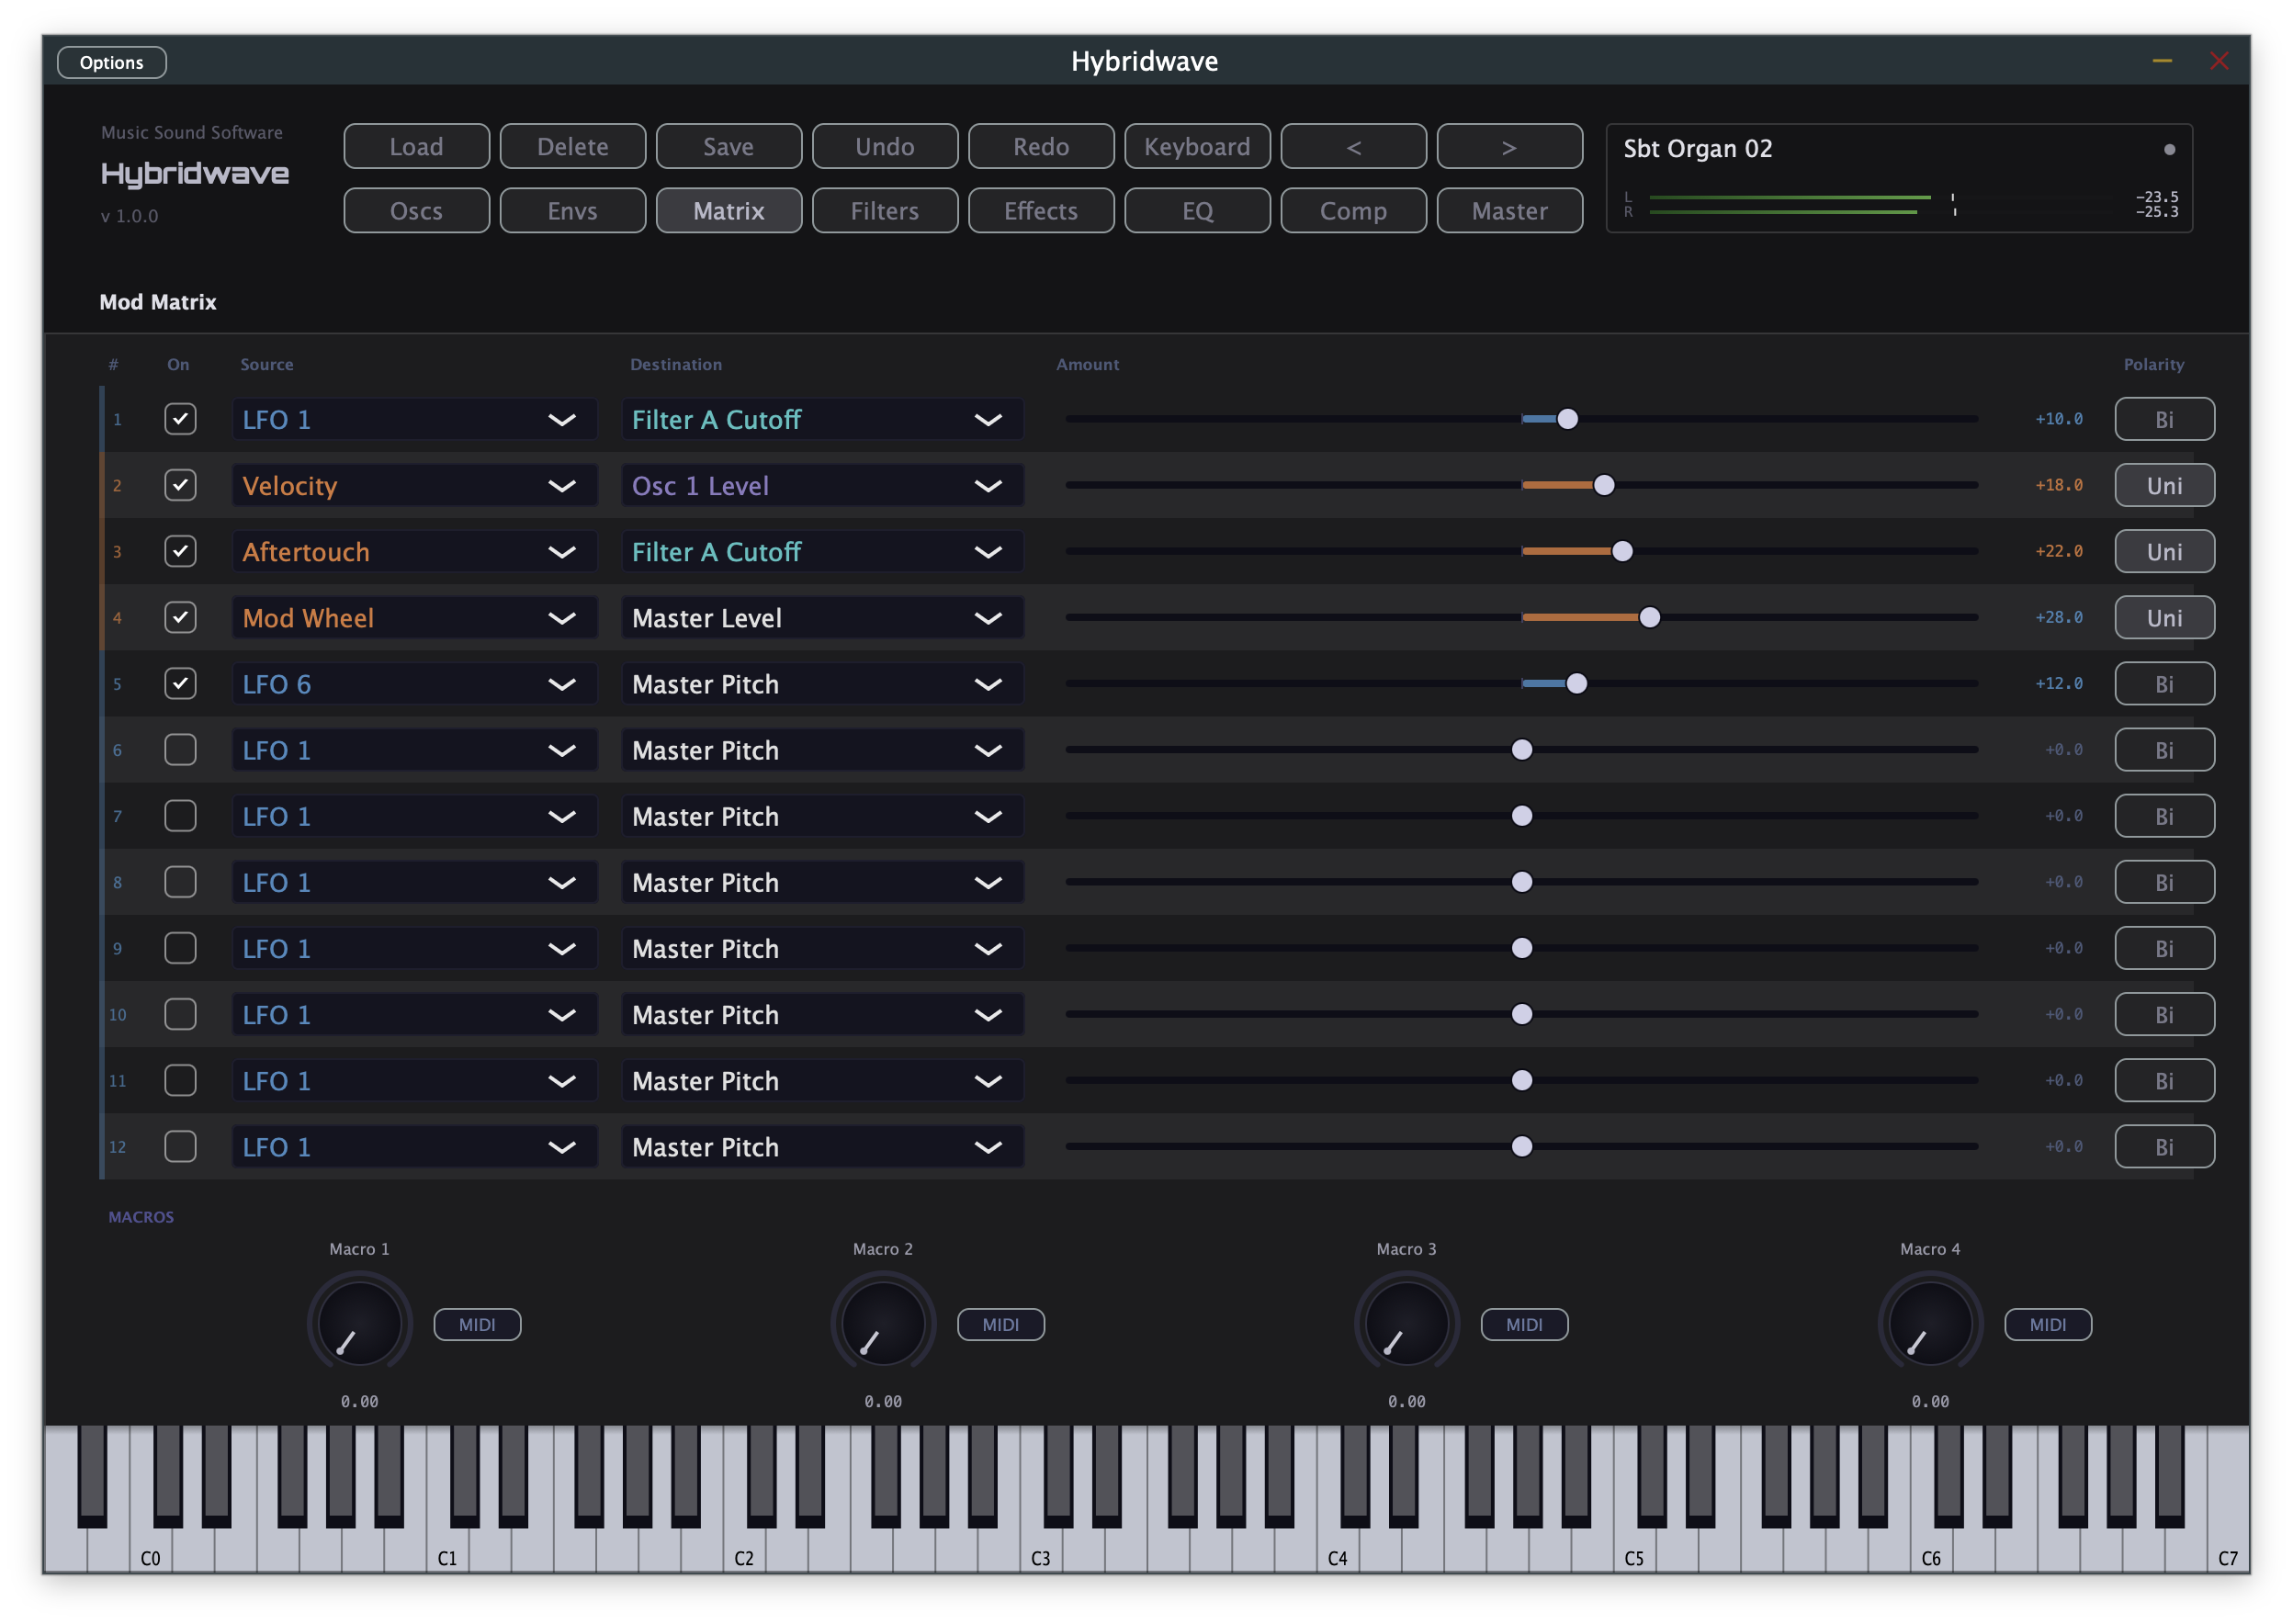
Each row has a Source, a Destination, an Amount slider, and a Polarity toggle (bipolar swings the destination both up and down from centre; unipolar only pushes it one direction). Toggle a row's On checkbox to enable it — routings stay configured even when switched off, so you can audition a preset with and without a given modulation.
Sources
All 7 LFOs, the Amp and Filter envelopes, the 3 free Mod Envelopes, Velocity, Mod Wheel, Aftertouch, Key Follow, a Random source (a new random value per note), the 4 Macro knobs, and 9 incoming MIDI CC values — pre-labelled so a controller's assignable knobs read sensibly by default.
| Category | Sources |
|---|---|
| LFOs | LFO 1–7 |
| Envelopes | Amp Env, Filter Env, Mod Env 1–3 |
| Performance | Velocity, Mod Wheel, Aftertouch, Key Follow, Random |
| Macros | Macro 1–4 |
| MIDI CC | CC2 Breath, CC7 Volume, CC10 Pan, CC11 Expression, CC71 Resonance, CC72 Release, CC73 Attack, CC74 Brightness, CC75 Decay |
Destinations
Around 70 destinations, including Master Pitch and Level, both filters' Cutoff and Resonance, every stage of the Amp envelope, and — per oscillator, for all 6 slots — Pitch, Level, Pan, and whichever engine-specific parameter is relevant (Wavetable Position, FM Ratio and Index, Grain Position/Size/Density, DCW, Fold Amount, or Damping), plus every effect's key parameters and each LFO's own depth.
| Category | Destinations |
|---|---|
| Master | Pitch, Level |
| Filter A | Cutoff, Resonance |
| Filter B | Cutoff, Resonance |
| Amp Envelope | Attack, Decay, Sustain, Release |
| Per oscillator (× 6 slots) | Pitch, Level, Pan, WT Position, FM Ratio, FM Index, Grain Position, Grain Size, Grain Density, DCW, Fold Amount, Damping |
| Effects | Phaser Depth/Rate, Chorus Depth/Rate, Delay Time/Feedback, Reverb Size/Damping, Distortion Drive, Bit Crush |
| LFO Depths | LFO 1–7 Depth — lets one LFO modulate another |
Macros
The four Macro knobs at the bottom have no fixed effect of their own — like any other source, route a Macro to whatever you want it to control, then click its MIDI button to learn an external CC or hardware knob to it. This is the easiest way to expose a single, meaningful performance control (like "brightness" or "movement") that quietly drives several parameters underneath.
Filters
Two independent filters, A and B, that can run in series, in parallel, or with either one soloed — with twelve filter types between them, from clean lowpasses to a soft-clip waveshaper.
| Routing | Signal path |
|---|---|
| Serial A→B | Everything passes through Filter A, then Filter B — stack two filter types for more complex shaping. |
| Parallel | The signal splits, passes through A and B independently, and sums back together. |
| A Only | Only Filter A is in the signal path. |
| B Only | Only Filter B is in the signal path. |
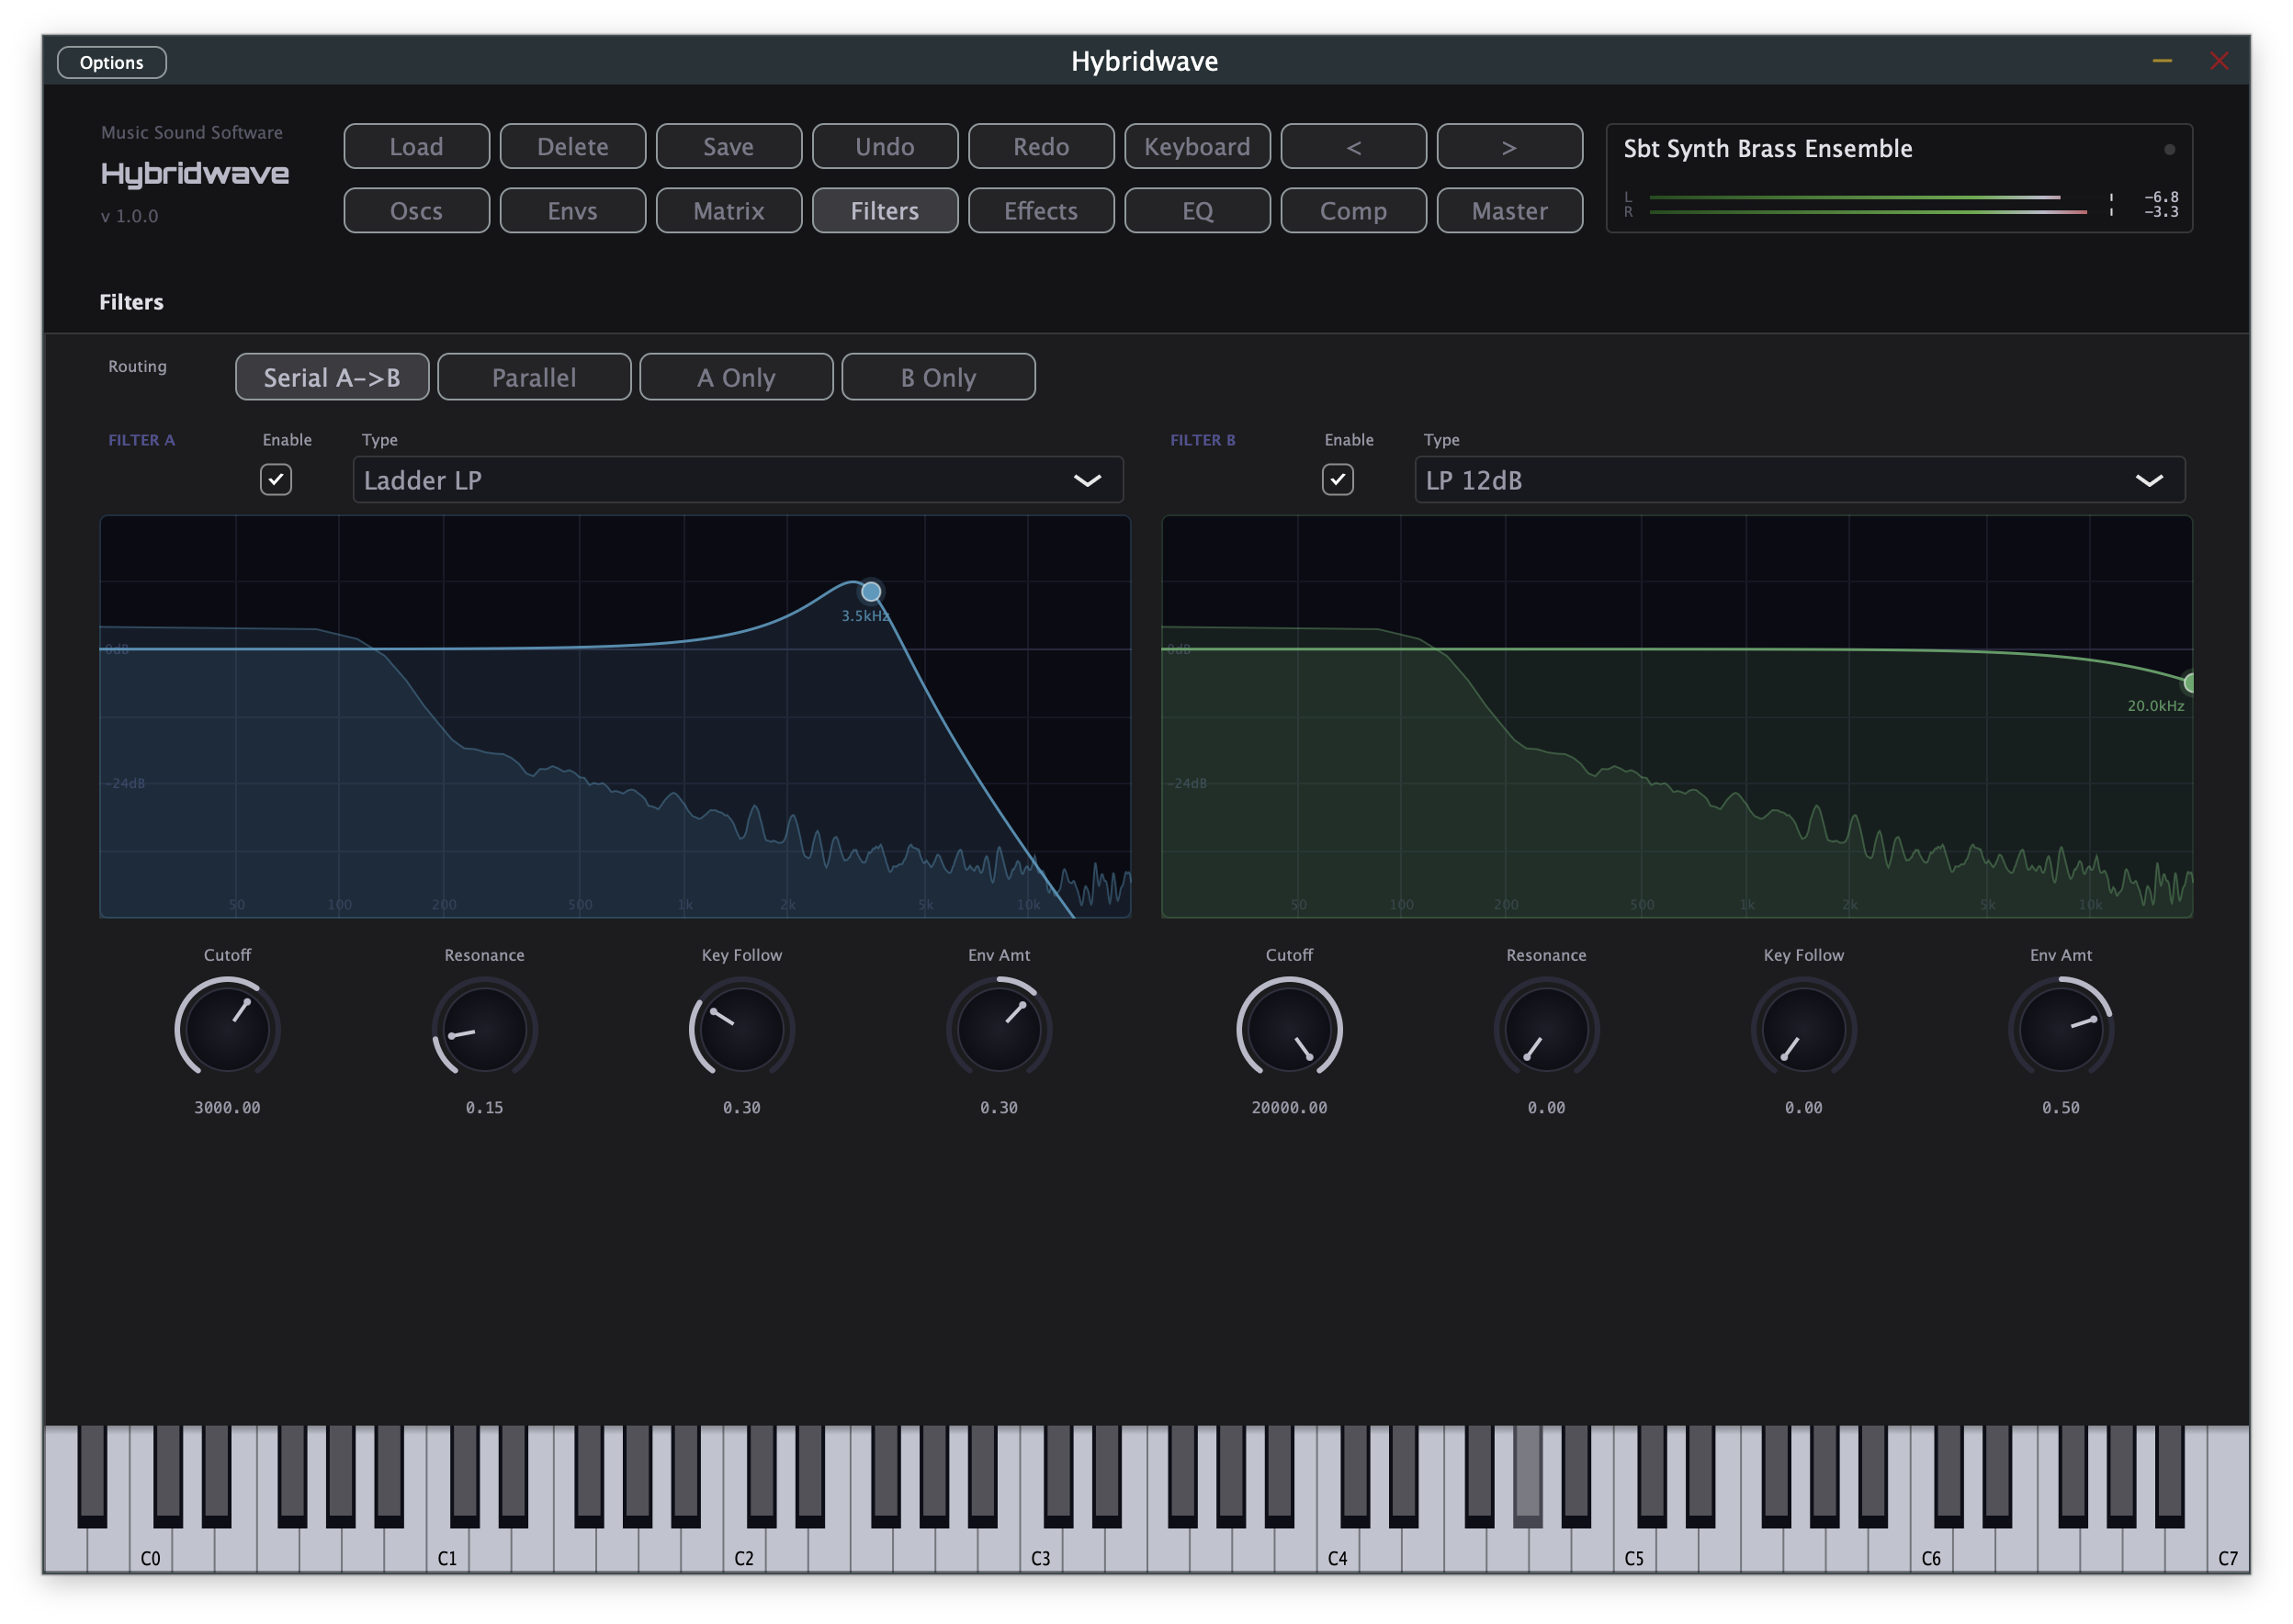
Both filters share the same four core controls: Cutoff, Resonance, Key Follow (how much cutoff tracks the note played, for consistent brightness across the keyboard), and Env Amt (how much the Filter Envelope pushes cutoff). Drag the handle directly on the response curve as a shortcut for adjusting Cutoff and Resonance together. Selecting the Waveshaper type relabels Cutoff and Resonance to Drive and Tone.
Effects
Nine effect slots that you can freely reorder — drag a card to change where it sits in the chain. Each has its own enable switch and wet/dry blend.
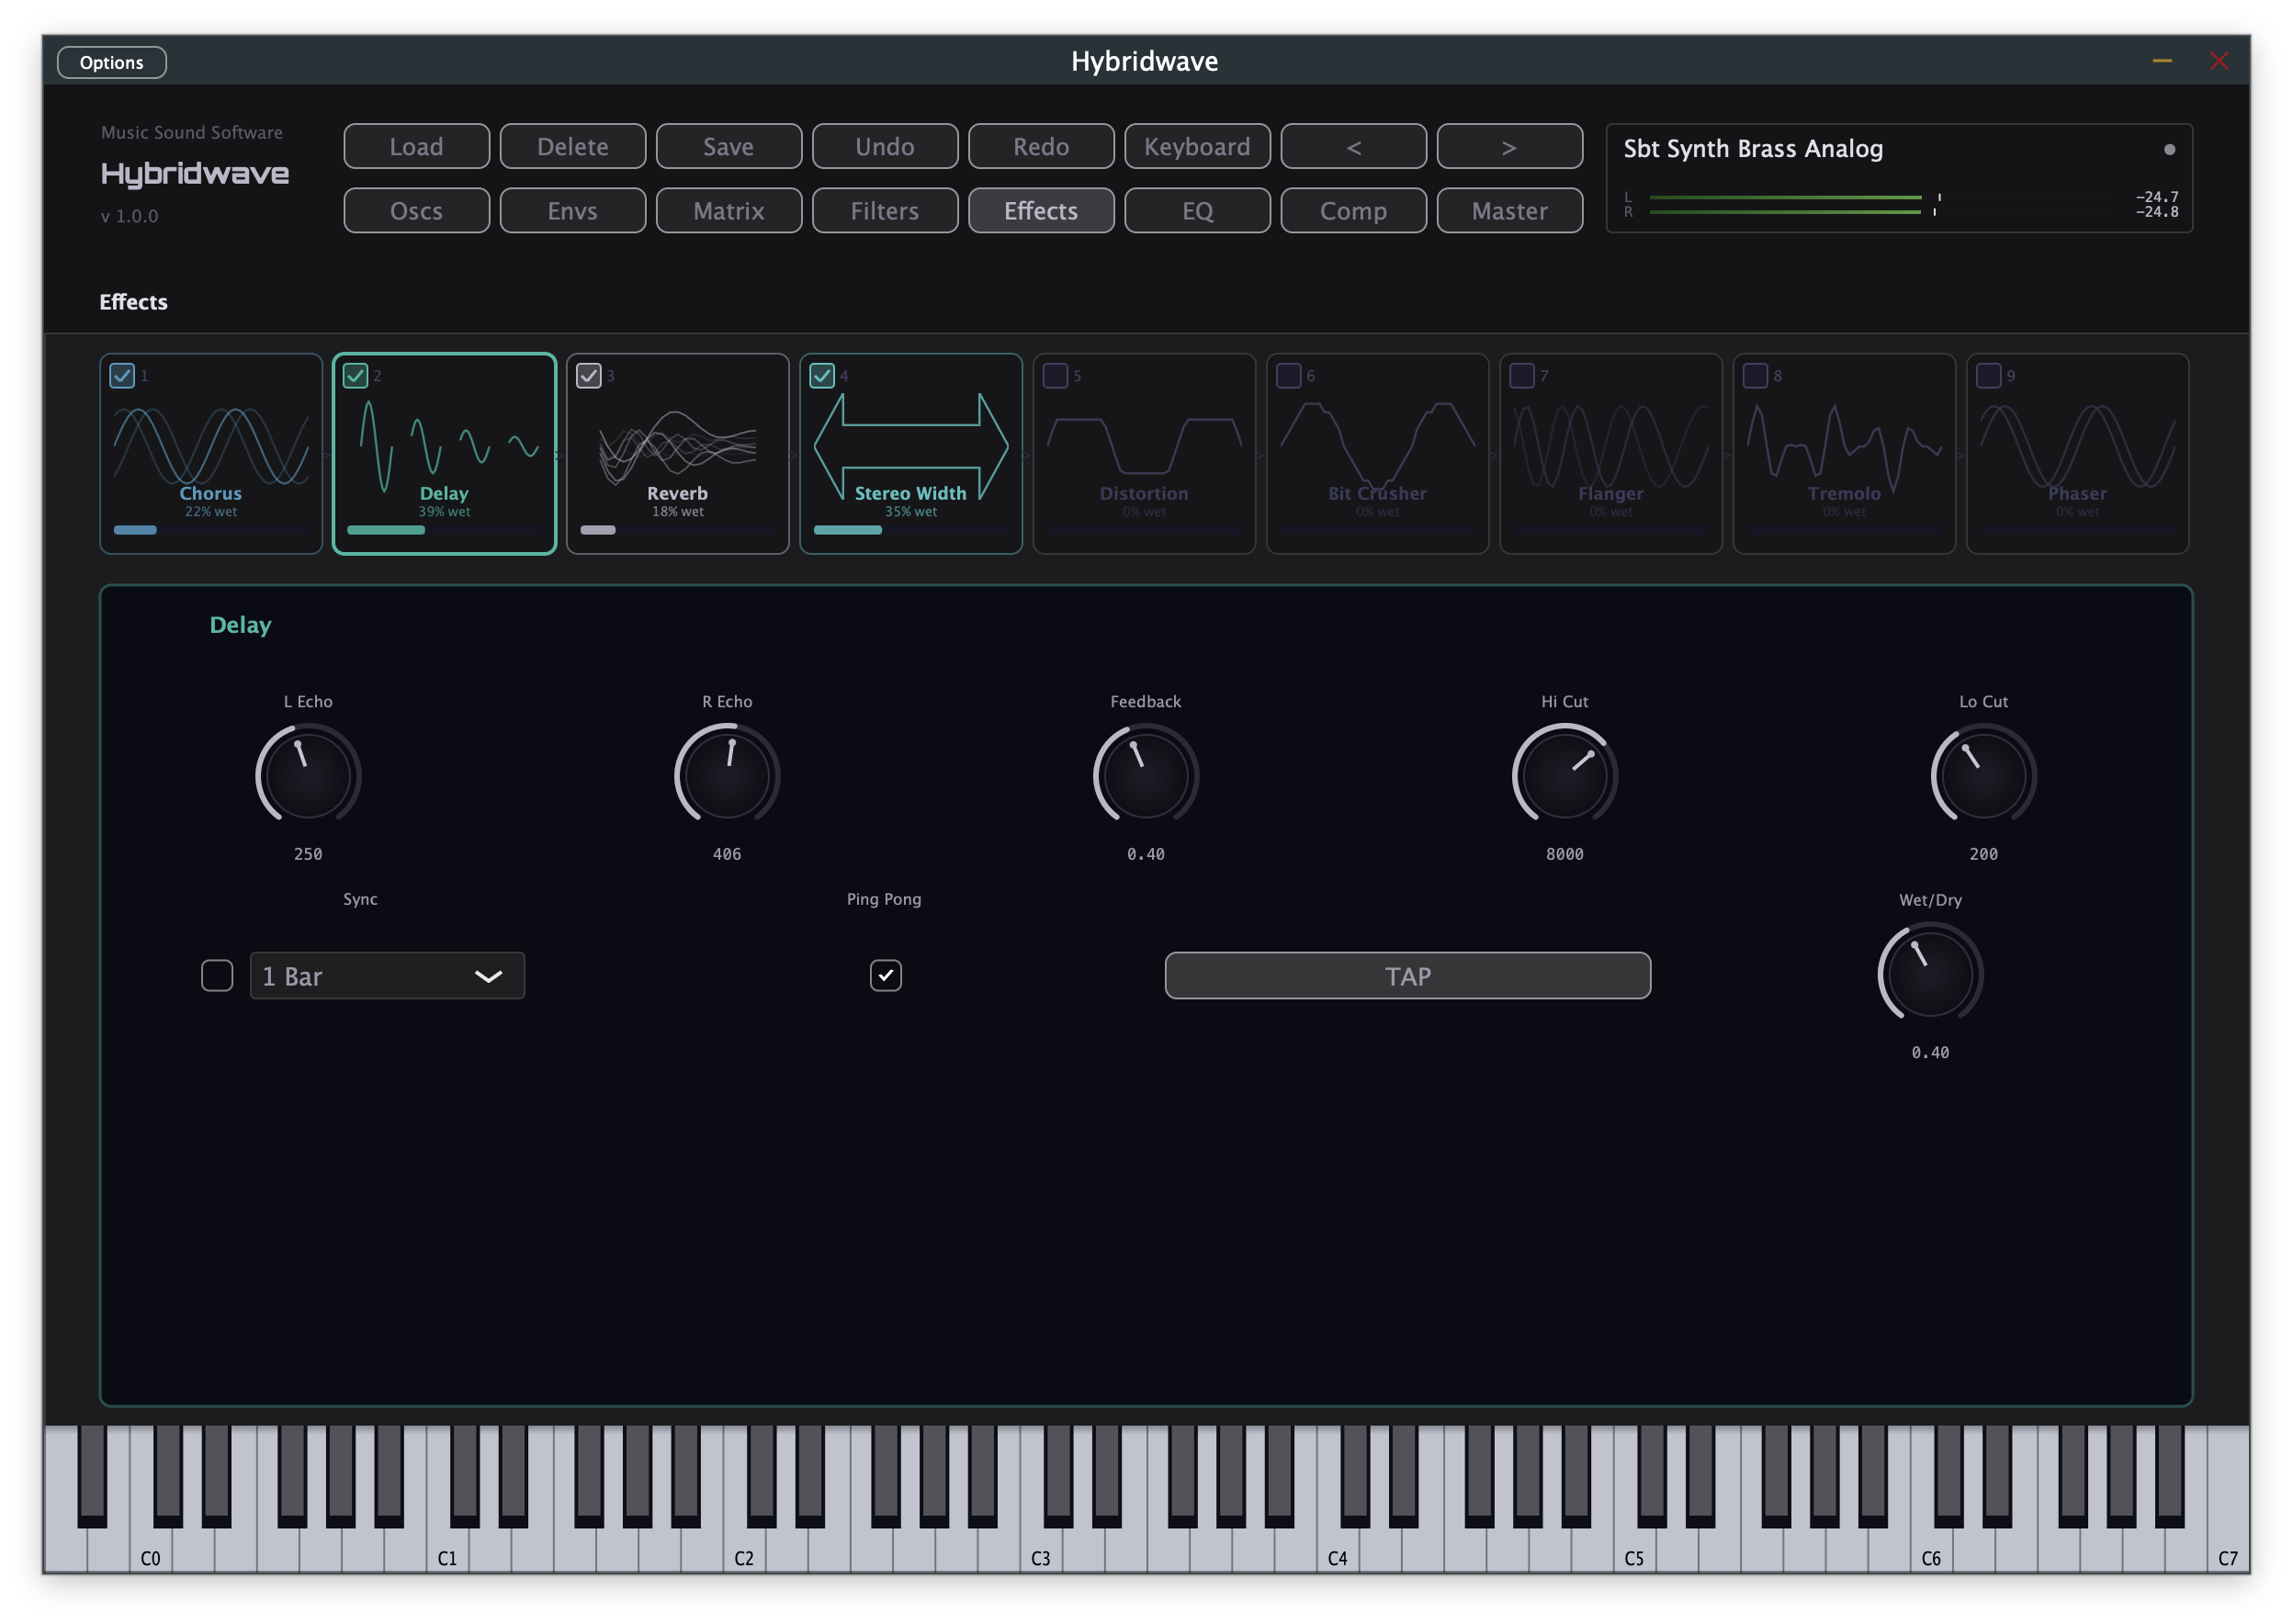
Click a card to open its full parameter set below the chain. Each slot's checkbox bypasses it independently, so you can compare a preset with an effect on and off without losing your settings or its position in the chain.
Equaliser
An 8-band parametric EQ sitting after the effects chain, with a live spectrum overlay so you can see exactly what you're shaping.
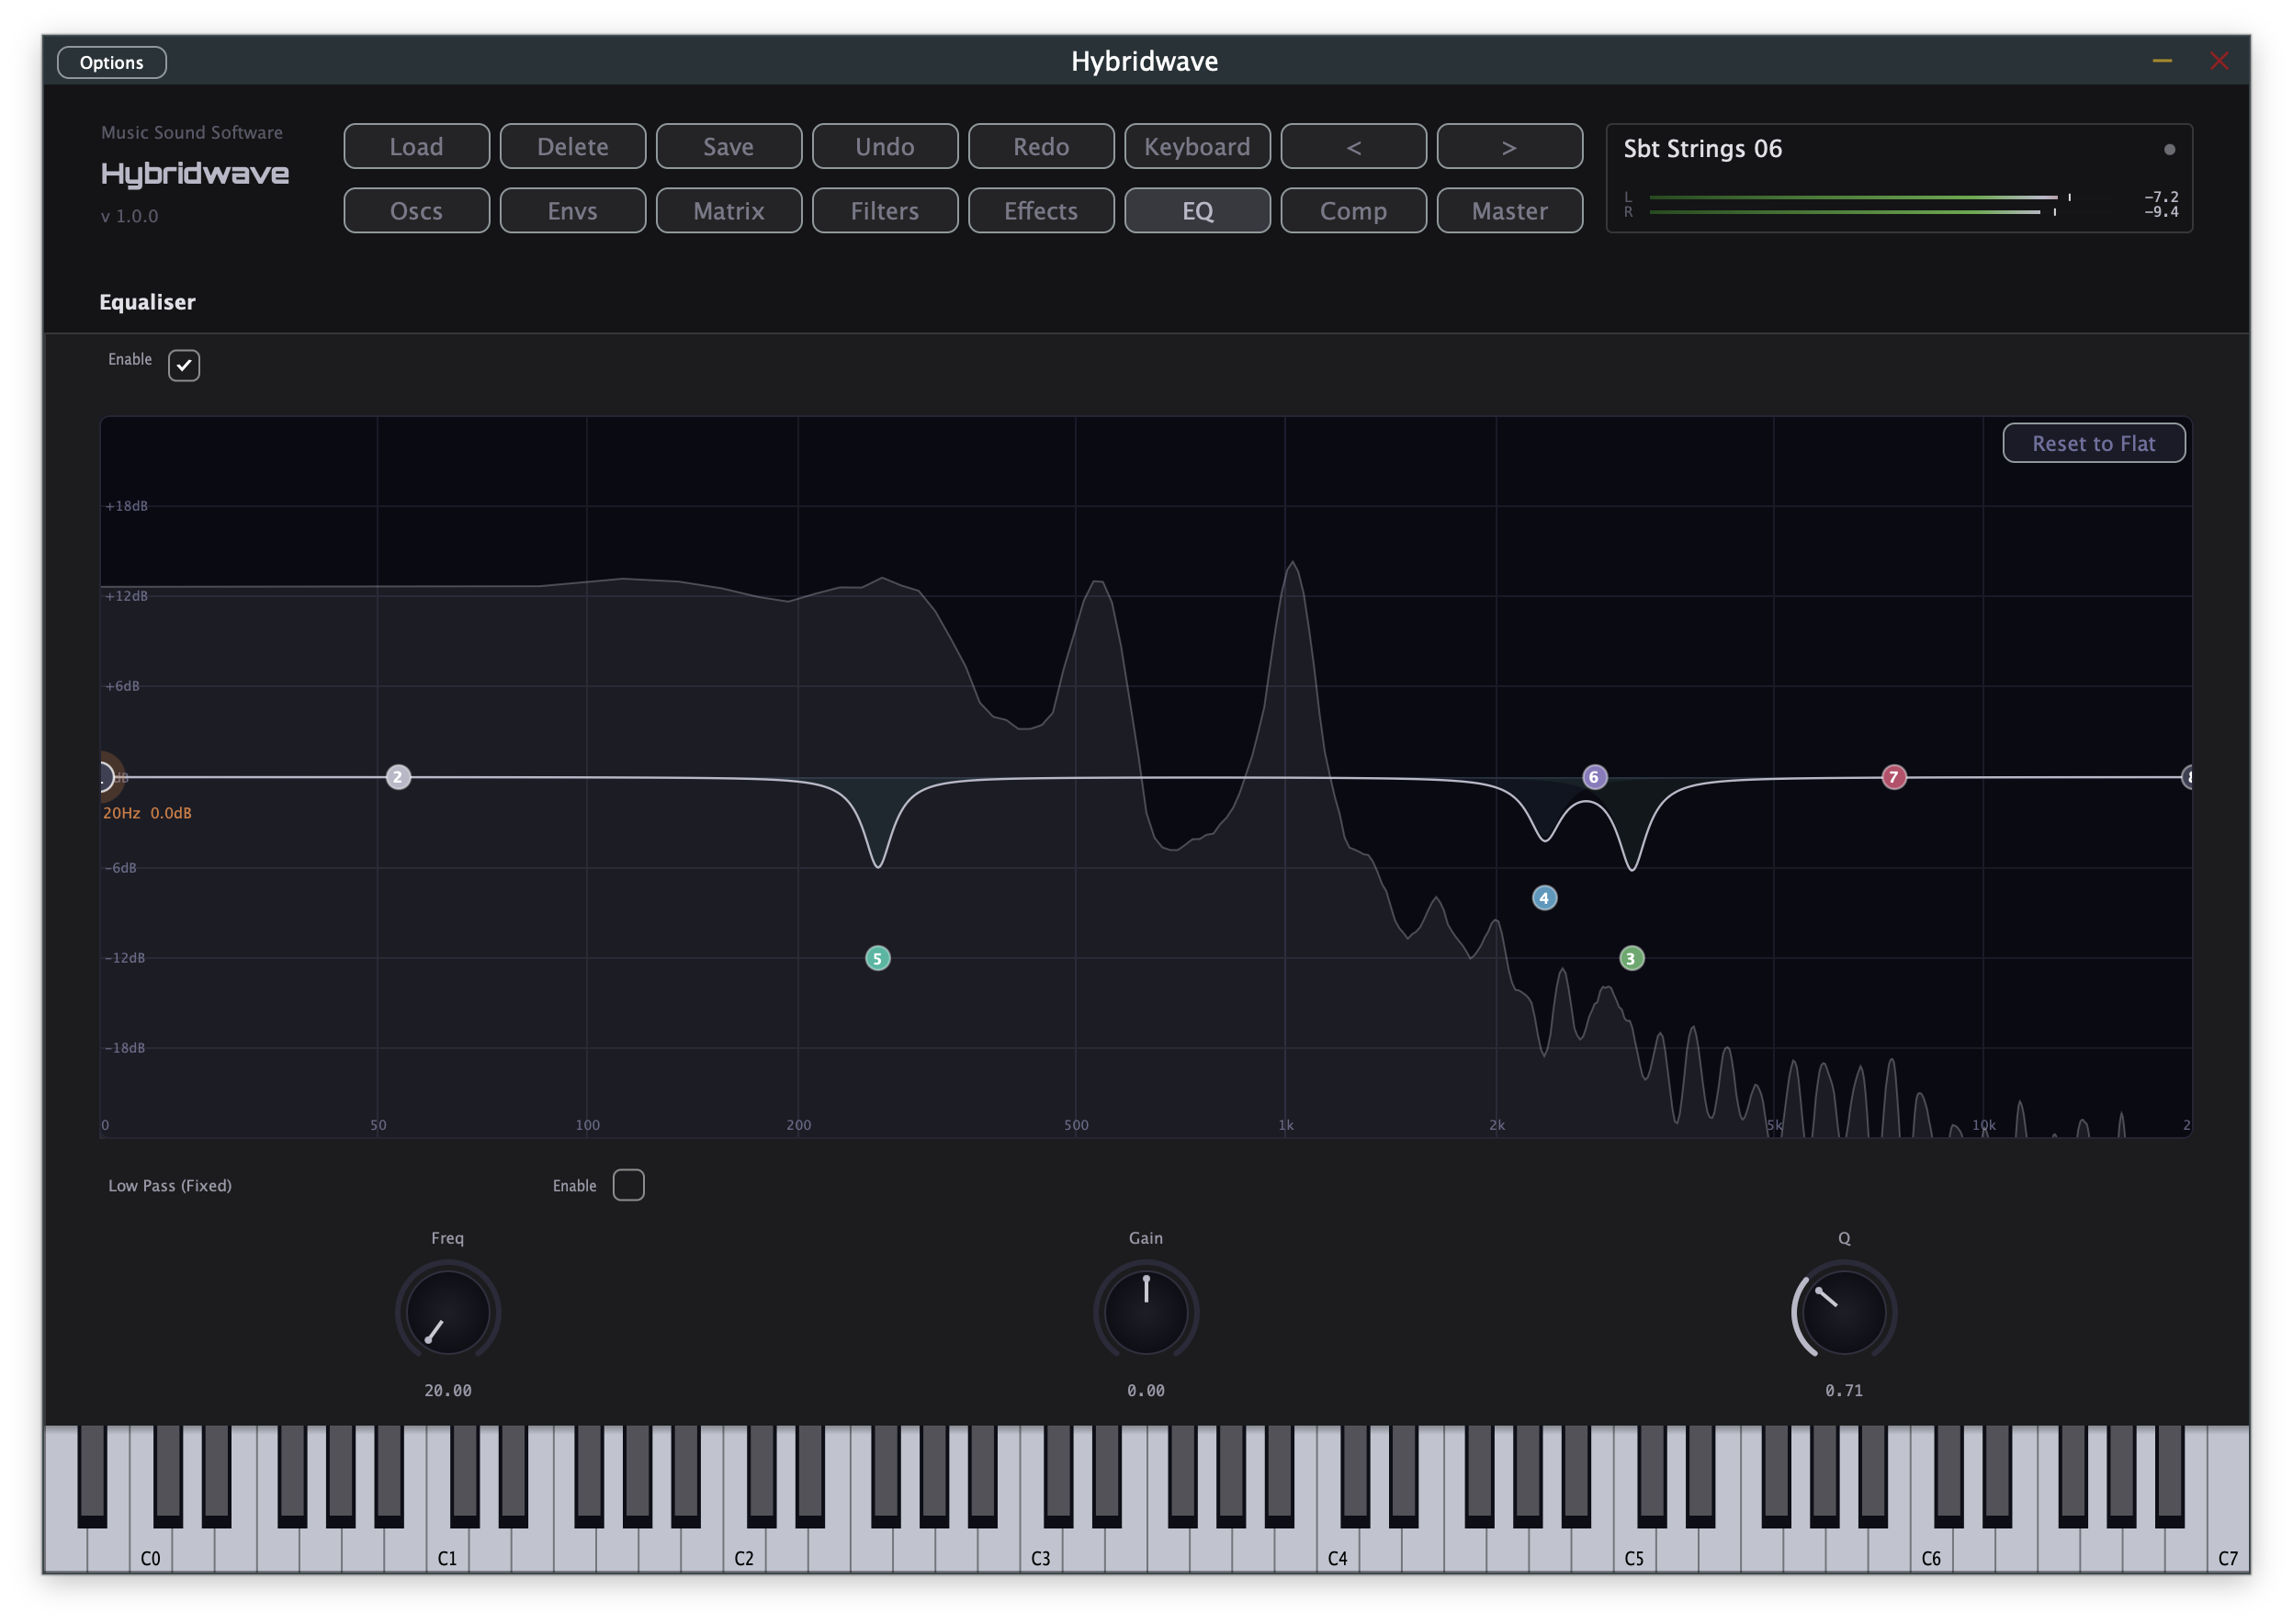
Each of the 8 numbered nodes on the graph is one band — drag a node directly to set its frequency and gain, and drag sideways with the scroll wheel (or the Q knob below) to adjust its width. Every band's Type can be set independently:
| Type | Use |
|---|---|
| Low Pass | Rolls off everything above the set frequency. |
| Low Shelf | Broadly boosts or cuts everything below the frequency. |
| Peak | A bell-curve boost or cut centred on the frequency — the most commonly used type for surgical adjustments. |
| Notch | A narrow, deep cut — useful for removing a specific resonance. |
| High Shelf | Broadly boosts or cuts everything above the frequency. |
| High Pass | Rolls off everything below the set frequency. |
Reset to Flat zeroes every band in one click. A dedicated Low Pass (Fixed) control sits below the main 8 bands as a simple, always-available top-end tone control independent of the numbered bands.
Compressor
Sits at the end of the chain, evening out dynamics before the signal reaches Master — with a fully interactive transfer curve so you can see and feel what it's doing.
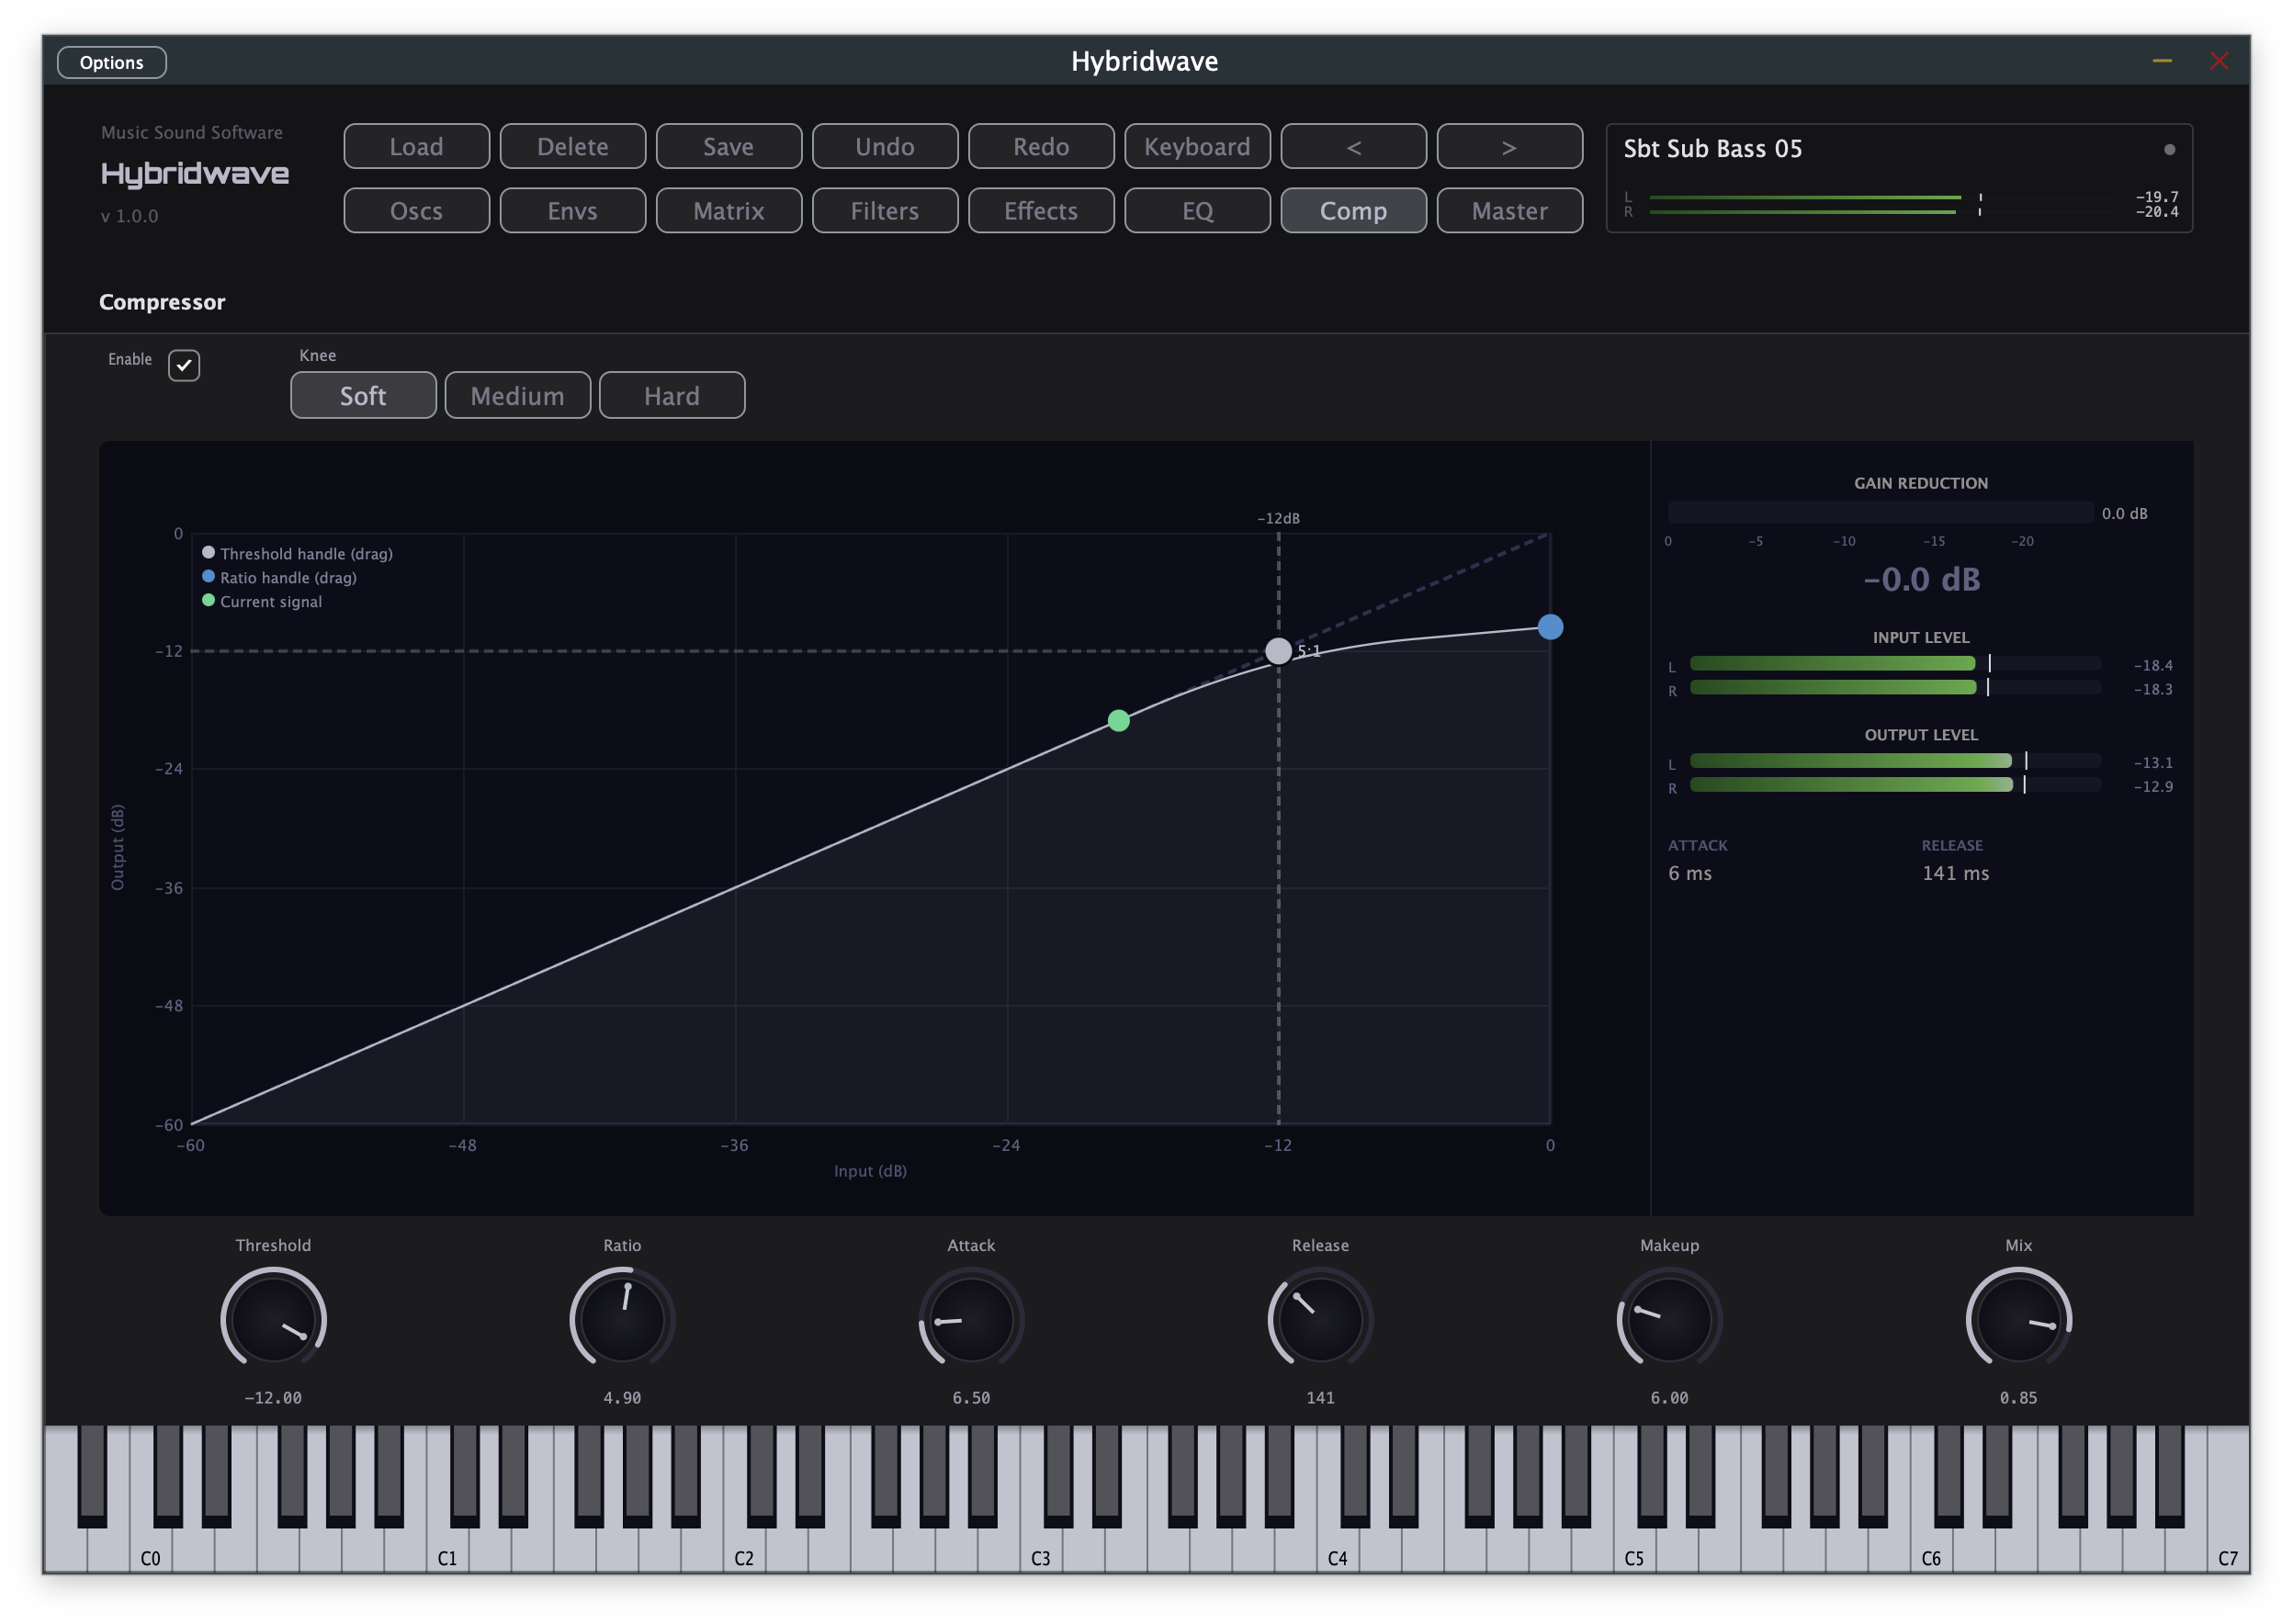
The graph plots input level against output level. Drag the white Threshold handle to set where compression begins; drag the blue Ratio handle to set how strongly the signal is reduced above that point. The green dot tracks the current signal in real time, so you can watch exactly where a note sits on the curve as it plays. The panel on the right shows live Gain Reduction, plus input and output level meters for both channels.
| Control | What it does |
|---|---|
| Threshold | The level above which compression kicks in. |
| Ratio | How strongly the signal is reduced above the threshold (e.g. 4:1 means 4 dB in becomes 1 dB out). |
| Attack | How quickly the compressor responds once the signal crosses the threshold. |
| Release | How quickly it lets go once the signal drops back below the threshold. |
| Makeup | Gain added back afterward, to compensate for the level lost to compression. |
| Mix | Blends compressed and dry signal — useful for parallel ("New York style") compression. |
| Knee | Soft, Medium, or Hard — how gradually compression ramps in around the threshold. Soft is more transparent; Hard is more obviously present. |
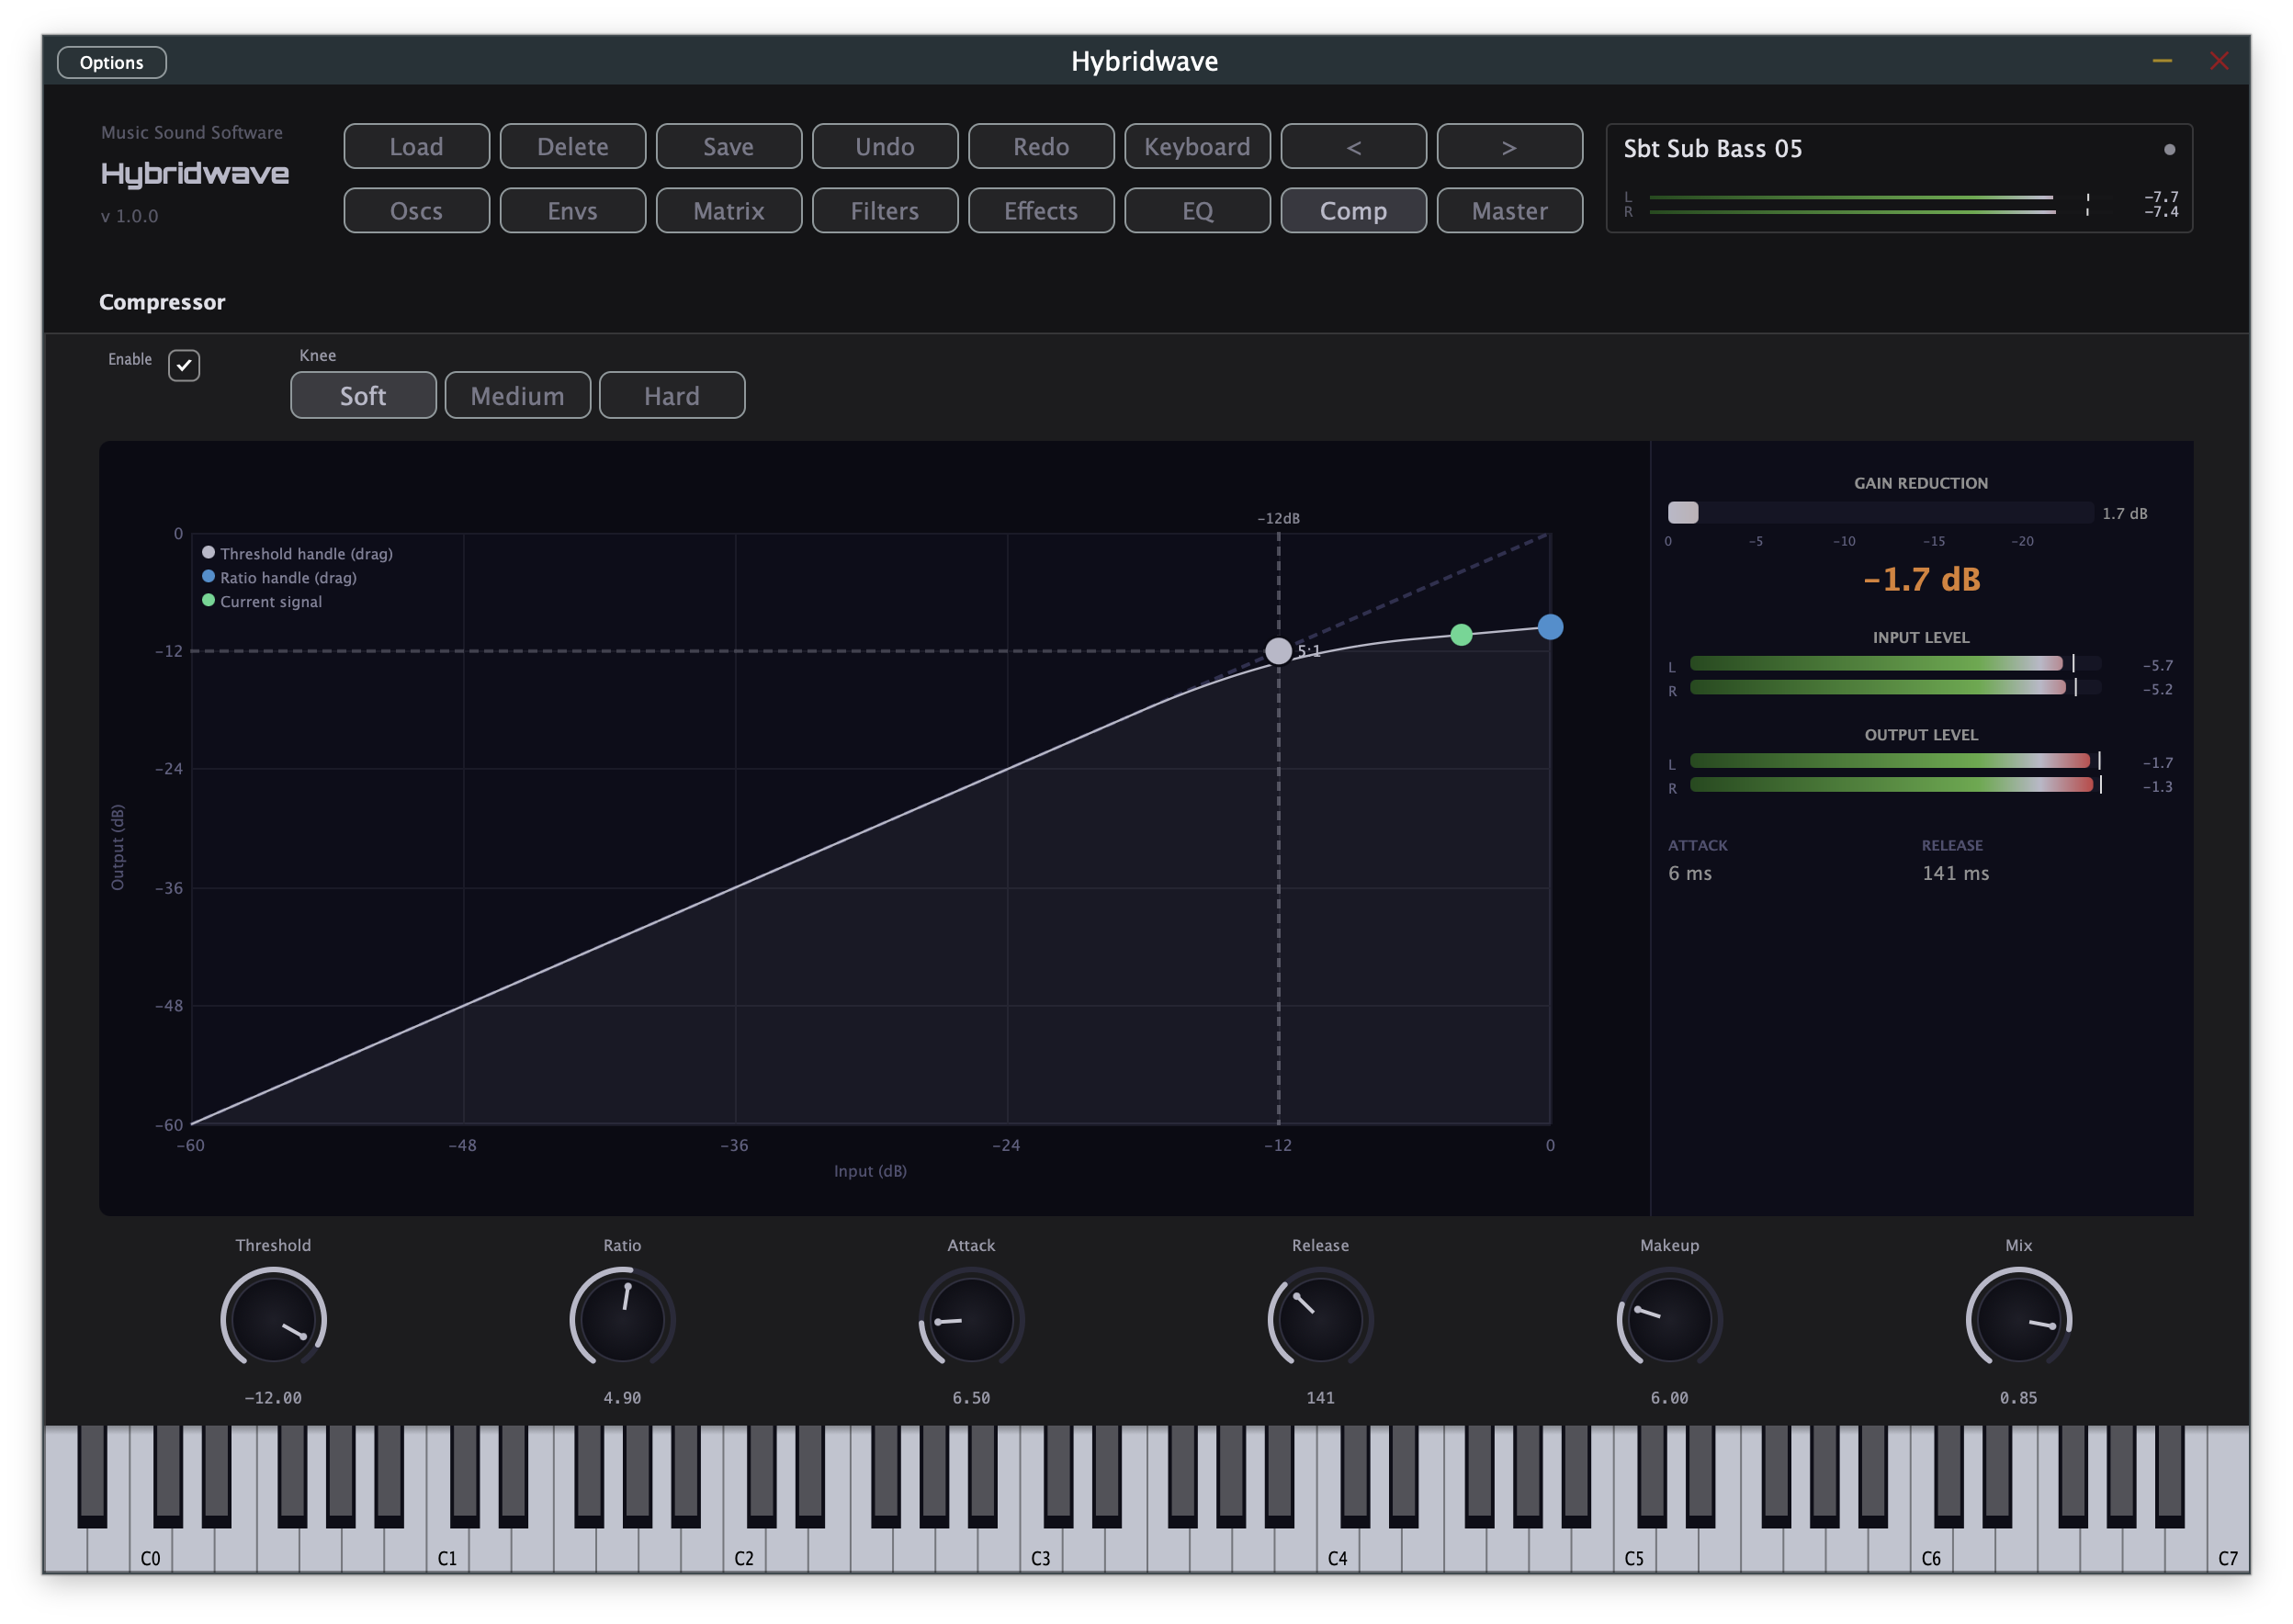
It's easy to overdo compression, especially with a low Threshold and a high Ratio together. If the Gain Reduction meter is constantly pinned and the sound has lost all sense of dynamics between soft and hard playing, back off the Threshold, the Ratio, or both.
Master & Arpeggiator
Global controls that sit above any individual preset — output level, glide, pitch bend, polyphony, MIDI setup, and a full arpeggiator.
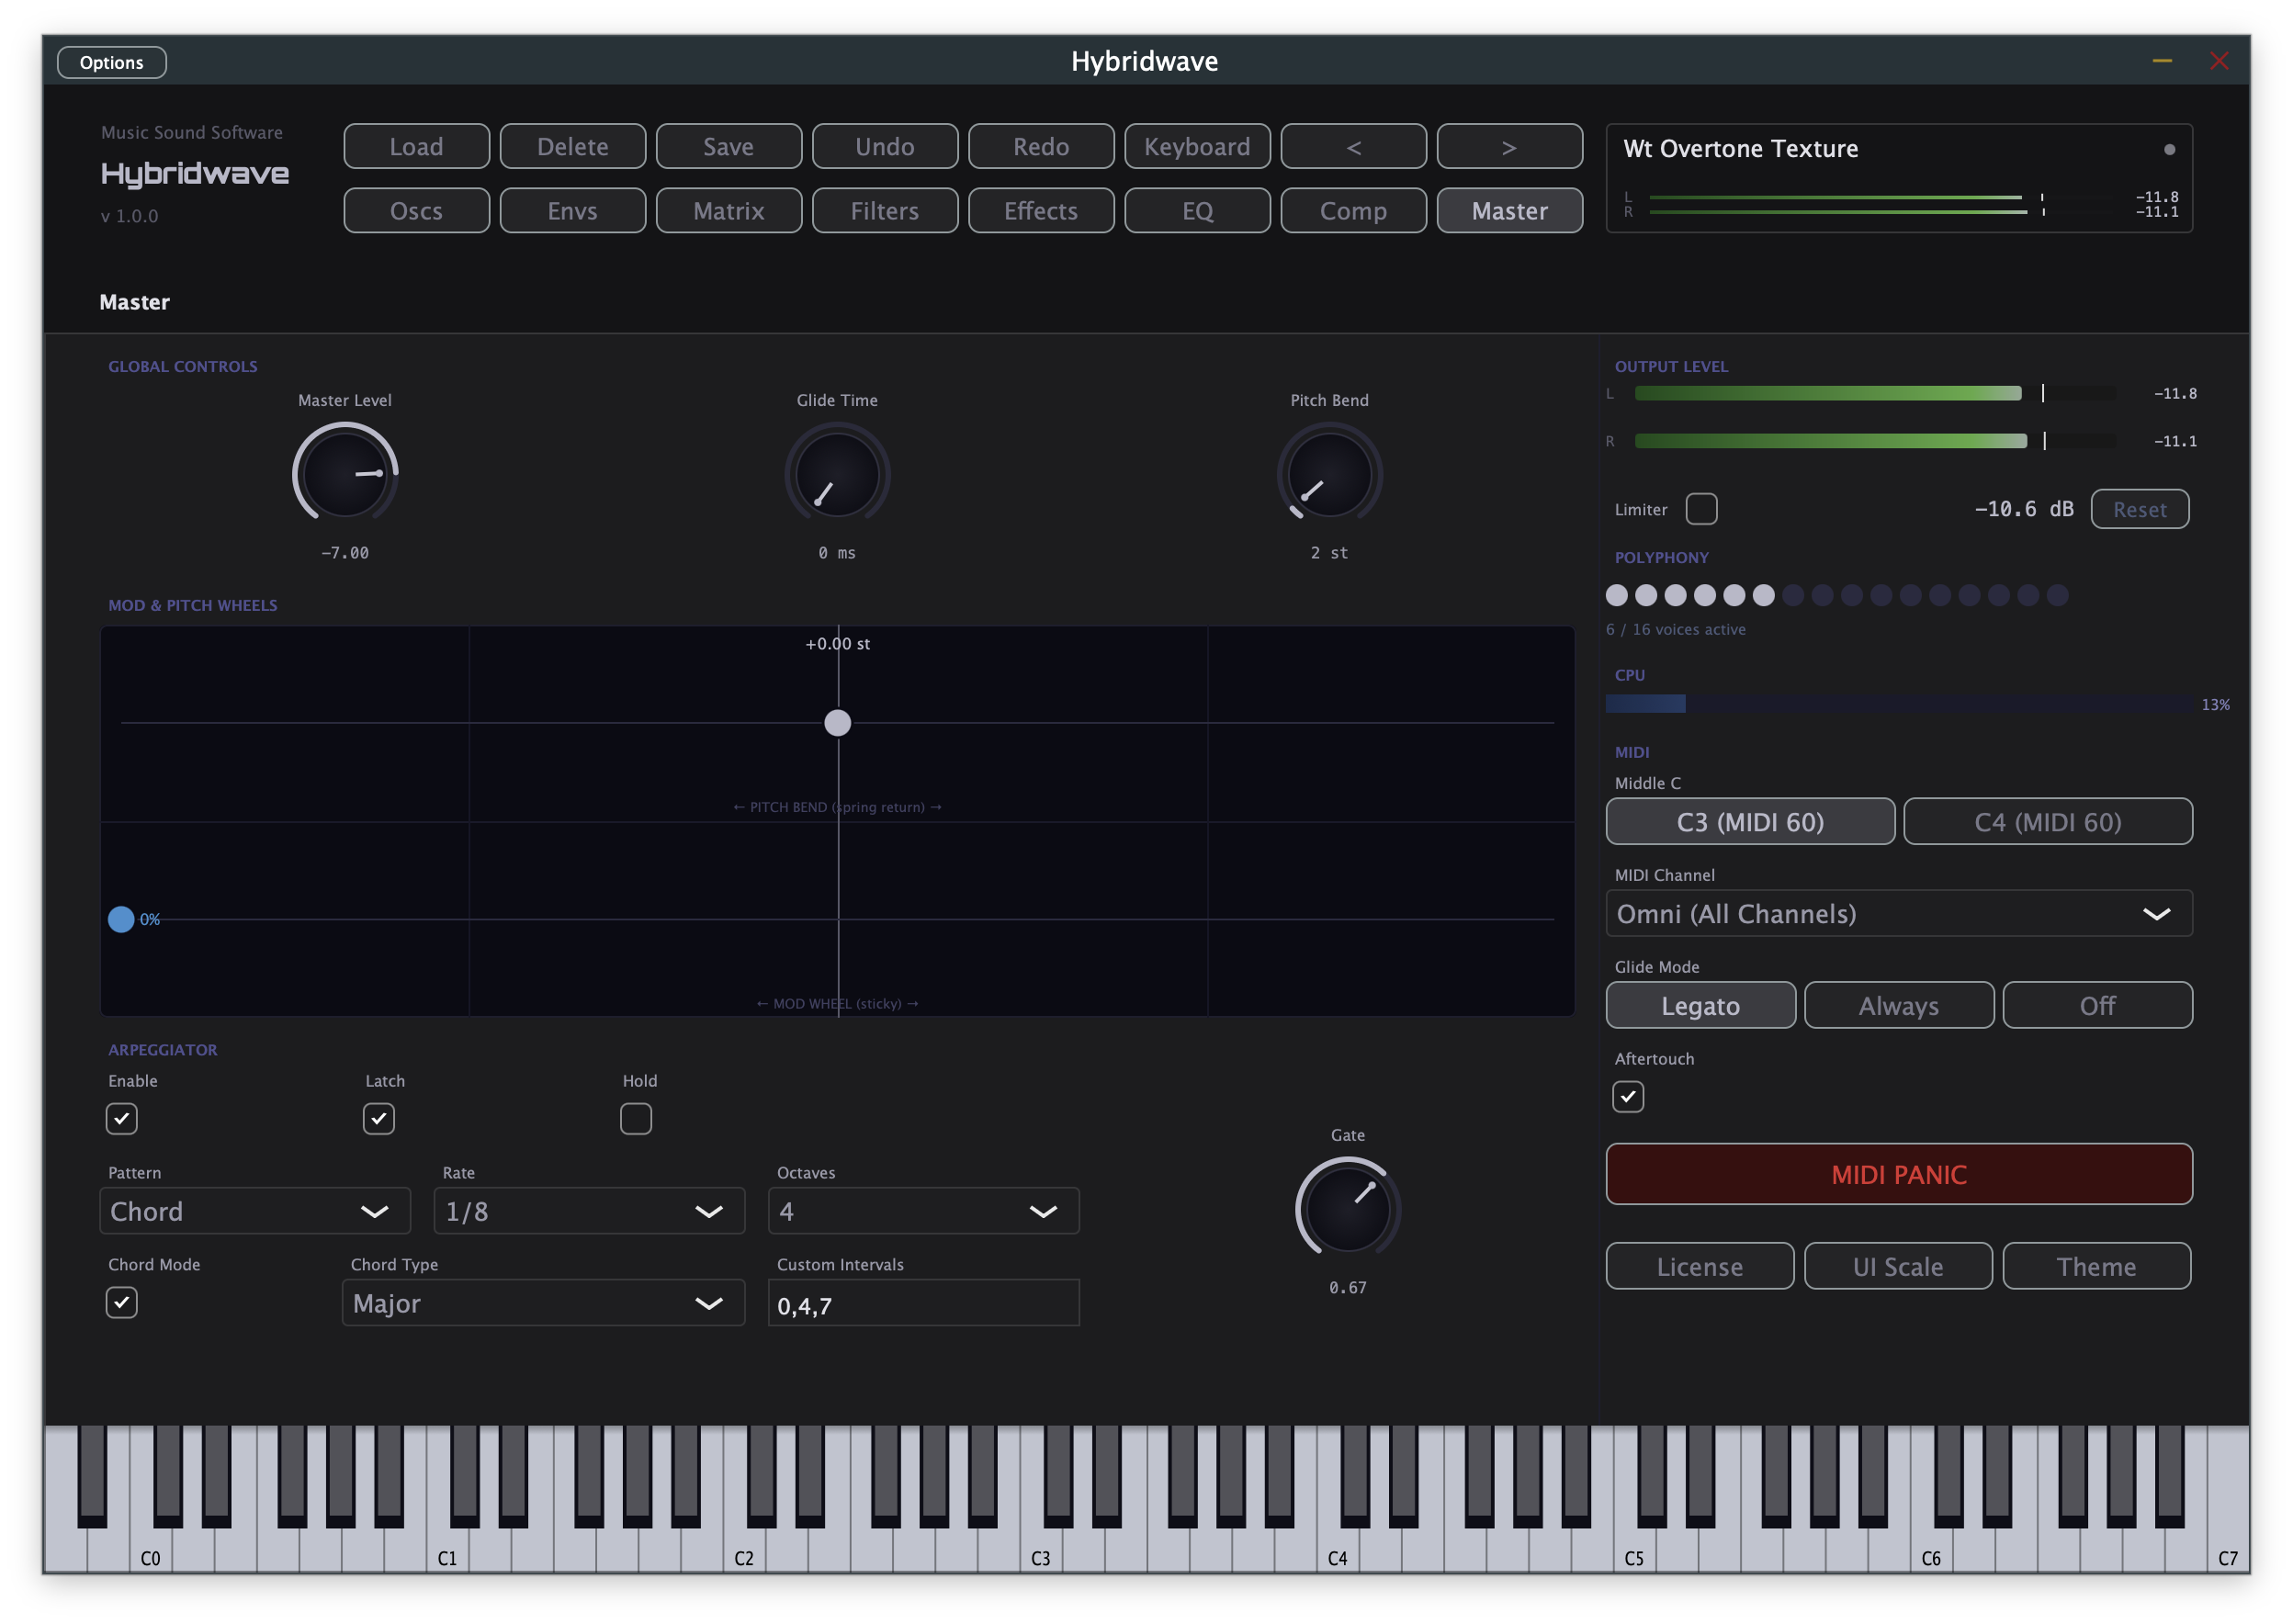
Global controls
| Control | What it does |
|---|---|
| Master Level | Final output gain, after everything else in the signal chain. |
| Glide Time | How long notes take to slide in pitch from one to the next. |
| Glide Mode | Legato only glides between overlapping (legato-played) notes; Always glides every note change regardless of overlap; Off disables glide entirely. |
| Pitch Bend | Range of the pitch wheel, in semitones. |
The Mod & Pitch Wheels panel is a live view of your controller's wheels — pitch bend spring-returns to centre, the mod wheel is sticky and stays where you leave it.
Polyphony, MIDI & output
The right-hand panel shows live Output Level meters (with a peak-hold readout and reset), a Limiter toggle for safe headroom, a Polyphony display showing how many of the 16 available voices are currently active, and a live CPU meter. Below that: which MIDI note counts as Middle C (C3 or C4, to match your controller's convention), the MIDI Channel Hybridwave listens on (Omni, by default, listens to all channels), Glide Mode shortcuts, and an Aftertouch toggle. MIDI Panic immediately silences every voice — useful if a stuck note ever gets through. Hovering any control shows a short description of what it does.
Arpeggiator
Enable the arpeggiator with the Enable checkbox; Latch keeps it running after you release the keys, and Hold works independently as a plain sustain-pedal-style latch. Choose a Pattern (including a dedicated Chord mode, which arpeggiates a full chord shape rather than single notes — pick a Chord Type like Major, or enter your own Custom Intervals), a Rate, how many Octaves to span, and a Gate length for how long each step rings out.
License, UI Scale, and Theme buttons in the bottom-right corner handle activation, window sizing, and the colour theme covered next.
Themes
Five built-in colour themes, changed instantly from the Theme button on the Master page — purely cosmetic, with no effect on sound.
Steel — a charcoal grey surface with a cool silver accent — is the default. Graphite is a cooler, darker take on Steel with an icy blue-grey accent. Cobalt is a deep navy with a rich, saturated blue accent. Harbour is a bluish charcoal with a softer, muted steel-blue accent. Fjord is a dark cyan-charcoal with a bright cyan-blue accent. Whichever theme you pick is remembered and restored the next time you open the plugin.
Firewave uses its own separate five-theme palette — Blaze, Amber, Cinder, Copper, and Gold — a warmer, fire-toned set distinct from the five shown above, reflecting Firewave's own visual identity. The Theme button works the same way; it just draws from Firewave's own set of themes instead of Hybridwave and Bluewave's.
Shearwave uses its own violet-accented interface, reflecting its phase distortion identity distinct from Bluewave's blues and Firewave's fire tones.